Installing Vinyl Plank Flooring in a Bathroom Around a Toilet
Vinyl plank flooring has become a popular choice for bathroom renovations due to its water resistance, durability, and aesthetic appeal. Installing vinyl plank around a toilet, however, presents a unique set of challenges that require careful planning and execution. This article provides a comprehensive guide to installing vinyl plank flooring in a bathroom, specifically addressing the complexities of fitting the material around a toilet.
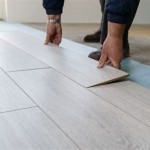
Before commencing the installation, it is essential to understand the different types of vinyl plank flooring available. Options include glue-down, click-lock, and peel-and-stick varieties. Click-lock vinyl plank is generally preferred for DIY projects due to its ease of installation and floating floor design, which allows for expansion and contraction without adhesive bonding to the subfloor. This article will primarily focus on the click-lock method.
Proper preparation is paramount for a successful installation. The existing floor must be clean, level, and dry. Loose or damaged tiles, chipped grout, or uneven surfaces need to be addressed. Subfloor imperfections can telegraph through the vinyl plank, compromising its appearance and longevity.
Furthermore, careful consideration must be given to the existing toilet. While it is possible to cut vinyl planks around the toilet’s base, the preferred method involves removing the toilet entirely before installation and reinstalling it afterwards. This approach ensures a cleaner and more professional finish, as it eliminates the need for intricate cuts and reduces the risk of water damage around the toilet base.
Key Point 1: Preparing the Subfloor and Removing the Toilet
The first step in preparing the subfloor is to thoroughly clean the area. Remove all debris, dust, and dirt using a broom and vacuum. If necessary, wash the floor with a mild detergent and allow it to dry completely. Inspect the subfloor for any signs of damage, such as cracks, holes, or loose boards. Repair these imperfections using appropriate patching compounds or shims. A self-leveling compound can be used to correct minor unevenness over larger areas.
Once the subfloor is clean and level, proceed to remove the toilet. This process involves several steps to ensure safety and prevent water damage. First, shut off the water supply to the toilet at the shut-off valve located near the base of the toilet. Flush the toilet to remove as much water as possible from the tank and bowl. Use a sponge to absorb any remaining water.
Disconnect the water supply line from the toilet. Place a bucket underneath the connection to catch any residual water. Next, remove the decorative caps covering the bolts that secure the toilet to the floor. Use a wrench to loosen and remove the bolts. Carefully rock the toilet back and forth to break the seal between the toilet and the flange. Lift the toilet straight up and place it on a protective surface, such as a drop cloth or cardboard, to prevent damage to the toilet or the surrounding area.
Once the toilet is removed, inspect the toilet flange for any signs of damage or corrosion. Clean the flange thoroughly, removing any old wax ring residue. It is essential to replace the wax ring with a new one before reinstalling the toilet. A damaged flange should be repaired or replaced before proceeding with the flooring installation. A new flange extender can be used if the existing flange is too low after the new flooring is installed.
After the toilet is removed and the flange is inspected and cleaned, the subfloor is ready for the underlayment, if needed. Some vinyl planks have a pre-attached underlayment, while others require the installation of a separate underlayment. Check the manufacturer's instructions for specific recommendations. An underlayment can provide additional cushioning, sound insulation, and moisture protection.
It is crucial to familiarize oneself with the manufacturer's instructions for the specific vinyl plank being used. Different manufacturers may have slightly different installation recommendations regarding acclimation, subfloor preparation, and locking mechanisms.
Key Point 2: Planning the Layout and Making Accurate Cuts
Planning the layout of the vinyl plank flooring is critical for achieving a visually appealing and structurally sound installation. Start by determining the direction in which the planks will be laid. In most bathrooms, the planks are typically laid parallel to the longest wall. However, personal preference and the overall design of the room may influence this decision. It is often recommended to run the planks in the same direction as natural light enters the room.
Before starting the installation, it's beneficial to dry-lay a few rows of planks to visualize the final appearance and identify any potential issues with the layout. This dry-lay process helps determine where cuts will be needed and ensures that the planks align properly. It's best to avoid having small slivers of planks along the walls, as they can be aesthetically unappealing and structurally weak.
To ensure proper alignment and spacing, use spacers along the walls to maintain a consistent expansion gap. This gap allows the floor to expand and contract with temperature and humidity changes, preventing buckling or warping. The recommended expansion gap typically ranges from ¼ to ½ inch, depending on the manufacturer's instructions.
When cutting vinyl planks, accuracy is paramount. Use a sharp utility knife with a new blade to score the plank along the cut line. For straight cuts, use a T-square or straightedge to guide the knife. After scoring the plank several times, it can usually be snapped along the scored line. For more complex cuts, such as those around doorways or pipes, a jigsaw or oscillating multi-tool may be necessary. Always wear safety glasses and work gloves when using power tools.
Creating a template for complex cuts around irregular shapes can greatly improve accuracy. Use cardboard or heavy paper to trace the shape of the object onto the template. Then, transfer the template to the vinyl plank and cut along the traced lines. This method is particularly useful for fitting planks around corners, curves, and other intricate details.
When cutting around the toilet flange, it's important to leave a small gap between the plank and the flange to allow for expansion and contraction. This gap can be concealed with a toilet flange cover or a bead of caulk.
Key Point 3: Installing Around the Toilet Flange and Reinstalling the Toilet
The area around the toilet flange requires meticulous attention to detail. After carefully measuring and cutting the vinyl plank to fit around the flange, dry-fit the pieces to ensure a proper fit. Before permanently installing the planks, apply a bead of silicone caulk around the flange to create a watertight seal. This caulk will help prevent water from seeping underneath the flooring and damaging the subfloor.
When installing the planks around the flange, ensure that they are securely locked together. Use a tapping block and a rubber mallet to gently tap the planks into place. Avoid using excessive force, as this can damage the locking mechanisms. If the planks are difficult to lock together, double-check the alignment and ensure that there are no obstructions.
Once the flooring is installed around the toilet flange, it's time to reinstall the toilet. Before placing the toilet back onto the flange, install a new wax ring. Place the wax ring on the flange, ensuring that it is centered and securely attached. Carefully lower the toilet onto the flange, aligning the bolt holes with the bolts in the flange. Gently rock the toilet back and forth to compress the wax ring and create a watertight seal.
Tighten the bolts evenly, alternating between each bolt to ensure that the toilet is level. Avoid overtightening the bolts, as this can crack the porcelain. Once the toilet is securely fastened to the floor, reconnect the water supply line. Turn on the water supply and check for leaks. If any leaks are detected, tighten the connections or replace the supply line as needed.
Finally, install the decorative caps over the bolts. Caulk around the base of the toilet with a mildew-resistant silicone caulk to create a watertight seal and prevent water from seeping underneath the toilet. Smooth the caulk with a wet finger or a caulk smoothing tool for a professional finish.
After the toilet is reinstalled and the caulk has cured, inspect the entire installation for any gaps or imperfections. Touch up any areas as needed. Clean the floor with a damp cloth to remove any dust or debris.
Installing vinyl plank flooring in a bathroom around a toilet requires careful planning, precise measurements, and meticulous execution. By following these steps and paying attention to detail, it is possible to achieve a professional-looking installation that will enhance the beauty and functionality of the bathroom.
Regular cleaning and maintenance will help prolong the life of the vinyl plank flooring. Avoid using abrasive cleaners or harsh chemicals, as these can damage the surface. Sweep or vacuum the floor regularly to remove dirt and debris. Wipe up spills immediately to prevent staining. Use mats or rugs in high-traffic areas to protect the flooring from wear and tear.
With proper care and maintenance, vinyl plank flooring can provide years of beauty and durability in the bathroom. Its water resistance, ease of installation, and affordability make it an excellent choice for both DIY enthusiasts and professional contractors.

How To Install Vinyl Plank Flooring In A Bathroom Fixthisbuildthat

How To Install Vinyl Plank Flooring In A Bathroom Fixthisbuildthat

How To Install Vinyl Plank Flooring In A Bathroom As Beginner Home Renovation

How To Cut Flooring Around A Toilet Luxury Vinyl Plank Bathroom Installation Calibamboo

How To Install Vinyl Plank Flooring In A Bathroom Fixthisbuildthat

How To Install Vinyl Plank Flooring In A Bathroom

Dos And Don Ts For Installing Vinyl Plank Floors In The Bathroom Advice Homeowners

How To Install Vinyl Plank Flooring In A Bathroom Fixthisbuildthat

How To Install Vinyl Plank Flooring Around Bathroom Toilet Bowl F Installing Waterproof

Vinyl Planks In Bathrooms Residential Inspiration Flooring
Related Posts