How To Install Vinyl Plank Flooring Over Tiles
Installing vinyl plank flooring over existing tile is a popular and cost-effective way to update a room without the extensive demolition and mess associated with removing the tile. This method offers a significant advantage: it saves time, labor, and disposal costs. However, successfully installing vinyl plank flooring over tile requires careful preparation and adherence to specific techniques to ensure a long-lasting and aesthetically pleasing result. This article provides a comprehensive guide to navigating the process.
The decision to install vinyl plank flooring over tile should not be taken lightly. It is important to consider the condition of the existing tile and the subfloor. Uneven surfaces or loose tiles can compromise the integrity of the new floor and lead to problems down the line. A thorough assessment is crucial before proceeding.
Different types of vinyl plank flooring exist, each with its own installation requirements. Click-lock floating floors are a popular choice for DIY projects, while glue-down options offer increased stability but require more technical skill. Understanding the characteristics of the chosen vinyl plank flooring is essential for successful installation.
Key Considerations Before Installation
Before commencing the installation process, several factors must be carefully evaluated. Addressing these considerations proactively will minimize potential issues and ensure a professional-looking finished product.
Condition of the Existing Tile: The existing tile floor must be in good condition. Loose, cracked, or uneven tiles need to be addressed before installation. Loose tiles should be removed and the resulting gaps filled with a leveling compound. Cracked tiles may require patching, but if the damage is extensive, professional evaluation is recommended. Unevenness can be addressed with self-leveling compounds.
Subfloor Stability: The subfloor underneath the tile must be solid and stable. A weak or unstable subfloor will cause the tile and, consequently, the vinyl plank flooring to flex and potentially crack over time. Any subfloor issues, such as rot or water damage, must be repaired before proceeding.
Height Considerations: Adding vinyl plank flooring over tile will raise the floor height. This can affect door clearances, transitions to adjacent rooms, and the operation of appliances like dishwashers. Measure the existing floor height and factor in the thickness of the vinyl plank flooring to determine if adjustments are necessary. Trimming doors or using transition strips can mitigate height differences.
Moisture Levels: Excessive moisture can damage both the tile and the vinyl plank flooring. Ensure the subfloor and tile are dry before installation. Using a moisture meter to check the moisture content of the subfloor is a recommended practice. If moisture levels are high, address the source of the moisture and allow the area to dry completely before proceeding. Installers also must consider the environment the tile floor is in. For example, if the tile floor is in the basement with high moisture levels, the subfloor may be susceptible to mold.
Materials and Tools Required
Having the right materials and tools on hand is crucial for a smooth and efficient installation. Gathering everything beforehand will prevent delays and ensure the job is completed to a high standard.
Vinyl Plank Flooring: Choose a vinyl plank flooring that is compatible with installation over tile. Consider the thickness, wear layer, and locking mechanism. Purchase approximately 10% extra to account for cuts and waste.
Self-Leveling Compound: A self-leveling compound is essential for creating a smooth and even surface over the tile. Choose a high-quality compound designed for use over tile.
Primer: A primer is needed to ensure the self-leveling compound adheres properly to the tile. Select a primer recommended by the self-leveling compound manufacturer.
Moisture Barrier (Optional): Depending on the subfloor and the type of vinyl plank flooring, a moisture barrier may be necessary. Consult the vinyl plank flooring manufacturer's instructions for guidance.
Underlayment (Optional): Some vinyl plank flooring comes with an attached underlayment. If not, consider adding a separate underlayment for added comfort and sound insulation. It's imperative to check the manufacturer's specifications on which underlayment to use.
Tools: The following tools are typically required:
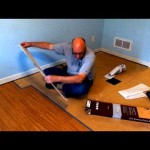
- Measuring tape
- Pencil
- Utility knife
- Straight edge or T-square
- Rubber mallet
- Spacers
- Mixing bucket
- Mixing drill with paddle
- Notched trowel
- Self-leveling compound rake (recommended)
- Safety glasses
- Dust mask
Step-by-Step Installation Guide
The following steps provide a detailed guide to installing vinyl plank flooring over tile. Adhering to these steps will help ensure a successful and professional-looking installation.
Step 1: Prepare the Tile Surface: Thoroughly clean the tile floor to remove any dirt, dust, grease, or wax. Use a degreasing cleaner if necessary. Rinse the floor with clean water and allow it to dry completely. Inspect the tile for loose or damaged areas. Repair any issues as described earlier.
Step 2: Apply Primer: Apply a primer to the tile surface according to the manufacturer's instructions. This will promote adhesion of the self-leveling compound. Allow the primer to dry completely before proceeding. Some primer is also necessary to assist in leveling surfaces but also prevent air bubbles from rising while self-leveling compounds dry.
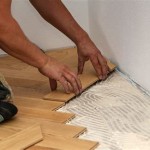
Step 3: Mix and Apply Self-Leveling Compound: Mix the self-leveling compound according to the manufacturer's instructions. Use a mixing drill with a paddle to ensure the compound is thoroughly mixed and free of lumps. Pour the compound onto the tile floor and spread it evenly using a notched trowel and a self-leveling compound rake. Work in small sections to ensure a consistent thickness. Allow the compound to dry completely according to the manufacturer's instructions. This may take several hours or even overnight. Make sure to also install wall foam or other edge support before applying the self-leveling compound to further assist an even distribution.
Step 4: Inspect and Prepare the Leveled Surface: Once the self-leveling compound is dry, inspect the surface for any imperfections. Use a sanding block or scraper to remove any bumps or ridges. Clean the surface thoroughly to remove any dust or debris.
Step 5: Install Moisture Barrier (Optional): If required, install a moisture barrier according to the manufacturer's instructions. Overlap the seams by at least 6 inches and tape them securely.
Step 6: Install Underlayment (Optional): If using a separate underlayment, install it according to the manufacturer's instructions. Align the underlayment sheets and tape the seams together.
Step 7: Plan the Layout: Before installing the vinyl plank flooring, plan the layout. Start by measuring the room and determining the best direction to run the planks. Consider the placement of seams and the amount of waste. It's usually best to run the planks parallel to the longest wall in the room. Leave expansion gap along the perimeter of the room.
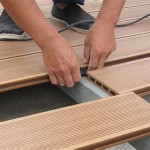
Step 8: Install Vinyl Plank Flooring: Begin installing the vinyl plank flooring according to the manufacturer's instructions. For click-lock floors, angle the planks together and press down until they click into place. Use a rubber mallet to gently tap the planks together to ensure a tight fit. Use spacers along the walls to maintain the necessary expansion gap. For glue-down floors, apply adhesive to the back of the planks and press them firmly onto the floor. Roll the floor with a flooring roller to ensure proper adhesion.
Step 9: Cut and Fit Planks: When you reach the walls or obstacles, measure and cut the planks to fit. Use a utility knife and a straight edge to score the planks and then snap them along the score line. For more complex cuts, use a jigsaw.
Step 10: Install Transition Strips: Install transition strips at doorways and between rooms to create a smooth transition between different flooring types. Secure the transition strips with screws or adhesive.
Step 11: Remove Spacers and Install Baseboards: Once the flooring is installed, remove the spacers and install baseboards to cover the expansion gap and give the floor a finished look. Secure the baseboards with nails or adhesive.
Step 12: Clean Up: Clean up any debris and dust. Inspect the floor for any imperfections and address them as needed.
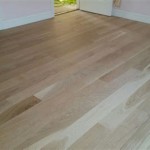
Proper preparation, careful installation, and adherence to manufacturer's instructions are the keys to successfully installing vinyl plank flooring over existing tile. The finished result can transform the appearance of a room.

How To Install Luxury Vinyl Plank Over Tile Flooring

How To Install Vinyl Plank Floors In A Bathroom Over Tile

How To Install Vinyl Plank Floors In A Bathroom Over Tile

New Vinyl Plank Flooring Over Tile Table And Hearth

Can You Put Lvp Over Tile Wc Supply Whole Cabinet

How To Install Vinyl Flooring Over Tiles Linoleum Thrift Diving

10 Beginner Mistakes Installing Vinyl Plank Flooring

How To Install Vinyl Plank Tiles In A Bathroom

How To Install Vinyl Plank Flooring As A Beginner Home Renovation

Can You Lay Vinyl Flooring Over Tile Mersey
Related Posts