Using Engineered Wood Flooring On Walls And Floors
Engineered wood flooring, traditionally understood as a surface material for floors, has gained traction as a versatile design element for wall applications. This broadened application stems from its aesthetic appeal, durability, and relative ease of installation when compared to solid hardwood. Employing engineered wood flooring on both walls and floors can create cohesive and visually interesting spaces, offering unique design opportunities for residential and commercial environments.
The construction of engineered wood flooring makes it particularly suitable for wall mounting. Unlike solid hardwood, which is prone to expansion and contraction with changes in humidity, engineered wood consists of multiple layers of wood veneer bonded together over a core. This layered construction provides enhanced dimensional stability, minimizing warping and movement when exposed to varying environmental conditions. This stability is paramount when applying the material to walls, where consistent flatness and adherence are crucial for a professional and long-lasting finish.
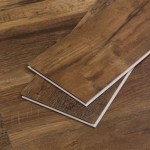
The aesthetic versatility of engineered wood flooring is another significant advantage. It is available in a wide array of wood species, finishes, and plank sizes, allowing for diverse design expressions. Mimicking the look of expensive hardwoods at a more accessible price point, engineered wood offers options ranging from classic oak and maple to exotic woods like bamboo and walnut. These varied visual options allow designers and homeowners to achieve their desired aesthetic without the cost and maintenance associated with solid hardwood.
Key Considerations Before Installation
Before embarking on an engineered wood flooring project that includes wall applications, several factors must be thoroughly considered. These considerations relate to sub-structure preparation, moisture management, and attachment methods. Neglecting these crucial steps can lead to installation failures, compromising the overall aesthetic and longevity of the finished project.
The wall surface must be adequately prepared to provide a secure and level substrate for the engineered wood. This involves ensuring that the wall is structurally sound, free from dust, debris, and any loose materials. For drywall surfaces, a thorough sanding and priming is recommended to promote optimal adhesion. In cases where the wall is uneven or significantly damaged, a layer of underlayment, such as plywood or cement board, may be necessary to create a perfectly flat surface. Ensuring a level and stable substrate is critical to prevent the engineered wood from bowing or detaching over time.
Moisture management is another critical aspect. While engineered wood is more dimensionally stable than solid hardwood, it is still susceptible to moisture damage. Prior to installation, the moisture content of the engineered wood should be checked to ensure it is within the manufacturer's recommended range. It is also essential to address any potential sources of moisture in the wall cavity, such as leaks or condensation. Applying a moisture barrier behind the engineered wood can further protect it from moisture intrusion, enhancing its durability and preventing warping or mold growth. It is important to note that applications in bathrooms and other high humidity environments may require specialized engineered wood options designed for such conditions.
The attachment method employed will directly impact the stability and appearance of the wall installation. Several options are available, including adhesive, mechanical fasteners (such as nails or screws), or a combination of both. Adhesive is generally used for its ability to provide uniform support across the entire surface of the plank. However, it is essential to select an adhesive specifically formulated for bonding wood to the substrate material. Mechanical fasteners provide additional holding power, particularly in areas subject to higher stress or where adhesive alone may not be sufficient. When using mechanical fasteners, ensure that they are properly countersunk to avoid damaging the surface of the engineered wood. The choice of attachment method should be determined by the weight and size of the planks, the substrate material, and the environmental conditions in the space.
Installation Techniques for Walls and Floors
The installation techniques for engineered wood flooring on walls differ somewhat from traditional floor installations. While the fundamental principles of alignment and cutting remain the same, the orientation and fastening methods require specific attention to ensure a secure and aesthetically pleasing result.
When installing engineered wood on walls, it is generally advisable to start from the bottom and work upwards. This allows each row of planks to rest upon the previous row, providing additional support during the installation process. Use a level to ensure that the first row is perfectly horizontal, as this will serve as the foundation for the entire wall installation. As with floor installations, it is important to leave a small expansion gap around the perimeter of the wall to accommodate for any minor movement. This gap can be concealed with trim or molding after the installation is complete.
Cutting the engineered wood planks to fit around corners, windows, or other architectural features requires precision and accuracy. A miter saw is ideal for making clean, angled cuts, while a jigsaw can be used for more intricate shapes. Always measure and mark the cut lines carefully before making any cuts, and use safety glasses to protect your eyes from dust and debris. It is also recommendable to practice on a scrap piece of engineered wood before cutting the actual planks to ensure a clean and accurate cut.
Floor installations of engineered wood flooring follow established industry standards. The subfloor must be level, clean and dry. An underlayment is often used to provide cushioning, sound insulation and moisture protection. Planks are generally installed using either a floating method (where the planks are connected together but not directly attached to the subfloor) or a glue-down method (where the planks are adhered directly to the subfloor). The choice of method depends on factors such as the type of engineered wood, the subfloor material, and the desired level of sound insulation. Like wall installations, expansion gaps are essential along the perimeter of the room.
Design Considerations and Aesthetic Impact
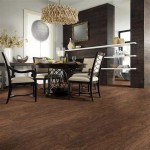
Employing engineered wood flooring on both walls and floors opens up a range of design possibilities. The consistent material palette creates a sense of continuity and flow, blurring the lines between horizontal and vertical surfaces. This can be particularly effective in smaller spaces, where the cohesive design can make the room feel larger and more unified.
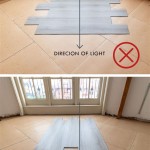
The orientation of the engineered wood planks can significantly impact the perceived dimensions of a space. Installing planks horizontally on both the floors and walls can make a room feel wider, while vertical installations can accentuate height. Diagonal installations can add a dynamic and visually interesting element, but they also require more careful planning and execution.
The choice of wood species and finish will also influence the overall aesthetic. Light-colored woods, such as maple or birch, can create a bright and airy feel, while darker woods, such as walnut or mahogany, can add warmth and sophistication. The finish of the wood can range from matte to high-gloss, each offering a different level of reflectivity and sheen. Experimentation with different combinations of wood species, finishes, and plank orientations can result in unique and personalized designs.
Incorporating engineered wood flooring on walls and floors can be a transformative design element. It offers a blend of aesthetic appeal, durability, and versatility that can elevate both residential and commercial spaces. Careful planning, proper installation techniques, and thoughtful design considerations are essential to unlock the full potential of this innovative application.
Maintenance and Longevity
Maintaining engineered wood flooring, whether installed on walls or floors, is relatively straightforward. Regular cleaning and preventative measures are crucial for preserving its appearance and extending its lifespan. Understanding the specific care requirements associated with the finish and the wood species will help ensure its long-term beauty.
For general cleaning, a soft-bristled broom or vacuum cleaner is effective for removing dust and debris. Avoid using abrasive cleaners or scouring pads, as these can scratch the surface of the wood. A damp mop with a pH-neutral cleaner specifically designed for wood floors can be used for more thorough cleaning. Ensure that the mop is wrung out thoroughly to prevent excess water from seeping into the seams between the planks. For wall applications, dusting regularly with a soft cloth is usually sufficient to maintain its clean appearance.
Preventative measures play a significant role in protecting engineered wood from damage. Using felt pads under furniture legs can prevent scratches and dents on floors. Placing mats or rugs in high-traffic areas, such as entryways, can help trap dirt and moisture before they are tracked onto the floor. For wall applications, avoid leaning heavy objects against the wood, as this can cause indentations or damage to the surface. Promptly addressing any water spills or leaks will prevent staining and warping. Regular inspection of the installed flooring, both on walls and floors, is critical for identifying potential issues and addressing them proactively. This can include checking for loose planks, signs of moisture damage, or any other anomalies that may require attention.

Engineered Wood Cladding Inovar Floor

Can You Use Engineered Wood Flooring In A Bathroom From The Forest Llc

Engineered Wood Flooring Colour And Finish Options Beyond Blog

Hardwood Flooring 101 Your Options And How To Choose

Natural Engineered Flooring Oak Brushed Uv Lacquered 14 3mm By 190mm 900mm At Wood And Beyond

What Is Engineered Wood Flooring Our Experts Explain Everything

4 Important Elements Of Engineered Wood Flooring Installation Mikasa Real Floors Blog

9 Accent Wall Styles For Your Home Decor Carlisle Wide Plank Floors

Light Wood Floors Colored Engineered Flooring Barlinek

Accent Wall Made From Engineered Hardwood Flooring Air Nailed To The Used Three Colors Patterns For Variations Top Edge Is Finished At A 45 Angle Downwards Allow Strip Of
Related Posts