How To Install Vinyl Plank Flooring On Open Stairs
Installing vinyl plank flooring on open stairs presents a unique challenge compared to a standard room installation. Open stairs, characterized by their exposed treads without risers or backing, require a meticulous approach to ensure both aesthetic appeal and structural integrity. The following details the process of installing vinyl plank flooring on open stairs, emphasizing the necessary steps and considerations for a successful outcome.
Preparation and Material Selection
Prior to beginning the installation, thorough preparation is essential. This includes assessing the existing stair structure, selecting appropriate materials, and gathering the necessary tools. The condition of the stairs should be carefully evaluated for any signs of damage, such as cracks, warping, or loose components. Any structural deficiencies must be addressed before moving forward. Securing loose treads, filling cracks with wood filler, and ensuring a level surface are crucial for a durable and visually pleasing finished product.
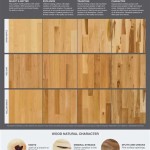
The selection of vinyl plank flooring is a critical step. Not all vinyl planks are suitable for stair applications. Consider the thickness, wear layer, and overall durability of the plank. A thicker plank with a robust wear layer is generally recommended for high-traffic areas like stairs. Additionally, the chosen vinyl plank should be compatible with the adhesive to be used. Consult the manufacturer's specifications for both the flooring and the adhesive to ensure compatibility and optimal performance.
The selection of stair nosing is equally important. Stair nosing provides a finished edge to the tread, protecting the edge from wear and tear while also enhancing the visual appeal of the stairs. Nosing should be chosen to complement the color and style of the vinyl plank flooring. Consider the profile of the nosing; options range from simple bullnose edges to more elaborate, decorative profiles. Ensure the nosing is specifically designed for use with vinyl plank flooring and that it provides a secure and stable edge for each tread.
Tools required for this project include a measuring tape, a pencil, a circular saw or miter saw, a utility knife, a rubber mallet, a level, a square, construction adhesive suitable for vinyl flooring, safety glasses, and knee pads. Depending on the complexity of the stair design, additional tools may be necessary.
Precise Measurement and Cutting
Accurate measurement and precise cutting are paramount for a professional-looking installation. Begin by measuring the width and depth of each stair tread individually. Because stairs are rarely perfectly uniform, each tread should be measured separately to account for any slight variations. Record each measurement carefully to avoid errors.
Once the measurements are taken, transfer them onto the vinyl plank flooring. Use a square to ensure that the cuts are perfectly perpendicular. When cutting vinyl plank, it's often beneficial to score the surface of the plank with a utility knife before using a saw. This helps prevent chipping and ensures a cleaner cut. For intricate cuts or angles, a miter saw provides greater precision compared to a circular saw.
The stair nosing will also require careful measurement and cutting. Measure the width of each tread and cut the nosing to the appropriate length. If the nosing is designed to overlap the vinyl plank, account for this overlap when making the cuts. Ensure the cut edge of the nosing is smooth and free of any burrs or imperfections. Test-fit each piece of vinyl plank and nosing on the corresponding tread before applying adhesive to ensure a proper fit.
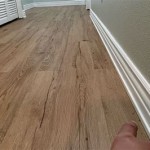
Pay close attention to the grain direction of the vinyl plank. It is generally recommended to run the grain of the plank lengthwise along the tread, which emphasizes the length of the stairs. Maintaining a consistent grain direction throughout the installation will contribute to a more visually appealing and cohesive result.
Adhesive Application and Installation Process
The proper application of construction adhesive is crucial for a secure and long-lasting installation. Select an adhesive specifically formulated for use with vinyl plank flooring. Read the manufacturer's instructions carefully to understand the recommended application method and curing time. Apply the adhesive to the stair tread in a consistent and even layer. Avoid applying too much adhesive, as this can cause the vinyl plank to slide or create an uneven surface. Conversely, applying too little adhesive may result in a weak bond.
Position the vinyl plank carefully onto the tread, aligning it precisely with the edges. Once the plank is in place, press it firmly onto the adhesive, working from the center outwards to ensure full contact. Use a rubber mallet to gently tap the plank, further securing it in place and eliminating any air pockets. Wipe away any excess adhesive with a damp cloth immediately.
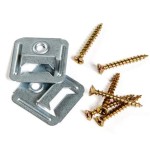
Next, install the stair nosing. Apply a bead of construction adhesive to the back of the nosing, ensuring it makes contact with both the vinyl plank and the edge of the tread. Position the nosing carefully, aligning it flush with the front edge of the tread. Press the nosing firmly into place and use the rubber mallet to gently tap it, securing it to the tread. Some stair nosing may also require screws or nails for added stability. If using screws or nails, pre-drill pilot holes to prevent splitting the wood.
Repeat this process for each stair tread, working systematically from the top to the bottom of the staircase. Allow the adhesive to cure completely before allowing foot traffic on the stairs. Refer to the manufacturer's instructions for the recommended curing time. It is advisable to allow at least 24 hours for the adhesive to fully cure.
Addressing Open Stair Specific Challenges
Installing vinyl plank on open stairs presents specific considerations not encountered on closed staircases. The exposed nature of the stairs means that all edges and surfaces must be finished neatly and securely. The absence of risers requires careful attention to the underside of the vinyl plank and nosing. Any exposed edges or gaps can detract from the overall look and potentially pose a safety hazard.
One effective technique for addressing the exposed underside is to use a matching or complementary trim piece to conceal the edge of the vinyl plank. This trim piece can be attached using construction adhesive and small finishing nails. Ensure the trim piece is cut precisely to fit the contours of the stair tread, providing a clean and finished look. Alternatively, paint or stain the exposed underside of the stair tread and nosing to match the vinyl plank flooring. This creates a cohesive and visually appealing result.
Another challenge arises from the potential for movement or flexing in the stair structure. Open stairs are often more susceptible to movement compared to closed stairs due to the lack of risers providing support. To mitigate this, consider using a construction adhesive with a high degree of flexibility. This will allow the vinyl plank to move slightly without compromising the bond. It is also beneficial to reinforce the stair structure itself by adding additional supports or bracing if necessary.
Finally, the selection of a suitable stair nosing is particularly important for open stairs. Choose a nosing profile that provides adequate support and protection for the edge of the tread. The nosing should extend slightly beyond the edge of the vinyl plank to prevent wear and tear. Consider using a nosing with a non-slip surface to enhance safety, especially in areas with high foot traffic.

Installing Vinyl On Open Stairs Diy Howto Vinylflooring Installation

How To Install Laminate Flooring On Floating Stairs

Vinyl Plank Flooring On Stairs

Install Vinyl Plank Flooring On Open Ends Stairs Home Renovation Diy

How To Install Vinyl Plank Flooring On Stairs In 6 Steps

How To Install Vinyl Flooring On Stairs Open Sided Staircase Nosing Tread And Riser Stepup

Luxury Vinyl Tile Seamless Upstairs And Downstairs Solution

Vinyl Plank On Stairs A Diy Guide How To Transform Your With Style Triad Flooring And Bath

How To Install Laminate Flooring On Staircase Step By Guide

How To Install Vinyl Plank Flooring On Stairs In 6 Steps
Related Posts