Home Depot LifeProof Vinyl Plank Flooring Installation: A Comprehensive Guide
Home Depot's LifeProof vinyl plank flooring is a popular choice for homeowners seeking durable, stylish, and water-resistant flooring. Installing LifeProof flooring can be a DIY project, but it requires careful planning and execution. This guide will provide a comprehensive overview of the installation process, covering key steps to ensure a successful outcome.
1. Preparation: The Foundation for a Successful Installation
Proper preparation is crucial for a seamless LifeProof installation. This includes:
-
Subfloor Assessment:
Ensure the subfloor is level, smooth, and free of any imperfections. LifeProof recommends a maximum subfloor slope of 1/8” per 10 feet. Any irregularities may cause unevenness in the finished floor. -
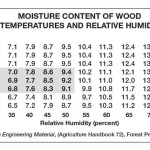
Moisture Barrier:
If installing over concrete, a moisture barrier is essential to prevent moisture damage. Consider a polyethylene vapor barrier or a moisture-resistant underlayment. -
Underlayment:
Use a high-quality underlayment designed for vinyl plank flooring. It provides cushioning, sound absorption, and helps mask minor subfloor imperfections. -
Tools & Materials:
Before starting, gather all necessary tools and materials, including:- Measuring tape
- Utility knife
- Tape measure
- Level
- Hammer
- Tapping block
- Safety glasses
- Knee pads
- Saw (for cutting planks)
- Spacer blocks (for expansion gaps)
- Installation instructions (provided with flooring)
2. Installation: Step-by-Step Guide
Once the subfloor is prepared, follow these steps for installing LifeProof vinyl plank flooring:
-
Layout:
Start by laying out the first row of planks, leaving a 1/4" expansion gap around the perimeter of the room. Use spacing blocks to maintain consistent gaps. -
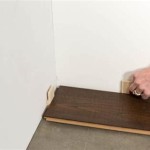
Plank Installation:
Install the first row of planks, ensuring the planks fit tightly together. Use a tapping block and hammer to interlock the planks securely. -
Subsequent Rows:
Install subsequent rows by staggering the planks, ensuring that joints do not align in consecutive rows. This creates a more visually appealing pattern and enhances the floor's structural integrity. -
Cutting Planks:
Use a utility knife or a saw to cut planks to fit around obstacles or to create specific patterns. Measure carefully and cut precisely to ensure a clean and consistent finish. -
Transition Strips:
Use transition strips to connect the LifeProof flooring with other floor coverings, such as carpet or tile. -
Finishing Touches:
Once the flooring is installed, remove the spacer blocks and clean up any debris. Allow the flooring to acclimate to room temperature for 24 hours before applying heavy furniture.
3. Maintenance and Care
LifeProof vinyl plank flooring is designed for durability and easy maintenance. Here are some tips for keeping your new flooring looking its best:
-
Sweep or Vacuum Regularly:
Remove dust, dirt, and debris regularly to prevent wear and tear. Use a soft-bristled broom or a vacuum cleaner with a brush attachment. -
Damp Mop Cleaning:
For deeper cleaning, mop your floors with a damp mop and a mild cleaning solution designed for vinyl flooring. -
Avoid Harsh Chemicals:
Avoid using harsh cleaners, abrasive scrubbers, or solvents as they can damage the flooring's surface. -
Protect from Scratches:
Use furniture pads or felt protectors to prevent scratches from furniture legs. Place mats in high-traffic areas to minimize wear and tear.
Installing LifeProof vinyl plank flooring can be a rewarding DIY project. By following these steps and taking the necessary precautions, homeowners can create a beautiful and durable flooring surface for their homes.

How To Install Lifeproof Flooring The Home Depot

How To Install Lifeproof Flooring The Home Depot

How To Install Lifeproof Flooring The Home Depot

How To Install Lifeproof Vinyl Flooring

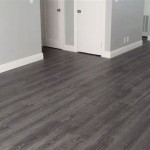
Lifeproof Luxury Vinyl Plank Flooring The Home Depot

How To Install Vinyl Plank Flooring Lifeproof Lvp

Lifeproof Sterling Oak 6 Mil X 8 7 In W 48 L Lock Waterproof Luxury Vinyl Plank Flooring 20 1 Sqft Case I966106l The Home Depot

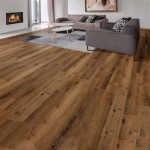
Lifeproof Trail Oak 6 Mil X 8 7 In W 48 L Lock Waterproof Luxury Vinyl Plank Flooring 20 1 Sqft Case I96713l The Home Depot

How To Install Vinyl Plank Flooring The Home Depot

Why We Chose Lifeproof Vinyl Flooring And How To Install It
Related Posts