Installing Snap-Together Wood Flooring: A Step-by-Step Guide
Snap-together wood flooring, also known as click-lock flooring, has gained immense popularity for its ease of installation and attractive appearance. This type of flooring offers a durable and elegant solution for homeowners looking to revamp their floors without the need for complex woodworking skills or extensive tools. This article will guide you through the process of installing snap-together wood flooring, providing detailed instructions and essential tips to ensure a successful project.
Preparing the Subfloor
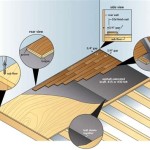
A strong and even subfloor is crucial for a successful snap-together wood flooring installation. Before starting, ensure that the subfloor is clean, free of debris, and free of any significant dips or bumps. This will prevent unevenness in the finished floor. If necessary, use a leveling compound to smooth out any irregularities.
For optimal performance, it is recommended to use a moisture barrier underneath the flooring. This will protect the wood from moisture damage and prevent warping. A moisture barrier can be a heavy-duty plastic sheet or a specialized underlayment product that can be purchased at most home improvement stores. The underlayment also adds a layer of cushioning and soundproofing, enhancing the overall comfort and quietness of the floor.
Inspect the subfloor for any signs of moisture or rot. If you find any issues, consult with a professional to address them before proceeding with the installation.
Installing the First Row
The first row of snap-together wood flooring is particularly important as it sets the foundation for the rest of the installation. The first plank should be placed against the wall, leaving an expansion gap of about 1/4 inch. This gap allows for the expansion and contraction of the flooring due to changes in temperature and humidity. The first plank can be cut to size if needed, creating a snug fit against the wall.
Use a tapping block and rubber mallet to gently tap the first plank into place. Be careful not to over-tighten the planks, as this could damage the tongue and groove system. For each subsequent plank, ensure that the tongue is properly inserted into the groove of the previous plank. It is best to stagger the seams of the flooring by at least 12 inches to create a more visually appealing and stable floor.
Continuing the Installation
Once the first row is installed, the remaining planks can be easily snapped into place. Align the tongue of each subsequent plank with the groove of the preceding plank and gently tap the plank into position using the tapping block and mallet.
For a more precise installation, it is recommended to use a flooring jig or a measuring tape to ensure that the planks are properly aligned and spaced. The flooring should be installed in a straight line, without any gaps or unevenness.
As you work, you may come across areas where the planks need to be cut to fit around obstacles like doorways or corners. Use a circular saw or a jigsaw to cut the planks to the desired length, ensuring that the cuts are precise and straight.
If you encounter any challenges or come across difficult areas, such as corners, doorways, or around pipes, take your time and consult the manufacturer's instructions for guidance.
Finishing Touches
After the flooring is installed, it is important to seal the perimeter gaps with a suitable sealant. This will prevent moisture from seeping into the subfloor and protect the flooring from damage.
Once the sealant is dry, you can install baseboards or shoe moldings to cover the expansion gap and complete the aesthetic finish.
Regular maintenance is essential to keeping your snap-together wood flooring looking its best. Avoid using harsh detergents or cleaning products, as they can damage the finish. Simply sweep or vacuum the floor regularly and mop it with a damp cloth and a mild cleaning solution.

How To Install Lock Engineered Hardwood Flooring

How To Install Lock Engineered Hardwood Flooring

How To Install Flooring Project Tutorial Bob Vila

How To Install Hardwood Flooring For Beginners

How To Install Laminate Flooring For Beginners

Guide To Installing Laminate Flooring Diy Family Handyman

How To Install Lock Engineered Hardwood Flooring

How To Install Hardwood Flooring The Home Depot

Why You Should Consider Snap Together Laminate Homeadvisor

Tongue And Groove Vs System Installation Flooring Esb
Related Posts