Topps Tiles Wooden Flooring Installation Instructions
Installing wooden flooring can transform a space, adding warmth and elegance. However, proper installation is crucial for achieving a professional finish and ensuring the longevity of the floor. This article provides comprehensive guidance on installing wooden flooring purchased from Topps Tiles, outlining the necessary steps and considerations for a successful project.
1. Acclimatisation
Before beginning installation, it is essential to allow the wooden flooring to acclimatise to the room's environment. This crucial step prevents issues like warping, buckling, and gapping after installation. Topps Tiles recommends acclimatising the unopened packs of flooring in the room where they will be installed for a minimum of 48 hours. The room temperature should be maintained between 18°C and 25°C, with a relative humidity of 40-60%. This allows the wood to adjust to the specific moisture content of the installation environment.
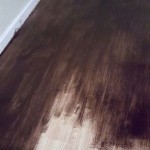
2. Subfloor Preparation
A smooth, level, and dry subfloor is critical for a successful wooden flooring installation. Uneven subfloors can lead to instability, squeaking, and premature wear. Topps Tiles advises assessing the subfloor for any imperfections like cracks, bumps, or unevenness. Existing floor coverings like carpets and vinyl should be completely removed. For concrete subfloors, a moisture test is necessary to ensure the moisture content is within acceptable limits. High moisture levels can cause damage to the wooden flooring. Self-levelling compound can be used to create a smooth and level surface if necessary. For wooden subfloors, ensure they are structurally sound and securely fixed. Loose boards should be re-secured, and any significant height variations should be addressed.
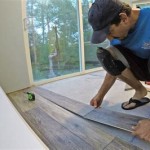
3. Underlayment
The appropriate underlayment provides several crucial benefits, including insulation against sound and heat loss, moisture protection, and a cushioning effect that enhances comfort underfoot. Topps Tiles offers a range of underlayments suitable for various wooden flooring types and subfloor conditions. Select an underlayment compatible with the chosen flooring and follow the manufacturer's instructions for installation. The underlayment should be laid smoothly and securely across the entire subfloor, with joints taped to prevent movement.
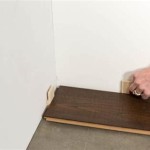
4. Installation Method
Topps Tiles provides wooden flooring with various installation methods, including click-lock systems and traditional tongue and groove. Click-lock systems offer convenient installation, requiring no adhesive and allowing for easy fitting of the planks. Tongue and groove systems typically require gluing the planks together. Carefully review the manufacturer’s instructions provided with the flooring for the specific installation method. Start installation from a straight wall, leaving a recommended expansion gap around the perimeter of the room. This gap allows for natural expansion and contraction of the wood due to temperature and humidity fluctuations.
5. Cutting and Fitting
During installation, it is inevitable that some planks will need to be cut to fit around doorways, pipes, and other obstacles. Use a suitable saw, such as a mitre saw or jigsaw, to ensure clean and accurate cuts. Measure carefully before cutting to minimize wastage. Remember to account for the expansion gap when cutting planks to fit at the edges of the room.
6. Doorways and Transitions
For doorways, use threshold strips to create a smooth and professional transition between different flooring types. Topps Tiles offers a variety of threshold strips to match the chosen flooring. Accurately measure the doorway width to ensure the threshold strip fits correctly. For transitions to other rooms with the same flooring type, use T-moldings to create a seamless join. These moldings accommodate the expansion and contraction of the flooring on either side of the transition.
7. Finishing Touches
Once the flooring is installed, remove any spacers used to maintain the expansion gap around the perimeter. Install skirting boards or quarter rounds to cover the expansion gap and provide a neat finish. These can be nailed or glued in place, depending on the type and the wall material. Clean the newly installed floor to remove any dust or debris from the installation process. Follow the manufacturer's recommendations for cleaning and maintenance to preserve the beauty and longevity of the wooden flooring.
By following these detailed instructions and adhering to the manufacturer's guidelines provided with the Topps Tiles wooden flooring, a successful and professional installation can be achieved. Correct installation ensures the floor's durability, enhances the aesthetic appeal of the space and provides years of enjoyment.

A Guide To Fitting Lvt Flooring
:fill(white)/www.toppstiles.co.uk/static/uploads/2020/08/Thurlow.jpg?strip=all "How To Lay Wood Effect Floor Tiles Topps")
How To Lay Wood Effect Floor Tiles Topps
:fill(white)/www.toppstiles.co.uk/static/media/catalog/product/7/5/752746-rena-nat-oak-eng-wood-floor-z-350_-ribbon-artichoke_v1-portrait_1.jpg?strip=all "Engineered Wood Flooring Topps Tiles")
Engineered Wood Flooring Topps Tiles

How To Tile A Bathroom Floor

Disadvantages Of Laminate Wood Flooring Key Drawbacks

Lvt Flooring Installation How To Lay 2g

Euston Floor Fitting Solid Engineered Parquet Fitters Nw1 Mr Sander

Tiling Onto Wood Training Blog Bal Adhesives

Ask The Experts Topps Tiles Rock My Style Daily Lifestyle Blog
:fill(white)/www.toppstiles.co.uk/static/media/catalog/product/r/e/rena-light-oak---supplier.jpg?strip=all "Rena Light Oak Engineered Wood Flooring Topps Tiles")
Rena Light Oak Engineered Wood Flooring Topps Tiles
Related Posts