How To Install Laminate Wood Flooring On Concrete Slab Floor
Laminate flooring offers a cost-effective and aesthetically pleasing alternative to traditional hardwood. Its durability and ease of installation make it a popular choice for homeowners. This article provides a comprehensive guide for installing laminate wood flooring directly onto a concrete slab floor.
Preparation is Key: Assessing and Preparing the Concrete Slab
Before beginning the installation process, the concrete slab must be thoroughly assessed. A clean, level, and dry surface is essential for successful laminate flooring installation. Any cracks or imperfections in the slab should be repaired using a concrete patching compound. Allow the patching compound to dry completely according to the manufacturer's instructions.
Moisture Testing: A Critical Step
Moisture is a significant concern when installing any flooring over concrete. Excessive moisture can lead to warping, buckling, and mold growth. A calcium chloride test or a relative humidity test using a concrete moisture meter is recommended to determine the moisture content of the slab. If the moisture levels exceed the manufacturer's recommendations, appropriate moisture mitigation measures, such as applying a vapor barrier, must be taken.
Vapor Barrier Installation: Protecting Against Moisture
A vapor barrier is essential for preventing moisture from migrating from the concrete slab into the laminate flooring. A polyethylene film with a thickness of 6 mil is commonly used. The vapor barrier should be laid over the entire concrete surface, overlapping the seams by at least 6 inches and taping them securely. Extend the vapor barrier up the walls slightly, trimming the excess after the flooring installation is complete.
Underlayment: Providing Cushioning and Sound Reduction
Underlayment provides cushioning for the laminate flooring, enhances sound insulation, and helps to level minor imperfections in the concrete slab. Various underlayment options are available, including foam, cork, and rubber. Choose an underlayment that is compatible with the specific laminate flooring being installed. Roll out the underlayment over the vapor barrier, ensuring the seams butt together tightly without overlapping.
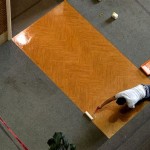
Beginning the Installation: The First Row
Begin installing the laminate flooring in a corner of the room, working from left to right. Place the first plank with the tongue facing the wall. Use spacers along the wall to maintain a consistent expansion gap of approximately ¼ to ½ inch. This gap allows the flooring to expand and contract with changes in temperature and humidity.
Continuing the Installation: Locking the Planks
Insert the tongue of the next plank into the groove of the previous plank at a slight angle. Lower the plank and press firmly until it clicks into place. Continue this process across the first row, ensuring the planks are tightly joined.
Subsequent Rows: Staggering the Seams
To achieve a professional and visually appealing result, stagger the seams of the laminate planks. Cut the first plank of the second row to a different length than the first plank of the first row, typically by one-third or one-half of the plank length. This staggering pattern provides structural integrity and enhances the aesthetic appeal of the floor. Continue installing the remaining rows, maintaining the staggered pattern and ensuring tight joints between the planks.
Cutting Laminate Planks: Utilizing Appropriate Tools
A variety of tools can be used to cut laminate planks, including a utility knife, a hand saw, or a power saw equipped with a fine-toothed blade. When using a power saw, score the surface of the plank first to prevent chipping. Always wear appropriate safety gear, including eye protection, when cutting laminate planks.
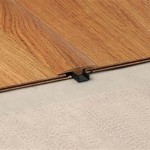
Doorways and Transitions: Ensuring a Seamless Finish
When installing laminate flooring through doorways, use a T-molding to create a smooth transition between rooms or flooring types. Undercut the doorjambs to allow the flooring to slide underneath. This provides a clean and professional finish.
Final Touches: Removing Spacers and Installing Baseboards
Once the entire floor is installed, remove the spacers along the walls. Install baseboards or quarter-round molding to cover the expansion gap and complete the installation. These final touches provide a polished and finished appearance.
Maintenance: Preserving the Beauty of Laminate Flooring
Regular maintenance is essential for preserving the beauty and longevity of laminate flooring. Sweep or vacuum frequently to remove dirt and debris. Clean up spills promptly using a damp cloth or mop. Avoid using excessive water or harsh cleaning chemicals, which can damage the flooring. Following these guidelines will ensure the laminate flooring provides years of beauty and functionality.

How To Install Laminate Over Concrete Day 1

Installing Laminate Flooring Over Concrete The Ultimate Guide Aa Floors

Laminate Flooring On Concrete Basement Floors Expert Installation Guide Csg Renovation

Lvp Flooring Installation Over Concrete Subfloor Full Instructional Builds By Maz Flooret

How To Install Tongue Groove Hardwood Floors Over Concrete

A Complete Guide On How To Install Laminate Flooring Concrete

Guidelines For Hardwood Floor Installation Over Concrete

Laying Laminate Flooring On Concrete

Lvp Flooring Installation How To Install Luxury Vinyl Plank In A Basement Diy

How To Install Laminate Flooring The Awesome Orange
Related Posts