How To Put Hardwood Flooring On Stairs
Installing hardwood flooring on stairs requires precision, patience, and attention to detail. This guide provides a comprehensive overview of the process, outlining the necessary steps for a successful installation.
Preparation is Key: Before beginning, gather all necessary tools and materials. These typically include hardwood flooring specifically designed for stairs (treads, risers, and nosings), measuring tape, saw (preferably a miter saw), wood glue, finishing nails, nail gun, safety glasses, gloves, wood filler, sandpaper, and a finish of choice (polyurethane, stain, etc.). Accurately measure the stair treads and risers to determine the required quantity of hardwood flooring. Add 10-15% extra to account for cuts and potential errors.
Assessing the Existing Staircase: Examine the current staircase for any damage or instability. Loose or squeaky treads and risers should be repaired or replaced before installing the hardwood. Ensure the subfloor beneath the existing staircase is clean, level, and free of debris. Any unevenness can impact the stability and final appearance of the hardwood flooring.
Starting with the Risers: Begin the installation process with the risers. Measure and cut the hardwood riser pieces to fit snugly against the existing riser. Apply wood glue to the back of the cut riser piece and position it against the existing riser. Secure the riser in place using finishing nails, ensuring they are countersunk to avoid interference with the tread installation.
Installing the Treads: Once the risers are installed, proceed with the treads. Measure and cut the hardwood tread pieces, ensuring accurate measurements for a proper fit. Apply wood glue to the top of the existing tread and position the new hardwood tread on top. Secure the tread using finishing nails, strategically placed for maximum hold and minimal visibility. For added stability, consider using construction adhesive in addition to the nails.
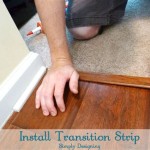
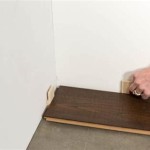
Nosing Installation: Stair nosings are the overhanging edges of the treads. These can be pre-finished or unfinished, depending on preference. Measure and cut the nosing pieces to fit the edge of each tread. Apply wood glue to the back of the nosing and secure it to the tread with finishing nails. Ensure the nosing is flush with the riser below for a seamless appearance.
Addressing Complex Stair Configurations: Winder stairs, or stairs that turn corners, require more intricate cuts and fitting. Careful templating is crucial for accurate measurements and cuts. Consider using cardboard or paper to create templates, ensuring the hardwood pieces fit perfectly before making any cuts.
Sanding and Finishing: Once all treads, risers, and nosings are installed, sand the entire staircase smooth. Start with a coarser grit sandpaper and progressively move to finer grits for a polished finish. This removes any imperfections and prepares the surface for the finish. Thoroughly clean the staircase to remove any dust or debris generated during the sanding process.
Applying the Finish: The choice of finish depends on the desired look and durability. Polyurethane is a popular choice for its durability and ease of application. Apply the finish in thin, even coats, allowing each coat to dry completely before applying the next. Follow the manufacturer's instructions for drying times and application methods. Multiple coats may be required for optimal protection and appearance. Lightly sand between coats with fine-grit sandpaper to ensure a smooth and even finish.
Safety Considerations: Throughout the installation process, prioritize safety. Wear safety glasses and gloves to protect against wood splinters and dust. Use caution when operating power tools and follow manufacturer instructions carefully. Ensure adequate ventilation when applying finishes and working with adhesives.
Post-Installation Care: Allow the finish to cure completely before using the stairs. Avoid heavy traffic or placing objects on the stairs during the curing period. Regular cleaning and maintenance will help preserve the beauty and longevity of the hardwood flooring. Use a damp mop or cloth for cleaning and avoid harsh chemicals that can damage the finish. Protective pads under furniture legs can prevent scratches and dents.
Professional Installation: While installing hardwood flooring on stairs can be a DIY project, complex stair configurations or lack of experience may necessitate professional installation. Consulting with a qualified flooring installer can ensure a flawless and safe installation.

How To Install Wood Flooring On Stairs Esb

Guide To Installing Hardwood Flooring On Stairs Steps Tips

Hardwood Flooring On Stairs Elevate Your Home S Style Simple Company

How To Install Laminate Flooring On Staircase Step By Guide

You Want To Install Hardwood On Stairs Reallyfloors America S Est Flooring

Hardwood Flooring On Stairs Elevate Your Home S Style Simple Company

How To Install Hardwood Flooring On Stairs Builddirect

How To Install Laminate On Stairs Step By For Beginners

Installing Wood Flooring On Stairs

How To Install Vinyl Plank Flooring On Stairs In 6 Steps
Related Posts