Moso Bamboo Flooring Installation Instructions
Installing Moso bamboo flooring is a relatively straightforward process that can be completed by most DIYers with some basic tools and materials. However, it is important to follow the manufacturer's instructions carefully to ensure a successful installation.
Materials You Will Need:
- Moso bamboo flooring
- Underlayment
- Moisture barrier
- Flooring adhesive
- Hammer
- Nail set
- Tapping block
- Saw
- Chalk line
- Spacer blocks
Step 1: Prepare the Subfloor
The first step is to prepare the subfloor by removing any existing flooring, baseboards, and trim. The subfloor should be level, smooth, and free of any debris. If the subfloor is not level, you may need to use a self-leveling compound to smooth it out.
Step 2: Install the Underlayment
Once the subfloor is prepared, you will need to install the underlayment. The underlayment will help to cushion the bamboo flooring and reduce noise. There are many different types of underlayment available, so be sure to choose one that is appropriate for your needs.
Step 3: Install the Moisture Barrier
Once the underlayment is installed, you will need to install the moisture barrier. The moisture barrier will help to protect the bamboo flooring from moisture damage. There are many different types of moisture barriers available, so be sure to choose one that is appropriate for your needs.
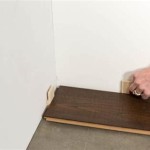
Step 4: Install the First Row of Bamboo Flooring
The first row of bamboo flooring should be installed along the longest wall in the room. Start by laying down a bead of flooring adhesive along the edge of the wall. Then, place the first plank of bamboo flooring in the adhesive and tap it into place using a tapping block and hammer. Continue installing the first row of bamboo flooring until you reach the end of the wall.
Step 5: Install the Remaining Rows of Bamboo Flooring
Once the first row of bamboo flooring is installed, you can begin installing the remaining rows. Start by laying down a bead of flooring adhesive along the edge of the previous row. Then, place the next plank of bamboo flooring in the adhesive and tap it into place using a tapping block and hammer. Continue installing the remaining rows of bamboo flooring until you reach the end of the room.
Step 6: Trim the Bamboo Flooring
Once the bamboo flooring is installed, you will need to trim it to fit around the edges of the room. To do this, use a saw to cut the bamboo flooring to the desired length. Then, use a nail set to nail the bamboo flooring into place.
Step 7: Install the Baseboards and Trim
The final step is to install the baseboards and trim. The baseboards will help to hide the expansion gap between the bamboo flooring and the wall. The trim will help to finish off the look of the room.
Tips for Installing Moso Bamboo Flooring
- Make sure to acclimate the bamboo flooring to the room temperature for at least 48 hours before installing it.
- Use a tapping block and hammer to tap the bamboo flooring into place. Do not use a sledgehammer, as this could damage the bamboo flooring.
- Leave a small expansion gap between the bamboo flooring and the wall. This will allow the bamboo flooring to expand and contract as needed.
- Clean the bamboo flooring regularly to keep it looking its best.

Bamboo Flooring Moso Specialist

Bamboo Elite Flooring Moso Specialist

Caramel Side Pressed

Bamboo Elite Premium Flooring Moso Specialist

Natural High Density

Bamboo Flooring Tesoro Woods

Home Decoration Building Material High Density Natural Color Moso Bamboo Flooring Floor Made In China Com

Caramel High Density

Moso Bamboo Flooring Sustainable Home Solutions

Bamboo Elite Premium Flooring Moso Specialist
Related Posts