Essential Aspects of Laminate Flooring Transition Installation Guidelines
Installing laminate flooring transitions ensures a seamless and professional finish between different flooring materials. Understanding the necessary preparation, material selection, and installation techniques is crucial for a successful installation.
1. Preparation
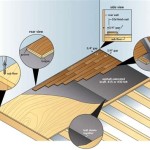
Thoroughly clean the subfloor and ensure it is level and dry. Use a moisture barrier to prevent moisture from damaging the laminate flooring. Determine the transition type required based on the height difference between the adjoining flooring materials.
2. Material Selection
Choose a transition that complements the color and style of your laminate flooring and the adjacent flooring material. Consider the width and height of the transition to ensure a snug fit. Opt for durable and high-quality transitions made from materials like aluminum or PVC.
3. Reducer Transition
Reducer transitions bridge the gap between laminate flooring and a lower-level flooring material, such as tile or carpet. Measure and cut the transition to fit the gap and ensure it overlaps both flooring surfaces. Secure the transition using nails or adhesive.
4. T-Molding Transition
T-molding transitions join two laminate flooring surfaces that are at the same level. Cut the molding to length and insert it into the gap between the floors. Use a tapping block and hammer to secure it firmly in place.
5. Stair Nose Transition
Stair nose transitions provide a transition between laminate flooring and stairs. Measure and cut the transition to match the length of the stair tread. Use construction adhesive to secure it to the stair tread and laminate flooring.
6. Doorway Transition
Doorway transitions create a smooth transition between laminate flooring and a doorway. Cut the transition to fit the width of the doorway and use adhesive or nails to secure it. Ensure the transition is level with the floor on both sides.
Tips for Successful Installation
- Always measure the gaps precisely and cut the transitions accurately.
- Use a tapping block to ensure transitions are fitted snugly.
- Allow the adhesive to dry completely before foot traffic.
- Trim any excess transition material after installation.
- Caulk around the perimeter of the transitions to prevent moisture penetration.
By following these guidelines and tips, you can ensure a high-quality and durable laminate flooring transition installation. Remember to choose the right materials, prepare the subfloor adequately, and install the transitions precisely for a professional-looking finish that enhances the overall aesthetics of your home.

Floating Floor Installation Instructions Onflooring

Installing Laminate Transitions Step By Instructions

How To Install Vinyl Flooring Transition Strip Lvp Moulding

Installing Laminate Transitions Step By Instructions

Floor Molding Frequently Asked Questions

Guide To Flooring Transition Strips Nufloors

Installing Pergo 4 In 1 Transitions On Concrete With No S

Installing Laminate Transitions Step By Instructions

How To Install Transition Strips In Doorways

Installing Laminate Flooring For Beginners Full Diy Guide
Related Posts