How to Install Laminate Flooring When Walls Aren't Squared
Installing laminate flooring is a great way to update your home's interior. It's relatively easy to do, and it can be completed in a weekend. However, there are a few challenges that you may encounter, one of which is installing laminate flooring when the walls aren't squared.
If your walls are not squared, it can make it difficult to get the laminate flooring to fit properly. This can result in gaps between the planks, which can look unsightly and allow moisture to seep in. To avoid these problems, it's important to take the time to square up your walls before you begin installing the laminate flooring.
Required Tools and Materials:
- Level
- Chalk line
- Framing square
- Circular saw
- Miter saw
- Pry bar
- Hammer
- Nail gun
- Laminate flooring
- Underlayment
- Molding
Step-by-Step Instructions:
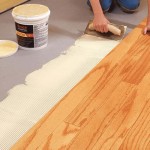
1. Determine the Squarest Wall: * Use a level to find the squarest wall in the room. This will be the wall that you will use as your reference point for squaring up the other walls. 2. Mark a Reference Line: * Snap a chalk line along the bottom of the squarest wall. This line will serve as your reference point for squaring up the other walls. 3. Square Up the Other Walls: * Use a framing square to square up the other walls to the reference line. Mark the walls where the framing square indicates that they need to be cut. 4. Cut the Walls: * Use a circular saw to cut the walls along the lines that you marked. Be sure to use a sharp blade and to cut slowly and carefully. 5. Install the Underlayment: * Roll out the underlayment over the subfloor. Cut the underlayment to fit around any obstacles, such as pipes or electrical outlets. 6. Install the Laminate Flooring: * Start by installing the first row of laminate flooring along the reference line. Use a pry bar to tap the planks into place. * Continue installing the laminate flooring, row by row, using a miter saw to cut the planks to fit around obstacles. 7. Install the Molding: * Once the laminate flooring is installed, you can install the molding around the edges of the room. This will help to hide any gaps and give the room a finished look.Tips:
* If your walls are badly out of square, you may need to use a combination of shims and spacers to get the laminate flooring to fit properly. * Be sure to use a level to check the floor as you install the laminate flooring. This will help to ensure that the floor is level and that there are no gaps between the planks. * Take your time and don't be afraid to ask for help if you need it. Installing laminate flooring can be a challenging task, but it's definitely doable with a little patience and effort.
Laminate Floor Installation For Beginners 9 Clever Tips

Install Vinyl Plank From A Hallway Into Room No Transition Strip

Vinyl Plank Installation Tips For Doorways Halls Walls And Closets

How To Install Vinyl Plank Flooring Backwards

How To Mark Out That Last Plank Around 2 Walls Teirnanmccorkell Howto Diy Tips Flooring

How To Install Laminate Flooring For Beginners Diy

How To Install Laminate Flooring Easy Step By Beginners Guide

Bad Laminate Installation Repair

Laminate Floor Installation Tips

How To Install Vinyl Plank Flooring Anything
Related Posts