Allure Ultra Interlocking Plank Flooring Installation Instructions
Allure Ultra interlocking plank flooring provides a durable and aesthetically pleasing flooring option suitable for various residential and commercial applications. Its interlocking mechanism facilitates relatively straightforward installation, making it a popular choice for both professional installers and experienced do-it-yourself enthusiasts. This document outlines comprehensive instructions for the successful installation of Allure Ultra interlocking plank flooring, covering essential preparation steps, installation techniques, and post-installation considerations. Adhering to these guidelines will help ensure a visually appealing, long-lasting, and structurally sound floor.
Before commencing any installation work, it is crucial to carefully review the manufacturer's specifications and warranty information provided with the Allure Ultra product. Understanding the specific requirements and limitations of the material is essential for a successful and compliant installation. Failure to comply with manufacturer guidelines may void the product warranty.
Preparing the Subfloor
The subfloor is the foundation upon which the Allure Ultra planks will rest, and its condition directly impacts the final appearance and performance of the flooring. Proper subfloor preparation is paramount to ensure a stable, level, and clean surface for installation. Neglecting this step can lead to unevenness, instability, and premature wear of the flooring.
The first step in subfloor preparation is to thoroughly inspect the existing surface. Identify and address any imperfections, such as cracks, holes, or uneven areas. Fill small cracks and holes with a suitable patching compound designed for flooring applications. For larger cracks or significantly uneven surfaces, consider using a self-leveling compound to create a smooth and consistent base. Ensure the patching or leveling compound is completely dry and cured according to the manufacturer's instructions before proceeding.
The subfloor must also be structurally sound. Check for any signs of rot, water damage, or weakness. Repair or replace any damaged sections of the subfloor to ensure adequate support for the new flooring. Loose or squeaky subfloor boards should be secured with screws or nails to prevent movement and noise.
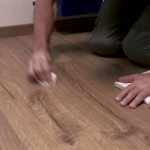
Cleanliness is another critical aspect of subfloor preparation. Remove all debris, dust, dirt, and other contaminants from the surface. Vacuum the subfloor thoroughly and then wipe it down with a damp cloth to remove any remaining residue. Allow the subfloor to dry completely before proceeding with the installation of the Allure Ultra planks. A clean surface promotes better adhesion and prevents the transfer of debris onto the back of the planks, which could compromise the interlocking mechanism.
The subfloor should be level within acceptable tolerances as specified by the manufacturer. Typically, this means no more than 3/16 inch variation over a 10-foot span. Use a long straightedge and a level to check for any significant dips or humps in the subfloor. If necessary, use shims or self-leveling compound to correct any unevenness and ensure a flat and level surface.
For concrete subfloors, moisture testing is essential. High moisture levels can damage the flooring and lead to mold growth. Use a moisture meter to test the moisture content of the concrete. If the moisture level exceeds the manufacturer's recommended limit, apply a moisture barrier or allow the concrete to dry further before proceeding with the installation.
Acclimation of the Allure Ultra planks to the installation environment is also crucial. Bring the planks into the room where they will be installed at least 48 hours prior to installation. This allows the planks to adjust to the temperature and humidity of the room, minimizing expansion or contraction after installation.
Installing Allure Ultra Interlocking Planks
Once the subfloor is properly prepared and the planks have acclimated, the installation process can begin. Careful planning and attention to detail are essential for achieving a professional-looking and long-lasting floor. It is recommended to start with a layout plan to determine the best orientation for the planks and minimize waste.
Begin by measuring the room and determining the center point. Draw a chalk line through the center of the room, both lengthwise and widthwise. This will serve as a reference point for aligning the first row of planks. It is generally recommended to start the installation along a straight wall, using the chalk lines as a guide.
The Allure Ultra planks feature an interlocking mechanism that allows them to be easily connected without the need for glue or nails. To install the planks, align the tongue of one plank with the groove of another and press them together firmly. The planks should snap together securely, creating a tight and virtually seamless joint. Use a rubber mallet to gently tap the planks together if necessary, ensuring a tight fit.
Maintain a consistent expansion gap of approximately ¼ inch around the perimeter of the room and any fixed objects, such as pipes or door frames. This expansion gap allows the flooring to expand and contract with changes in temperature and humidity without buckling or warping. Use spacers to maintain the proper expansion gap during installation.
When cutting planks to fit around obstacles or at the end of a row, use a utility knife and a straightedge to score the plank and then snap it along the score line. For more intricate cuts, a jigsaw or other suitable cutting tool may be necessary. Always wear safety glasses and gloves when cutting the planks.
Stagger the end joints of adjacent rows to create a more visually appealing and structurally sound floor. A common practice is to use the cut-off piece from the end of one row to start the next row, provided it is at least 6 inches in length. This helps to distribute the joints and prevent long, continuous lines that can weaken the floor and detract from its appearance.
Throughout the installation process, regularly check the alignment of the planks and ensure that they are properly interlocked. Wipe away any excess adhesive or debris that may accumulate on the surface of the flooring. A clean installation will result in a more professional-looking and durable floor.
For areas with high foot traffic or potential for moisture exposure, consider using a seam sealer to further protect the joints between the planks. Seam sealers can help to prevent water penetration and maintain the integrity of the flooring in demanding environments.
Post-Installation Procedures and Maintenance
After the Allure Ultra planks have been installed, several post-installation procedures should be followed to ensure the longevity and appearance of the floor. Proper cleaning and maintenance are essential for preserving the beauty and durability of the flooring.
Remove all spacers and clean the floor thoroughly with a damp mop and a mild detergent specifically designed for vinyl flooring. Avoid using harsh chemicals or abrasive cleaners, as these can damage the surface of the flooring. Refer to the manufacturer's recommendations for appropriate cleaning products.
Inspect the perimeter of the room and install baseboards or quarter-round molding to cover the expansion gap. This will provide a finished look and protect the edges of the flooring from damage. Secure the baseboards or molding to the wall, not to the flooring, to allow for expansion and contraction.
Place protective pads under the legs of furniture to prevent scratches and dents. Avoid dragging heavy objects across the floor, as this can also cause damage. Use mats or rugs in high-traffic areas to further protect the flooring from wear and tear.
Regularly sweep or vacuum the floor to remove dirt and debris. Promptly clean up any spills to prevent staining or water damage. With proper care and maintenance, Allure Ultra interlocking plank flooring can provide years of beauty and durability.
Avoid excessive exposure to direct sunlight, as this can cause the flooring to fade or discolor over time. Use curtains or blinds to control the amount of sunlight entering the room.
Periodically inspect the floor for any signs of damage or wear. Address any issues promptly to prevent them from worsening. Minor scratches or scuffs can often be repaired with a touch-up kit or a floor restorer.
By following these installation instructions and maintenance guidelines, you can ensure that your Allure Ultra interlocking plank floor provides a beautiful, durable, and long-lasting surface for years to come.

Learn How To Install Allure Ultra Simplefit Flooring Official

Trafficmaster Allure Ultra Resilient Flooring Installation Review

How To Install Allure Flooring

How To Install Rigid Core Luxury Vinyl Planks

How To Install Vinyl Plank Flooring In A Bathroom Fixthisbuildthat

10 Beginner Mistakes Installing Vinyl Plank Flooring

Finishing The Vinyl Plank Flooring Ana White

6 Ways To Cut Vinyl Plank Flooring Beginners Guide

How To Install Loose Lay Vinyl Plank Flooring Special Installation Tips

Vinyl Flooring That Looks Like Wood Thrifty Decor Diy And Organizing
Related Posts