How to Install Laminate Flooring In Door Jambs
Installing laminate flooring can significantly enhance the aesthetic appeal and functionality of a space. One of the more challenging aspects of laminate flooring installation involves fitting the planks neatly around door jambs. A precise and careful approach is crucial to achieve a professional-looking finish. This article provides a detailed guide on how to properly install laminate flooring around door jambs, ensuring a seamless and attractive transition.
Preparing for Installation: Gathering Tools and Materials
Before initiating the installation process, it is imperative to gather all necessary tools and materials. These include: laminate flooring planks, a measuring tape, a pencil, a circular saw or jigsaw (preferably with a fine-tooth blade), a coping saw, a tapping block, a pull bar, shims, safety glasses, ear protection, and most importantly, an undercut saw (also known as a jamb saw) or a multi-tool with a cutting attachment designed for undercutting. The undercut saw is specialized for cutting door jambs and casings without damaging the surrounding wall. A utility knife can also be useful for scoring laminate planks. Proper preparation is vital for efficient and accurate installation.
Acclimatizing the laminate flooring to the room's environment is also essential. This usually involves leaving the planks in the room for at least 48 to 72 hours prior to installation. This allows the material to adjust to the temperature and humidity levels of the space, minimizing expansion and contraction issues after installation. Ensure the subfloor is clean, level, and dry. Any imperfections should be addressed before proceeding. This may involve patching holes, sanding down high spots, or applying a self-leveling compound. A clean and even subfloor is critical for a successful laminate flooring installation.
Choosing the correct underlayment is another crucial step. The underlayment provides a moisture barrier, sound insulation, and a smoother surface for the laminate flooring. Select an underlayment that is appropriate for the specific type of subfloor and laminate flooring being used. Follow the manufacturer's instructions for installing the underlayment, ensuring it is properly sealed and secured.
The Undercutting Technique: Creating Space for the Laminate
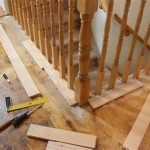
The preferred method for installing laminate flooring around door jambs is to undercut the jambs themselves. This involves using an undercut saw to create a small gap at the bottom of the jamb, allowing the laminate flooring to slide beneath it. This method provides a clean, professional finish that is superior to cutting the laminate around the jamb. Undercutting eliminates the need for caulk or molding to cover gaps, resulting in a more aesthetically pleasing and durable installation.
To begin undercutting, place a piece of laminate flooring (with the underlayment attached) next to the door jamb. This will serve as a guide for the depth of the cut. Use the undercut saw to carefully cut away the bottom portion of the door jamb. Maintain a consistent depth throughout the cut, ensuring the laminate flooring will slide easily underneath. Take your time and make smooth, controlled cuts to avoid damaging the jamb or the surrounding wall.
After making the cut, remove any debris or splinters from the undercut area. Test fit a piece of laminate flooring to ensure it slides smoothly underneath the jamb. If necessary, make minor adjustments to the cut using a chisel or sanding block. The goal is to create a snug fit that allows the laminate flooring to move freely without binding or creating gaps. This step is pivotal for achieving professional looking results.
For door casings that are too thick to undercut effectively, a coping saw can be used to carefully remove a small portion of the casing. This will create a similar effect as undercutting, allowing the laminate flooring to slide beneath the casing. Use a utility knife to score the casing along the cut line before using the coping saw. This will help prevent chipping and ensure a clean cut. Take your time and make smooth, controlled cuts to avoid damaging the surrounding wall.
Installing the Laminate Planks Around the Door Jamb
Once the door jambs have been properly undercut, the installation of the laminate flooring planks can proceed. Start by measuring the distance from the wall to the door jamb and calculate the required length of the laminate plank. It is essential to account for the expansion gap recommended by the manufacturer, typically around ¼ to ½ inch.
Use a circular saw or jigsaw to cut the laminate plank to the appropriate length. Ensure the cut is straight and clean to avoid gaps or misalignments. A fine-tooth blade will help prevent chipping and splintering. It is recommend to use safety glasses and ear protection during the cutting process.
Carefully slide the cut laminate plank under the door jamb, ensuring it fits snugly against the adjacent planks. Use a tapping block and pull bar to gently tap the plank into place, securing it to the locking mechanism of the adjoining planks. Avoid using excessive force, as this can damage the planks or the locking mechanism. Ensure the plank is properly aligned and level before moving onto the next one.
For planks that require intricate cuts or shapes to fit around irregular door jambs, create a template using cardboard or paper. Trace the outline of the door jamb onto the template, then transfer the template to the laminate plank. Use a jigsaw or coping saw to carefully cut the plank according to the template. Test fit the plank to ensure it fits properly before securing it in place.
When installing the final row of planks, it may be necessary to rip the planks to the required width. Use a table saw or circular saw to rip the planks, ensuring the cut is straight and consistent. It is essential to maintain the expansion gap along the wall, so calculate the required width of the planks accordingly. After ripping the planks, carefully install them along the wall, using a pull bar and tapping block to secure them in place.
Addressing Potential Issues and Ensuring a Professional Finish
Despite careful planning and execution, certain issues may arise during the laminate flooring installation process. One common issue is gapping, which can occur if the planks are not properly aligned or if the subfloor is uneven. To address gapping, use a tapping block and pull bar to gently tap the planks together, ensuring they are tightly interlocked. If the gapping persists, consider using shims to level the subfloor or replacing the affected planks.
Another potential issue is squeaking, which can occur if the laminate flooring is not properly installed or if the subfloor is not adequately prepared. To address squeaking, identify the source of the noise and apply a small amount of lubricant or wood glue to the affected area. In some cases, it may be necessary to remove and reinstall the planks to address the underlying issue.
To ensure a professional finish, inspect the installed laminate flooring for any imperfections or inconsistencies. Fill any gaps or cracks with color-matched wood filler, and touch up any scratches or blemishes with a laminate repair kit. Clean the flooring thoroughly with a damp cloth and a mild detergent. Avoid using harsh chemicals or abrasive cleaners, as these can damage the laminate flooring. Installing quarter-round molding along the baseboards can also conceal any remaining expansion gaps and provide a finished look.
When dealing with door jambs that are significantly uneven or damaged, it may be necessary to employ more advanced techniques. For example, a router can be used to create a more precise and consistent undercut. Alternatively, a multi-tool with a sanding attachment can be used to smooth out any imperfections in the jamb. In extreme cases, it may be necessary to replace the door jamb entirely.
Proper ventilation is essential throughout the laminate flooring installation process. Open windows and doors to ensure adequate airflow, and use a dust mask to protect against airborne particles. If working with adhesives or sealants, follow the manufacturer's instructions for ventilation and safety precautions. This is particularly true when using solvent-based adhesives.
By following these guidelines and taking a meticulous approach, it is possible to achieve a professional-looking laminate flooring installation around door jambs. The key is to prioritize accuracy, patience, and attention to detail. Investing the time and effort to properly prepare the subfloor, undercut the door jambs, and install the laminate planks will result in a durable and aesthetically pleasing flooring solution that will enhance the beauty and value of your space for years to come.

How To Lay Laminate Flooring Through A Doorway Blog Floorsave

Avoid Hassles With This Lvp Quick Tip For Door Jambs

Installing Last Row Of Laminate Flooring In Hallways

Jamb Saws Undercut Door Casings

How To Undercut Door Jambs For Laminate Flooring Diy

How To Undercut A Door Frame Tutorial

Should Door Jambs Be Cut In A Mobile Home When Installing Floating Floor

How To Undercut Architrave Blog Floorsave

Installing A Laminate Floor Around The Door Frame Jamb In Hallway Mryoucandoityourself

Bad Laminate Installation Repair
Related Posts