Rapid Loc Flooring Installation Guide: A Comprehensive Guide to a Seamless Floor
Rapid Loc flooring, renowned for its click-lock system, offers a quick and convenient installation process. By following this comprehensive guide, you can achieve a seamless and professional-looking floor that will enhance the beauty and functionality of your space.
Essential Tools and Materials
Before embarking on the installation process, gather the following essential tools and materials:
- Rapid Loc flooring planks
- Underlayment
- Moisture barrier
- Tap block and pull bar
- Circular saw or miter saw
- Measuring tape
- Chalk line
- Pencil
- Safety glasses
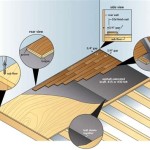
Preparing the Subfloor
A properly prepared subfloor ensures a stable and durable foundation for your Rapid Loc flooring. Begin by removing any existing flooring, baseboards, and obstacles.
Next, inspect the subfloor for any unevenness, moisture damage, or loose particles. Repair or replace any damaged areas. Install an underlayment over the subfloor to provide sound insulation and moisture resistance.
Laying the First Row
Start laying the Rapid Loc flooring in the corner of the room where the two longest walls meet. Angle the first plank at a 45-degree angle and insert the tongue into the groove of the starting strip or wall base. Make sure the plank is flush against the wall and the edge is straight.
Continue laying the first row, using the tap block and pull bar to securely lock the planks together. Ensure that each plank is fully engaged before moving on to the next.
Continuing the Installation
For subsequent rows, stagger the plank joints by at least 6 inches. To cut planks to length, use a circular saw or miter saw. Measure the distance from the wall to the edge of the plank and cut accordingly.
Insert the tongue of the new plank into the groove of the previously installed plank at a 20-degree angle. Gently tap the plank into place using the tap block and pull bar. Repeat the process for all subsequent rows.
Installing the Last Row
To install the last row, measure the distance from the wall to the last plank and cut it to length. Use a pull bar to pull the plank into place against the wall. Secure the plank by tapping it gently with the tap block.
Trimming and Finishing
Once the flooring is installed, trim any excess material around the edges using a utility knife. Install baseboards and moldings to conceal the edges and enhance the overall appearance.
Maintenance and Care
To maintain the beauty and longevity of your Rapid Loc flooring, regular cleaning and maintenance are essential. Use a soft-bristled broom or vacuum cleaner to remove loose dirt and debris. Avoid using harsh chemicals or abrasive cleaners.
Rapid Loc flooring offers a durable and easy-to-maintain flooring solution that enhances the aesthetic appeal and functionality of any space. By following this comprehensive guide, you can achieve a professional-looking installation that will provide years of enjoyment.

How To Install Lock Engineered Hardwood Flooring

Laminate Flooring Drop Lock System Installation Guide

A Beginner S Guide To Installing Vinyl Plank Flooring Dumpsters Com

Quick Vinyl Plank Drop And Lock Installation Demo

How To Install A Lock Vinyl Floor

Hybrid Timber Laminate Flooring Installation Comprehensive Guide

How To Install Spc Floating Floor

Hybrid Timber Laminate Flooring Installation Comprehensive Guide

Step By Guide Installing Classen Herringbone Laminate Panels With Megaloc Twin Lock

How To Install Spc Floating Floor
Related Posts