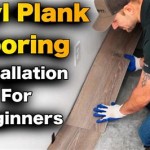
Easiest Way To Install Vinyl Plank Flooring
Vinyl plank flooring has surged in popularity as a durable, aesthetically pleasing, and relatively affordable flooring option. Its ease of installation is a significant factor contributing to its widespread appeal. While professional installation guarantees a flawless result, many homeowners find that installing vinyl plank flooring themselves is a manageable DIY project. This article outlines one of the easiest methods for installing vinyl plank flooring, focusing on preparation, accurate execution, and troubleshooting common issues.
The perceived simplicity of vinyl plank flooring installation stems from its click-lock mechanism. This system eliminates the need for messy adhesives and specialized tools typically associated with traditional flooring methods like tile or hardwood. Instead, the planks interlock, creating a floating floor that rests upon the subfloor.
However, a successful installation relies heavily on meticulous preparation. Rushing the preparatory stages often leads to imperfections that compromise the floor's longevity and visual appeal. It is critical to address subfloor imperfections, plan the layout strategically, and gather all necessary tools before commencing the installation process.
Essential Tools and Materials
Before beginning the installation, gathering the correct tools and materials is crucial. This proactive step minimizes interruptions and ensures a smoother workflow. Here is a list of essential items:
Vinyl Plank Flooring: Calculate the square footage of the room and purchase at least 10% more material to account for cuts and waste. Ensure all planks are from the same dye lot to guarantee color consistency.
Underlayment (Optional): While some vinyl planks have pre-attached underlayment, adding a separate layer can provide additional cushioning, sound insulation, and moisture protection. Choose an underlayment compatible with vinyl plank flooring.
Measuring Tape: Essential for accurately measuring the room and calculating plank placement.
Pencil: Used for marking cut lines on the planks.
Utility Knife or Scoring Tool: For making precise cuts on the vinyl planks. A sharp blade is crucial for clean edges.
Straight Edge or T-Square: Helps ensure straight and accurate cuts.
Rubber Mallet: Used for gently tapping the planks together to ensure a tight and secure fit.
Spacers: Placed around the perimeter of the room to maintain expansion gaps. These gaps allow the floor to expand and contract with temperature and humidity fluctuations, preventing buckling.
Pull Bar or Pry Bar: A specialized tool for tightening planks in hard-to-reach areas, such as along walls.
Knee Pads: Recommended for comfort during extended periods of kneeling.
Broom or Vacuum: For cleaning the subfloor before, during, and after installation.
Safety Glasses: To protect eyes from debris during cutting.
Subfloor Preparation: Achieving a Smooth and Level Foundation
The condition of the subfloor directly impacts the final appearance and performance of the vinyl plank flooring. Any imperfections, such as unevenness, cracks, or debris, will telegraph through the planks, creating a less-than-ideal finish. Therefore, thoroughly preparing the subfloor is paramount.
Cleaning: Begin by thoroughly cleaning the subfloor. Remove all dust, dirt, debris, and existing flooring materials. Vacuum thoroughly and sweep to ensure a completely clean surface.
Leveling: Check the subfloor for any unevenness using a level or straight edge. Significant variations in height (more than 3/16 inch over a 10-foot span) need to be addressed. Self-leveling compound can be used to fill low spots and create a smooth, even surface. Allow the self-leveling compound to dry completely according to the manufacturer's instructions before proceeding.
Repairing Cracks and Holes: Fill any cracks or holes in the subfloor with a concrete patch or wood filler, depending on the subfloor material (concrete or plywood/OSB). Allow the patch to dry and sand it smooth to be level with the surrounding surface.
Moisture Testing: Excessive moisture can damage vinyl plank flooring and lead to mold growth. Test the moisture level of the subfloor using a moisture meter. The specific acceptable moisture level will vary depending on the vinyl plank manufacturer's recommendations. If the moisture level is too high, address the source of the moisture before installing the flooring or consider using a moisture barrier.
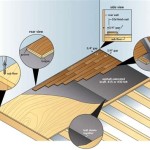
Underlayment Installation (Optional): If using underlayment, install it according to the manufacturer's instructions. Typically, the underlayment is rolled out and secured with tape at the seams.
Strategic Installation: Laying the Foundation for Success
Once the subfloor is properly prepared, careful planning of the plank layout is essential. A well-planned layout minimizes waste, ensures a visually appealing pattern, and simplifies the installation process.
Direction of Planks: Consider the room's shape and light source when deciding on the direction of the planks. Generally, running the planks parallel to the longest wall or the primary light source creates a more spacious and aesthetically pleasing effect. However, factors like the direction of floor joists (if installing over a wood subfloor) may influence the decision.
Dry Lay: Before applying any adhesive (if required) or clicking the planks into place, perform a dry lay. This involves arranging the planks in the room to visualize the final layout and identify any potential issues, such as awkward cuts or uneven spacing. Adjust the starting point or plank direction as needed to achieve the desired aesthetic.
Starting Row: Begin the installation along the straightest wall in the room. Use spacers to maintain the recommended expansion gap between the wall and the first row of planks. The expansion gap allows the floor to expand and contract with temperature and humidity changes, preventing buckling.
Click-Lock Installation: Most vinyl plank flooring utilizes a click-lock system. Align the tongue of one plank with the groove of the adjacent plank and gently press down until the planks lock together. Use a rubber mallet to tap the planks together for a tighter fit, if necessary. Avoid hitting the planks too hard, as this can damage the locking mechanism.
Cutting Planks: When you reach the end of a row or need to navigate around obstacles, accurate cutting is essential. Measure the required length of the plank, mark the cut line with a pencil, and use a utility knife or scoring tool to score the plank along the marked line. Snap the plank along the score line or use a saw for more complex cuts.
Staggering Seams: To enhance the visual appeal and structural integrity of the floor, stagger the seams between rows. A minimum stagger of 6 inches is generally recommended. This means that the end joints of adjacent rows should not align. Use the cut-off piece from the end of one row to start the next row, if possible, to minimize waste.
Working Around Obstacles: When installing around pipes, door frames, or other obstacles, measure and cut the planks carefully to fit snugly around the obstruction. Use a jigsaw or coping saw for intricate cuts. Consider using shoe molding or quarter-round molding to conceal any gaps around the obstacles.
Final Row: The final row of planks often requires cutting to fit the remaining space. Measure the space carefully, leaving room for the expansion gap. Use a pull bar or pry bar to tighten the final row of planks into place, ensuring a secure fit.
Finishing Touches: Once the installation is complete, remove the spacers and install baseboards or quarter-round molding to cover the expansion gaps and provide a finished look. Clean the floor thoroughly to remove any dust or debris.
By following these steps, homeowners can successfully install vinyl plank flooring and enjoy a beautiful and durable new floor. The key to a successful installation lies in meticulous preparation, accurate execution, and attention to detail.

Installing Vinyl Plank Flooring How To Fixthisbuildthat

How To Install Vinyl Plank Flooring As A Beginner Home Renovation

Installing Vinyl Plank Flooring For Beginners Anika S Diy Life

How To Install Vinyl Plank Flooring In A Bathroom Fixthisbuildthat

A Beginner S Guide To Installing Vinyl Plank Flooring Dumpsters Com

Installing Vinyl Floors A Do It Yourself Guide The Honeycomb Home

Easy Ways To Install Vinyl Plank Flooring On Concrete

How To Install Vinyl Plank Flooring As A Beginner Home Renovation

How To Install Vinyl Plank Flooring The Home Depot

How To Install Vinyl Plank Flooring
Related Posts