Laying Laminate Flooring Over Existing Floorboards: A Comprehensive Guide
Laminate flooring is a popular choice for many homeowners due to its durability, affordability, and aesthetic versatility. It offers a realistic wood-look finish without the high cost and maintenance associated with solid hardwood. One common question homeowners face is whether it's possible to install laminate flooring directly over existing floorboards. The answer is generally yes, but certain prerequisites and procedures must be followed to ensure a successful and long-lasting installation. This article provides a detailed guide on how to properly lay laminate flooring over floorboards, addressing crucial aspects from preparation to execution.
Preparing the Existing Floorboards: The Foundation for Success
The most critical step in laying laminate flooring over floorboards is proper preparation of the existing subfloor. Failure to adequately prepare the floorboards can lead to issues such as unevenness, squeaking, and premature wear of the laminate. The following steps are essential for ensuring a stable and suitable foundation.
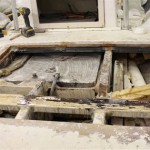
Inspection for Damage and Stability: The first step is a thorough inspection of the existing floorboards. Look for signs of damage such as water stains, warping, rot, or insect infestation. Any damaged boards must be replaced before proceeding. It's also vital to assess the stability of the floorboards. Loose boards should be securely fastened to the joists using screws or nails. Walking across the floor should not produce excessive movement or squeaking. If significant instability is present, additional bracing or reinforcement may be necessary.
Addressing Unevenness: Unevenness in the floorboards is a common issue that can significantly impact the final appearance and performance of the laminate floor. Minor undulations can often be addressed with a self-leveling compound. This liquid mixture is poured over the floorboards and allowed to spread and harden, creating a smooth and level surface. For more significant variations, sanding the floorboards may be required. Renting a floor sander and using progressively finer grits of sandpaper can effectively smooth out high spots and create a more uniform plane. A straight edge and level should be used frequently to monitor progress and ensure that the desired level of flatness is achieved. It is important to note that the self-leveling compound is only suitable for smaller imperfections and cannot be used to level large drops in height or significantly sloping floors.
Cleaning and Debris Removal: Before laying the underlayment and laminate planks, the floorboards must be thoroughly cleaned. Remove all debris, including dust, dirt, and old adhesive. A vacuum cleaner with a brush attachment is effective for removing loose particles. For more stubborn dirt, mopping with a mild detergent solution may be necessary. Ensure that the floorboards are completely dry before proceeding to the next step. This is crucial to prevent moisture buildup, which can lead to mold growth or warping of the laminate.
Sanding for Adhesion (If Applicable): In some instances, particularly if the existing floorboards have a glossy finish, sanding may be necessary to improve the adhesion of the underlayment or any leveling compounds. Lightly sanding the surface creates a slightly rough texture that promotes bonding. Use a fine-grit sandpaper and avoid excessive sanding, which could damage the floorboards. Vacuum the floor thoroughly after sanding to remove any remaining dust.
Selecting and Installing the Underlayment: A Critical Component
The underlayment plays a crucial role in the overall performance and longevity of the laminate floor. It provides several important functions, including cushioning, sound dampening, and moisture protection. Choosing the right underlayment and installing it correctly are essential for maximizing the benefits.
Types of Underlayment: Various types of underlayment are available, each with its own advantages and disadvantages. Foam underlayment is a common choice due to its affordability and ease of installation. It provides good cushioning and sound dampening. Cork underlayment offers excellent sound insulation and is a more environmentally friendly option. Felt underlayment provides superior cushioning and is often preferred for areas with high foot traffic. Choosing the right type depends on the specific needs and priorities of the project. Consider factors such as budget, noise level, and desired level of comfort.
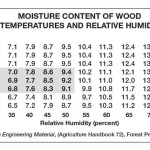
Moisture Barrier: Moisture is a significant threat to laminate flooring. It can cause warping, swelling, and mold growth. Therefore, a moisture barrier is essential, especially when installing laminate over floorboards, which can be susceptible to moisture from below. Some underlayments come with an integrated moisture barrier, while others require a separate layer of polyethylene film. Ensure that the moisture barrier is properly installed, overlapping the seams and taping them securely to prevent moisture from seeping through.
Installation Techniques: The underlayment should be rolled out across the floorboards, ensuring that it is laid flat and smooth. Overlap the seams by a few inches and secure them with tape. Use a utility knife to trim the underlayment around the perimeter of the room, leaving a small gap between the underlayment and the walls. This gap allows for expansion and contraction of the flooring due to temperature and humidity changes. If using a separate moisture barrier, lay it down first, following the same overlapping and taping procedures.
Dealing with Unevenness (Underlayment Adjustment): If minor unevenness remains after preparing the floorboards, a thicker underlayment can help to compensate. However, avoid using excessively thick underlayment, as it can create a spongy feel and potentially compromise the stability of the laminate. Consider using a combination of self-leveling compound and underlayment to achieve a smooth and level surface. A professional consultation can help determine the best approach for addressing specific unevenness challenges.
Laying the Laminate Flooring: Precision and Attention to Detail
Once the subfloor and underlayment are properly prepared, the actual laying of the laminate flooring can begin. This process requires careful planning, precise cutting, and attention to detail to achieve a professional-looking result.
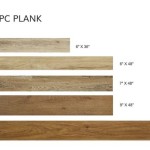
Planning and Layout: Before starting, carefully plan the layout of the laminate planks. Determine the direction in which the planks will run, typically parallel to the longest wall in the room. Consider the placement of seams and try to stagger them to avoid creating long, continuous lines. This creates a more visually appealing and structurally sound floor. Measure the room accurately and calculate the number of planks needed. Add an extra 10% to account for waste due to cuts and errors.
Cutting and Fitting: Laminate planks typically have a tongue-and-groove system that allows them to be easily joined together. Use a saw (circular saw or miter saw preferred) to cut the planks to the desired length. Ensure clean, straight cuts to create tight seams. When fitting the planks, leave a small expansion gap (typically ¼ inch to ⅜ inch) between the flooring and the walls. This gap allows for expansion and contraction of the flooring due to temperature and humidity changes. Use spacers to maintain a consistent gap. For intricate cuts around doorways or pipes, use a jigsaw or coping saw to achieve precise shapes.
Click-Lock Installation: Most laminate flooring uses a click-lock system for easy installation. Angle the plank slightly and insert the tongue into the groove of the adjacent plank. Gently press down until the planks click together securely. Use a tapping block and hammer to gently tap the planks together if necessary. Avoid excessive force, which could damage the planks or the click-lock mechanism. Work systematically across the room, row by row, ensuring that the planks are properly aligned and securely joined.
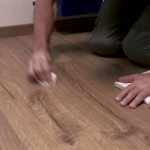
Finishing Touches: After the laminate flooring is installed, remove the spacers and install baseboards or quarter-round molding around the perimeter of the room. This covers the expansion gap and provides a finished look. Install transition strips between different flooring types or in doorways to create a smooth and seamless transition. Clean the floor thoroughly to remove any dust or debris. Inspect the floor for any imperfections and address them promptly. A well-laid laminate floor can enhance the beauty and value of any home, providing years of durable and attractive service.

Laying New Wood Flooring Over Original Uneven Floorboards Le Arthur Wells

A Guide To Fitting Wood And Laminate Flooring Expert Advice Floorsave

Can I Lay Laminate Flooring Over Floorboards The Guys

Can I Lay Sheet Vinyl Over Floor Boards

How To Install Vinyl Flooring Over Hardwood Floors Wood Floor Fitting

Laying Solid Wood Flooring Onto Existing Floorboards And Beyond Blog

How To Install Laminate Flooring For Beginners

Guide To Lay Vinyl Flooring Over Floorboards

Common Mistakes When Laying Laminate Flooring Next Day Floors

Laying New Wood Flooring Over Original Uneven Floorboards Le Arthur Wells
Related Posts