Which Direction To Lay Laminate Flooring On Floorboards?
Laying laminate flooring over existing floorboards is a common home improvement project. A key consideration during installation is the direction in which the laminate planks are oriented. The optimal direction can impact the aesthetic appeal, structural integrity, and perceived size of the room. Several factors influence the decision, including the subfloor's condition, the room's dimensions, light source, and desired visual effect.
Prior to installation, it is crucial to properly prepare the subfloor. This involves ensuring the existing floorboards are level, clean, and free from any protruding nails or screws. Any imperfections in the subfloor will translate to the laminate flooring, potentially leading to uneven surfaces, squeaking, and premature wear. A self-leveling compound may be necessary to correct any significant height variations. Furthermore, a moisture barrier should be installed between the existing floorboards and the laminate flooring to prevent moisture damage, which can cause warping and buckling.
Understanding the Influence of Floorboard Direction
The direction of the underlying floorboards is paramount when installing laminate. Generally, it is recommended to install laminate flooring perpendicular to the existing floorboards. This helps distribute weight evenly across the subfloor and minimizes the risk of the laminate following any inconsistencies or movement in the original floorboards. Installing laminate in the same direction as the floorboards can create a “floating floor” effect, where the laminate is more prone to flexing and potential damage.
Installing laminate perpendicular to the underlying floorboards creates a more structurally sound and stable floor. This method prevents the laminate from directly aligning with the seams and potentially weak points of the subfloor. By crossing the grain direction, the load is distributed more effectively, enhancing the durability and longevity of the laminate flooring.
However, there are exceptions to this rule. If the existing floorboards are exceptionally stable and well-secured, and the subfloor is perfectly level, installing the laminate in the same direction may be considered. However, this approach carries a higher risk and requires careful assessment of the subfloor's condition and stability before proceeding.
Considering Room Dimensions and Light Source
Beyond the subfloor's orientation, the dimensions and incoming light also play a vital role in determining the optimal direction for laminate installation. Running the laminate planks lengthwise in the room, parallel to the longest wall, often creates a sense of spaciousness and visually lengthens the room. This technique is particularly effective in narrow or rectangular rooms, helping to mitigate the feeling of confinement.
Conversely, installing laminate across the width of the room can make a longer room appear wider. This approach can be beneficial in square or irregularly shaped rooms where emphasizing length is not desired. Experimenting with different layouts visually can help determine which orientation achieves the preferred aesthetic.
The natural light source significantly influences the appearance of the laminate flooring. Installing the planks with the long edges running towards the primary light source can reduce the visibility of seams and create a cleaner, more uniform look. This approach minimizes shadows and highlights the natural grain patterns in the laminate, enhancing its aesthetic appeal. If the light source is inconsistent or comes from multiple directions, considering the room's overall dimensions and desired visual effect becomes even more critical.
Careful consideration should be given to how the light will interact with the flooring at different times of day. Observing how the light falls across the room can reveal subtle imperfections in the subfloor and help determine the best direction to minimize their visibility. Sample planks can be laid out in different orientations to assess the impact of the light source on the overall appearance.
Installation Techniques and Additional Considerations
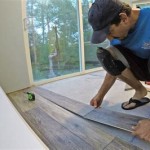
Proper installation techniques are crucial for achieving a professional-looking and long-lasting laminate floor. After determining the optimal direction, accurate measurements and careful planning are essential. Start by laying out a dry run of the planks to ensure a proper fit and identify any potential challenges. Use spacers along the walls to maintain a consistent expansion gap, allowing for natural movement of the laminate due to temperature and humidity fluctuations. This expansion gap is critical to prevent buckling and warping.
When cutting the laminate planks, use a sharp saw and appropriate safety equipment. Avoid forcing the planks together during installation, as this can damage the locking mechanisms and result in uneven seams. Tapping blocks and a rubber mallet can be used to gently secure the planks without causing damage. Pay close attention to the manufacturer's instructions, as specific recommendations may vary depending on the type of laminate.
The choice of underlayment also plays a significant role in the performance of the laminate floor. A high-quality underlayment provides additional cushioning, reduces noise transmission, and helps to even out minor imperfections in the subfloor. Choose an underlayment that is specifically designed for laminate flooring and meets the manufacturer's recommendations.
The color and style of the laminate can also influence the perceived size and appearance of the room. Lighter colors tend to make a room feel larger and brighter, while darker colors can create a more intimate and cozy atmosphere. Consider the overall design aesthetic of the room when selecting the laminate flooring to ensure a cohesive and harmonious look.
Doorways and transitions between rooms require careful attention. Use transition strips to create a smooth and seamless connection between different flooring types. These strips also protect the edges of the laminate and prevent tripping hazards. Ensure that the transition strips are properly installed and securely fastened to the subfloor.
Finally, regular maintenance is essential to prolong the life of the laminate floor. Sweep or vacuum the floor regularly to remove dirt and debris. Use a damp mop with a laminate-specific cleaner to clean the floor, avoiding excessive water that can seep into the seams and cause damage. Avoid using abrasive cleaners or scouring pads, as these can scratch the surface of the laminate.
When dealing with complex room layouts or challenging subfloor conditions, consulting with a professional flooring installer is recommended. A professional can assess the specific requirements of the project and provide expert guidance on the optimal installation techniques and materials.

Determining The Direction To Lay Install Hardwood Laminate Or Luxury Vinyl Plank Flooring

How To Install Laminate Flooring For Beginners

Direction To Lay Laminate Floor Help R Flooring

Flooring Direction Which Way Is Best Garrison Collection

Installing Laminate Flooring Floor Installation By Findanyfloor Com

Which Direction To Lay Your Hardwood Flooring Riterug

Installing Laminate Flooring In Hallways Do It Yourself

Which Direction Should The Floor Be Laid Real Wood Floors

Common Mistakes To Avoid When Installing Laminate Floors

Choosing Which Direction To Lay Vinyl Plank Flooring Install Today Reallyfloors America S Est Hardwood
Related Posts