Laying Hardwood Flooring: Alternative Installation Methods
Hardwood flooring provides a timeless aesthetic and durable surface for residential and commercial spaces. While tongue and groove systems are the most prevalent installation methods, certain circumstances necessitate exploring alternative approaches. This article outlines methods for installing hardwood flooring when dealing with boards that lack a tongue and groove, focusing on appropriate materials, techniques, and considerations for a successful and lasting installation.
The absence of a tongue and groove system changes the dynamics of installation. Traditionally, these interlocking features create a secure and aligned surface by mechanically connecting each board. Without this interlocking mechanism, the adhesive becomes the primary binding agent, requiring careful product selection and meticulous application.
Several scenarios may lead to choosing a method other than tongue and groove. Reclaimed wood, for example, often lacks a standardized milling process, resulting in boards with inconsistent dimensions or missing tongue and groove features. Similarly, custom-milled hardwood or situations where boards have been damaged may necessitate an alternative approach. Furthermore, certain artistic or design choices might require a different layout, making tongue and groove impractical.
Subfloor Preparation is Paramount
Regardless of the installation method, proper subfloor preparation is critical for achieving a level, stable, and long-lasting hardwood floor. The subfloor serves as the foundation upon which the hardwood boards are installed. Any imperfections or instabilities in the subfloor will invariably translate to problems in the finished floor, such as unevenness, squeaking, and potential adhesive failure.
Begin by thoroughly inspecting the subfloor for any signs of damage, such as water stains, rot, or insect infestation. Address any structural issues before proceeding with the installation. This may involve repairing or replacing damaged sections of the subfloor.
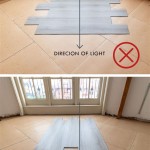
Next, ensure the subfloor is level. Use a long level or straight edge to identify any high or low spots. Minor imperfections can be addressed with self-leveling compound, while more significant variations may require sanding or shimming. When employing self-leveling compound, follow the manufacturer's instructions carefully to ensure proper mixing and application.
Cleanliness is another crucial aspect of subfloor preparation. Remove any debris, dust, paint splatters, or adhesive residue from the subfloor surface. A thorough vacuuming, followed by wiping with a damp cloth, will help ensure a clean and receptive surface for the adhesive. For stubborn residue, consider using a scraper or solvent-based cleaner, taking appropriate safety precautions.
Finally, assess the moisture content of both the subfloor and the hardwood flooring. Excessive moisture can lead to expansion, contraction, and warping of the wood, resulting in floor failure. Use a moisture meter to measure the moisture content of both materials. Ideally, the moisture content of the hardwood flooring and the subfloor should be within a similar range. Acclimatize the hardwood flooring to the environment for several days before installation to allow it to adjust to the ambient humidity.
Direct Glue-Down Method
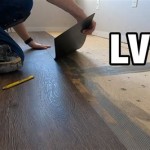
The direct glue-down method is a common approach for installing hardwood flooring without a tongue and groove. This method involves applying adhesive directly to the subfloor and then pressing the hardwood boards into the adhesive. The strength and longevity of the installation depend heavily on the quality of the adhesive and the thoroughness of the application.
Select a premium-grade wood flooring adhesive specifically designed for the type of wood and subfloor being used. Different adhesives have different properties, such as open time, cure time, and moisture resistance. Consult with an adhesive manufacturer or flooring specialist to determine the most suitable adhesive for the project.
Apply the adhesive evenly to the subfloor using a notched trowel. The size and shape of the notches on the trowel will determine the thickness of the adhesive layer. Follow the adhesive manufacturer's recommendations for the appropriate trowel size. Work in manageable sections to prevent the adhesive from drying out before the hardwood boards are installed.
Carefully position each hardwood board onto the adhesive, ensuring proper alignment and spacing. Use spacers along the walls to maintain a consistent expansion gap. Press the boards firmly into the adhesive to ensure good contact. A rolling pin or a heavy-duty flooring roller can be used to further improve adhesion and remove any air pockets.
After the adhesive has cured, remove the spacers and install baseboards or other trim to cover the expansion gap. Clean any excess adhesive from the surface of the hardwood flooring. Allow the adhesive to fully cure before subjecting the floor to heavy traffic.
The Importance of a Leveling Compound
When laying hardwood directly onto concrete subfloors, the presence of a level surface is often a challenge. Concrete, due to its nature, can have undulations and discrepancies. These imperfections can lead to uneven flooring, where the absence of a tongue and groove system exacerbates the potential for instability. A leveling compound becomes an essential component of a successful, direct-adhered hardwood installation in such situations.
A self-leveling compound is a cementitious mixture designed to be poured onto a subfloor, where it will flow and settle to create a perfectly smooth and level surface. It is crucial to select a leveling compound suitable for use with hardwood flooring adhesives and the existing concrete subfloor. Some compounds are specifically formulated for wood flooring applications, offering enhanced adhesion and flexibility.
Before applying the leveling compound, the concrete subfloor must be properly prepared. This includes cleaning the surface to remove all dirt, dust, oil, and other contaminants. Any cracks or holes in the concrete should be repaired with a concrete patch. Furthermore, a primer may be necessary to improve the adhesion of the leveling compound to the concrete.
The leveling compound is mixed with water according to the manufacturer's instructions. The consistency of the mixture is critical; it should be fluid enough to flow easily but also thick enough to maintain its level. Once mixed, the compound is poured onto the subfloor and spread evenly using a gauge rake or trowel. Special attention should be paid to filling any low spots or depressions.
The self-leveling compound will then flow and settle to create a perfectly level surface. The drying time will vary depending on the product and environmental conditions. Once the compound is completely dry, the surface can be lightly sanded to remove any minor imperfections and prepare it for the hardwood flooring adhesive. A properly leveled subfloor will ensure even adhesive coverage and a stable, long-lasting hardwood floor.
Mechanical Fastening with Biscuits or Dowels
In certain scenarios, such as when dealing with thicker hardwood planks or when additional stability is desired, mechanical fastening methods can be incorporated alongside adhesive. This involves using biscuits or dowels to create a physical connection between adjacent boards, supplementing the bonding strength of the adhesive.
Biscuit joinery involves cutting crescent-shaped slots into the edges of the hardwood boards using a biscuit joiner. These slots are then filled with glue and a compressed wood biscuit is inserted, expanding as it absorbs the glue and creating a tight bond. Biscuit joinery provides lateral alignment and helps to prevent the boards from shifting or cupping.
Dowels are cylindrical pieces of wood that are inserted into pre-drilled holes in the edges of the hardwood boards. Dowel joinery provides both lateral and vertical alignment, making it a stronger fastening method than biscuit joinery. However, dowel joinery requires more precise drilling and alignment to ensure a proper fit.
When using biscuits or dowels, it is essential to use a high-quality wood glue that is compatible with the hardwood and adhesive being used. Apply glue liberally to the slots or holes and to the surfaces of the biscuits or dowels before inserting them. Clamp the boards together until the glue has fully cured.
The spacing and placement of the biscuits or dowels will depend on the thickness and width of the hardwood boards. Generally, a biscuit or dowel should be placed every 12 to 18 inches along the edges of the boards. Stagger the placement of the biscuits or dowels on adjacent rows to avoid creating a weak point in the flooring.

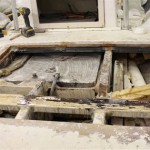
Laying Hardwood Flooring On Second Story With No Subfloor

Laying Hardwood Flooring On Second Story With No Subfloor

How To Install Beautiful Wood Floors Using Basic Unfinished Lumber The Creek Line House

How To Remove Tongue And Groove Flooring Without Causing Any Damage

Installation Methods For Wooden Floor Craftedforlife

How To Install Hardwood Flooring The Home Depot

How To Install Hardwood Flooring Step By Forbes Home

Laying Hardwood Flooring On Second Story With No Subfloor

How To Remove A Single Piece Of Hardwood Flooring The Art Doing Stuff

How To Install Beautiful Wood Floors Using Basic Unfinished Lumber The Creek Line House
Related Posts