How To Install Laminate Flooring Under a Toilet
Installing laminate flooring can significantly enhance the aesthetic appeal and practicality of a bathroom. However, one of the trickiest aspects of this project is dealing with the toilet. Unlike furniture that can be easily moved, a toilet is permanently plumbed to the water and drain lines, presenting a unique challenge when laying flooring underneath it. This article provides a comprehensive guide on how to properly install laminate flooring around a toilet, ensuring a professional and watertight finish.
There are two primary methods for handling this situation: one involves removing the toilet entirely, laying the flooring, and then reinstalling the toilet; the other involves carefully cutting the laminate flooring to fit snugly around the base of the toilet. The choice between these methods depends on the installer's comfort level with plumbing, the condition of the existing toilet and its wax ring, and the desired aesthetic outcome.
Regardless of the chosen method, meticulous preparation and precise execution are crucial to prevent leaks, ensure a secure floor, and maintain the integrity of the laminate flooring itself. Improper installation can lead to water damage, mold growth, and costly repairs in the future.
Removing and Reinstalling the Toilet
The most recommended and generally more professional approach is to remove the toilet entirely before laying the laminate flooring. This allows for a seamless flooring installation and eliminates the need for intricate cuts around the toilet's base. However, this method requires some basic plumbing knowledge and a cautious approach.
Step 1: Preparation and Safety. Begin by gathering the necessary tools and materials. This includes: a wrench or adjustable pliers, a putty knife, a new wax ring, shims (if needed), a sponge or towels, a bucket, and safety glasses. Turn off the water supply to the toilet at the shut-off valve located on the wall behind the toilet. Flush the toilet to empty the tank and bowl as much as possible. Use a sponge to remove any remaining water from the bowl and tank. Place the sponge into the bucket.
Step 2: Disconnecting the Toilet. Disconnect the water supply line from the fill valve at the base of the toilet tank. Have a bucket handy to catch any residual water. Carefully loosen and remove the bolts that secure the toilet to the floor. These bolts are typically covered with decorative caps. Use a putty knife to gently scrape away any caulk around the base of the toilet. This will help to loosen the toilet and prevent damage when lifting it.
Step 3: Removing the Toilet. With the bolts removed and the caulk scraped away, carefully rock the toilet back and forth to break the seal of the wax ring. Lift the toilet straight up and away from the flange. Be cautious as the toilet can be heavy and awkward to handle. Place the toilet on its side on a protected surface (such as a drop cloth or old towels) to prevent damage to the toilet or the surrounding area.
Step 4: Preparing the Flange. Once the toilet is removed, inspect the toilet flange (the circular fitting that connects the toilet to the drainpipe). Remove the old wax ring from the flange using a putty knife or scraper. Clean the flange thoroughly to remove any debris and ensure a clean surface for the new wax ring. Check the flange for any cracks or damage. If the flange is damaged, it may need to be repaired or replaced before proceeding.
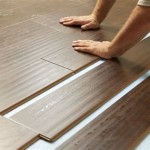
Step 5: Installing the Laminate Flooring. With the toilet removed and the flange prepared, you can now install the laminate flooring as normal. Ensure the flooring is properly measured, cut, and installed up to the flange. Leave a small expansion gap around the flange to allow for the natural expansion and contraction of the flooring. Use a hole saw or jigsaw to neatly cut around the flange opening if necessary.
Step 6: Reinstalling the Toilet. After the flooring is installed, it's time to reinstall the toilet. Place a new wax ring onto the flange, ensuring it is properly seated. Carefully lift the toilet and align it with the bolt holes in the flange. Gently lower the toilet onto the flange, pressing down firmly to create a good seal with the wax ring. Reinstall the bolts and tighten them evenly, alternating between each bolt to ensure the toilet is level. Do not overtighten the bolts, as this can crack the porcelain.
Step 7: Reconnecting the Water Supply. Reconnect the water supply line to the fill valve on the toilet tank. Turn the water supply back on slowly and check for leaks at the connections. Flush the toilet several times to ensure it is functioning properly.
Step 8: Caulking the Base (Optional). If desired, you can apply a bead of caulk around the base of the toilet where it meets the laminate flooring. This will help to prevent water from seeping underneath the toilet and causing damage. Use a mildew-resistant caulk specifically designed for bathrooms. Smooth the caulk with a wet finger or a caulking tool for a clean, professional finish. Consider the aesthetics: some professionals argue against caulking the entire base, preferring to leave a small gap at the back to allow any potential leaks to be noticed quickly.
Cutting the Laminate Around the Toilet
If removing the toilet is not feasible or desirable, the alternative is to carefully cut the laminate flooring to fit around the base of the toilet. This method requires precision and patience to achieve a professional-looking result. It is generally considered more difficult and less likely to result in a perfectly watertight seal compared to removing the toilet.
Step 1: Creating a Template. To accurately cut the laminate flooring, you will need to create a template of the toilet's base. There are several ways to do this. One method involves using cardboard or heavy paper to trace the outline of the toilet's base. Place the cardboard around the base of the toilet and carefully trace the shape onto the cardboard. Another method involves using a profile gauge or contour gauge to capture the shape of the toilet's base. These tools consist of a series of pins that conform to the shape of the object being measured.
Step 2: Transferring the Template. Once you have created a template, transfer it onto the laminate flooring. Place the template on the laminate flooring and trace the outline onto the flooring using a pencil or marker. Be sure to account for the expansion gap when transferring the template. This is typically around ¼ inch.
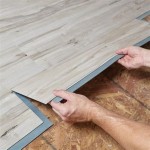
Step 3: Cutting the Laminate. Using a jigsaw or other suitable cutting tool, carefully cut the laminate flooring along the traced lines. It is recommended to cut slightly outside the lines initially and then gradually trim the flooring until it fits snugly around the toilet's base. Take your time and make small, precise cuts to avoid mistakes.
Step 4: Fitting and Adjusting. After cutting the laminate flooring, dry-fit it around the toilet's base to check the fit. If necessary, make adjustments using a sander or file until the flooring fits perfectly. The goal is to achieve a snug fit without putting excessive pressure on the toilet or compromising the expansion gap.
Step 5: Applying Sealant. Once the laminate flooring is properly fitted around the toilet's base, apply a bead of sealant around the perimeter where the flooring meets the toilet. Use a high-quality, mildew-resistant sealant specifically designed for bathrooms. This will help to prevent water from seeping underneath the flooring and causing damage. Smooth the sealant with a wet finger or a caulking tool for a clean, professional finish.
Essential Considerations for Success
Whether you choose to remove the toilet or cut the laminate around it, there are several essential considerations to ensure a successful installation and prevent future problems.
Waterproofing: Waterproofing is paramount in bathroom flooring installations. Laminate flooring, while water-resistant, is not entirely waterproof. Any gaps or seams around the toilet can allow water to penetrate, leading to swelling, warping, and mold growth. Using a high-quality sealant around the base of the toilet and along the edges of the laminate flooring is essential. Consider applying a waterproofing membrane to the subfloor before installing the laminate flooring for added protection. This will create a barrier that prevents water from penetrating the subfloor in case of leaks.
Expansion Gap: Laminate flooring expands and contracts with changes in temperature and humidity. Leaving an appropriate expansion gap around the perimeter of the room and around fixtures like the toilet is crucial to prevent buckling or warping. The expansion gap should typically be around ¼ inch. This gap allows the flooring to move freely without putting pressure on the surrounding walls or fixtures.
Toilet Flange Integrity: The toilet flange is a critical component of the toilet installation. It connects the toilet to the drainpipe and provides a secure base for the toilet. Inspect the flange carefully before reinstalling the toilet. If the flange is cracked, damaged, or corroded, it should be repaired or replaced. A damaged flange can lead to leaks and instability. Consider using a toilet flange extender if the existing flange is too low or damaged. This will raise the flange to the proper height and provide a secure base for the toilet.
Choosing the Right Laminate: Select a laminate flooring specifically designed for bathroom use. These laminates are typically more water-resistant and durable than standard laminates. Look for laminates that have a waterproof core and a wear layer that is resistant to scratches and stains. Avoid using laminates that are not specifically designed for wet areas, as they are more likely to be damaged by moisture.
By carefully following these steps and considering these essential factors, you can successfully install laminate flooring around a toilet, creating a beautiful and functional bathroom space.

How To Cut Flooring Around A Toilet Luxury Vinyl Plank Bathroom Installation Calibamboo

How To Install Vinyl Plank Flooring In A Bathroom Fixthisbuildthat

How To Cut Engineered Wood Laminate Lvt Around Toilets Top Trade Tips

How To Install Vinyl Plank Flooring In A Bathroom Fixthisbuildthat

How To Cut Engineered Wood Laminate Lvt Around Toilets Top Trade Tips

How To Install Vinyl Plank Flooring In A Bathroom Fixthisbuildthat

How To Install Vinyl Plank Flooring In A Bathroom Fixthisbuildthat

How To Install Vinyl Plank Flooring In A Bathroom Fixthisbuildthat

How To Cut Engineered Wood Laminate Lvt Around Toilets Top Trade Tips

How To Lay Laminate Flooring Around A Toilet Builddirect
Related Posts