How To Install Flooring On Stairs: A Comprehensive Guide
Installing flooring on stairs is a significant home improvement project that can dramatically enhance the aesthetic appeal and safety of a residence. This process requires careful planning, precise measurements, and a thorough understanding of the necessary tools and techniques. This article provides a comprehensive guide to installing flooring on stairs, covering everything from preparation to finishing touches, ensuring a professional and long-lasting result.
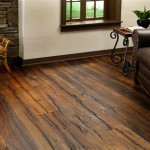
The choice of flooring material for stairs significantly impacts the difficulty of the installation and the final appearance. Common options include solid hardwood, engineered hardwood, laminate, carpet, and vinyl. Solid hardwood offers a classic, durable look but can be more challenging to install due to its rigid nature. Engineered hardwood provides a similar aesthetic with slightly more flexibility and ease of installation. Laminate flooring is a cost-effective and relatively easy-to-install option, while carpet offers comfort and sound absorption. Vinyl is a durable and water-resistant choice, suitable for high-traffic areas and potentially damp environments.
Regardless of the material chosen, proper preparation is paramount for a successful installation. This involves assessing the existing staircase, removing the old flooring, and preparing the subfloor to create a smooth, level surface. Ignoring these preliminary steps can lead to uneven flooring, squeaks, and a compromised installation.
Key Point 1: Preparing the Staircase for Flooring Installation
The first crucial step in installing flooring on stairs is thorough preparation. This involves a detailed assessment of the existing staircase, removal of the old flooring, and meticulous preparation of the subfloor. This stage is essential for ensuring a stable, level, and structurally sound base for the new flooring.
Begin by carefully inspecting the existing staircase. Look for signs of damage such as cracks, loose treads, or uneven surfaces. Address any structural issues before proceeding with the flooring installation. Loose treads should be securely fastened, and damaged areas should be repaired or replaced. Ignoring these issues can lead to problems later on, such as squeaking or uneven flooring.
Next, remove the old flooring material. This may involve prying up carpet, removing adhesive residue, or dismantling old wood flooring. Use appropriate tools such as a pry bar, scraper, and adhesive remover. Take care not to damage the underlying subfloor during this process. Wear safety glasses and gloves to protect yourself from debris and potential hazards.
Once the old flooring is removed, thoroughly clean the subfloor. Remove any remaining debris, dust, and adhesive residue. A clean surface is crucial for proper adhesion of the new flooring. Use a vacuum cleaner and a damp cloth to ensure the subfloor is completely clean and dry.
Inspect the subfloor for any imperfections, such as unevenness, cracks, or holes. Unevenness can be addressed by applying self-leveling compound. Follow the manufacturer's instructions carefully to ensure proper application and curing. Cracks and holes can be filled with wood filler or patching compound. Allow the filler to dry completely before sanding it smooth.
Sanding the subfloor is essential for creating a smooth and level surface. Use a belt sander or orbital sander to remove any remaining imperfections and create a uniform surface. Start with a coarse grit sandpaper and gradually move to a finer grit for a smoother finish. Vacuum the subfloor thoroughly after sanding to remove any dust.
Finally, apply a primer or sealer to the subfloor. This will improve adhesion of the new flooring and protect the subfloor from moisture damage. Choose a primer or sealer that is compatible with the chosen flooring material. Allow the primer or sealer to dry completely before proceeding with the installation.
Key Point 2: Measuring and Cutting Flooring for Stairs
Accurate measurement and precise cutting are paramount for achieving a professional and aesthetically pleasing flooring installation on stairs. Incorrect measurements can lead to gaps, uneven surfaces, and a compromised final result. This section outlines the steps involved in measuring and cutting flooring for stairs, ensuring a precise and efficient installation.
Begin by measuring each individual stair tread and riser. Stair treads are the horizontal surfaces that you step on, while risers are the vertical surfaces between the treads. Use a measuring tape to determine the width and depth of each tread and the height of each riser. Note that stair dimensions may vary slightly from one step to another, so it is important to measure each step individually.
When measuring, it is crucial to account for any overhang or nosing on the treads. Nosing is the rounded edge of the tread that extends slightly beyond the riser. Include the nosing in your measurement to ensure that the flooring covers the entire tread surface. Use a contour gauge to accurately replicate the shape of the nosing for precise cutting.
Once you have the measurements, transfer them to the flooring material. Use a pencil or marker to clearly mark the cutting lines on the flooring. Double-check the measurements to ensure accuracy before cutting. Remember the adage: "Measure twice, cut once."
Choose the appropriate cutting tool based on the type of flooring material. For solid hardwood and engineered hardwood, a miter saw or circular saw with a fine-tooth blade is recommended. For laminate flooring, a miter saw or jigsaw can be used. For carpet, a utility knife or carpet cutter is suitable. For vinyl, a utility knife or scissors can be used.
When cutting the flooring, follow the marked lines carefully. Use a straight edge as a guide to ensure a clean and accurate cut. For hardwood and laminate flooring, consider using a scoring knife to score the surface before cutting to prevent chipping. Wear safety glasses and ear protection when using power tools.
After cutting the flooring, test fit it on the stair tread or riser. Make any necessary adjustments to ensure a perfect fit. If the flooring is slightly too large, use a block plane or sander to trim it down. If the flooring is slightly too small, consider using a filler piece or caulk to fill the gap. Remember that precise cuts reduce the need for such remedies.
For stairs with complex shapes or angles, creating a template can be helpful. Use cardboard or paper to create a template that matches the shape of the stair. Transfer the template to the flooring material and cut accordingly. This technique is particularly useful for winding stairs or stairs with irregular shapes.
Key Point 3: Installing the Flooring Material on the Stairs
The final stage involves securing the flooring material to the prepared staircase. This step requires careful attention to detail, proper use of adhesives and fasteners, and a commitment to maintaining consistent alignment. The method used will depend on the type of flooring material and the specific staircase structure.
Before applying adhesive or fasteners, dry-fit each piece of flooring to ensure a proper fit. This allows for any final adjustments to be made before permanently attaching the flooring. Check for gaps, unevenness, or misalignment. Make necessary corrections before proceeding.
Apply adhesive to the subfloor and the back of the flooring material according to the manufacturer's instructions. Use a notched trowel to spread the adhesive evenly, creating ridges that will enhance adhesion. Choose an adhesive that is specifically designed for the type of flooring material being used.
Position the flooring material carefully on the stair tread or riser. Align it precisely with the edges and corners. Press firmly to ensure good contact with the adhesive. Use a rubber mallet to gently tap the flooring into place. This will help to eliminate air pockets and ensure a strong bond.
For added security, consider using fasteners such as nails or screws. Use a nail gun or screw gun to drive the fasteners through the flooring and into the subfloor. Be careful not to overdrive the fasteners, as this can damage the flooring. Countersink the fasteners slightly and fill the holes with wood filler if necessary.
When installing flooring on the nosing, use a combination of adhesive and fasteners. Apply adhesive to the nosing and the back of the flooring material. Wrap the flooring around the nosing and secure it with fasteners. Use a miter saw to cut the flooring at an angle to create a clean and professional finish.
As you install each piece of flooring, use a level to ensure that it is perfectly horizontal or vertical. Minor adjustments can be made by adding shims or adjusting the adhesive thickness. Consistent leveling is crucial for creating a uniform and visually appealing staircase.
After installing the flooring on each stair tread and riser, clean up any excess adhesive or debris. Use a damp cloth to wipe away any adhesive residue. Vacuum the staircase thoroughly to remove any dust or debris. Allow the adhesive to cure completely before walking on the stairs.
Installing stair treads and risers requires a systematic approach. Typically, risers are installed first, followed by the treads. This order ensures that the tread covers the top edge of the riser, creating a clean and finished look. Use construction adhesive and finishing nails to secure each piece.
For laminate or vinyl flooring installations, consider using stair nose moldings. These moldings provide a finished edge for the treads and protect the flooring from wear and tear. Install the stair nose moldings according to the manufacturer's instructions, using adhesive and fasteners.
Once the flooring installation is complete, inspect the staircase carefully for any imperfections. Fill any gaps or cracks with caulk or wood filler. Touch up any scratches or blemishes with stain or paint. Apply a protective finish to the flooring to enhance its durability and appearance.

How To Install Laminate Flooring On Staircase Step By Guide

How To Install Laminate On Stairs Follow Our Essential Guide Laying And Costing For

How To Install Laminate Flooring On Stairs Direct Wood

How To Install Vinyl Plank Flooring On Stairs In 6 Steps Inc

How To Install Laminate Flooring On Stairs 13 Steps

Value Carpets Flooring Installing Laminate On Stairs

How To Install Laminate Flooring On Stairs Direct Wood

Laminate On Stairs With Bad Installation

Laminate Stairs Installation How To Install Stair Tread Riser Overlap Nose Tips Mryoucandoityourself

Stairs With Laminate Wonder What Is The Cost To Install
Related Posts