Lifeproof Vinyl Plank Flooring Transition Strips: A Guide to Seamless Floor Transformations
Lifeproof vinyl plank flooring has become a popular choice for homeowners due to its durability, water resistance, and stylish aesthetics. However, when installing Lifeproof flooring in multiple rooms or areas with different floor coverings, transitions between different floor types can be a challenge. Fortunately, Lifeproof offers a range of transition strips specifically designed for seamless integration with their vinyl plank flooring, ensuring a visually appealing and functional finish.
Understanding the Different Transition Strips
Lifeproof offers a variety of transition strips to accommodate different floor types and installation needs. These strips serve multiple functions, including:
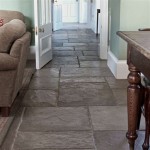
- Seamless Transitions: Creating a smooth transition between different floor coverings, such as Lifeproof vinyl plank flooring and carpet, tile, or hardwood.
- Floor Leveling: Addressing slight differences in floor heights between different areas, ensuring a smooth and even flow.
- Edge Protection: Protecting the edges of the Lifeproof vinyl plank flooring from wear and tear, especially in high-traffic areas.
- Aesthetics: Enhancing the overall appearance of the flooring installation with stylish and complementary designs.
The most common types of transition strips offered by Lifeproof include:
- T-Molding: Used to create a seamless transition between Lifeproof vinyl plank flooring and other floor coverings. It is typically installed along the edge of the Lifeproof flooring, with the "T" shape covering the exposed edge.
- Reducer Molding: This type is used to transition between flooring at different levels, such as from Lifeproof vinyl plank flooring to a lower level of carpet. The reducer molding slopes down gradually to compensate for the height difference.
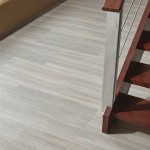
- Stair Nosing: This molding is specifically designed for stair applications, protecting the edges of the Lifeproof vinyl plank flooring on stairs and providing a safe and visually appealing transition from the riser to the tread.
- Quarter Round: A simple and elegant option for creating a smooth transition between flooring at the same level. It provides a rounded edge, covering the exposed edge of the Lifeproof vinyl plank flooring.
Choosing the Right Transition Strips
Selecting the appropriate transition strips for your Lifeproof vinyl plank flooring installation depends on several factors, including:
- Floor Types: Determine the different floor coverings that you will be transitioning between. For example, you will need a different type of transition strip for connecting Lifeproof vinyl plank flooring to carpet than for connecting it to tile.
- Floor Level Differences: If there are significant height differences between the flooring types, a reducer molding or stair nosing will be required. For minimal height differences, a T-molding or quarter round may suffice.
- Aesthetics: Consider the overall design and style of your home. Lifeproof offers a variety of transition strip colors and finishes to complement your flooring and décor.
- Traffic Levels: High-traffic areas might require more durable transition strips, such as those made from metal or a more robust material.
Installation Tips for Seamless Transitions
Installing transition strips requires some precision and attention to detail to ensure a seamless and professional finish.
- Accurate Measurements: Carefully measure the length and width of the area where you will be installing the transition strips. Ensure you have enough material and that it is cut to the correct dimensions.
- Proper Preparation: Before installation, ensure the subfloor is clean, level, and free of debris. Prepare the edges of the flooring where the transition strip will be installed. Apply a bead of adhesive to the back of the transition strip, ensuring it is evenly distributed.
- Secure Installation: Carefully position the transition strip and press it firmly against the flooring. Use a hammer and a block of wood to tap the transition strip into place, ensuring it is securely attached and level.
- Finishing Touches: After installation, you may need to trim any excess transition strip material. Use a fine-tooth saw to make precise cuts. Fill any gaps or seams with a matching caulk or sealant to ensure a smooth and watertight finish.
By considering these factors and following the installation instructions provided by Lifeproof, you can create seamless and stylish transitions between different floor coverings, adding value and enhancing the overall aesthetics of your home.

So You Re Thinking Of Installing Lifeproof Flooring Just Call Me Homegirl

Lifeproof Luxury Vinyl Plank Flooring Just Call Me Homegirl

So You Re Thinking Of Installing Lifeproof Flooring Just Call Me Homegirl

How To Install Vinyl Flooring Transition Strip Lvp Moulding

Lifeproof Luxury Vinyl Plank Flooring Just Call Me Homegirl

So You Re Thinking Of Installing Lifeproof Flooring Just Call Me Homegirl

Uncover How To Use Luxury Vinyl Plank Transition Strips

Flooring Transition Strips Moldings Trims Onflooring

Installing Vinyl Plank Flooring Lifeproof Waterproof Rigid Core Sustain My Craft Habit

Art3d Gray 1 57 In X 120 Self Adhesive Vinyl Transition Strip For Joining Floor Gaps Tiles A179hd52 The Home Depot
Related Posts