How To Install Shaw Vinyl Plank Flooring On Stairs
Installing vinyl plank flooring on stairs can significantly enhance the aesthetic appeal and durability of this high-traffic area. Shaw vinyl plank flooring, known for its quality and resilience, offers a practical and attractive solution for staircases. This article provides a step-by-step guide on how to successfully install Shaw vinyl plank flooring on stairs, covering essential preparation, measurement techniques, cutting methods, adhesive application, and finishing touches.
Before commencing the installation process, meticulous preparation is paramount. Accurate measurements and precise cutting are crucial for achieving a professional and long-lasting result. Selecting the appropriate tools and materials, understanding the specific characteristics of Shaw vinyl plank flooring, and adhering to the manufacturer's guidelines are all essential components of a successful installation.
The process, while manageable for experienced DIY enthusiasts, requires patience and attention to detail. Rushing through any step can compromise the final outcome, leading to potential durability or aesthetic issues. Prioritizing accuracy and taking the necessary time to complete each stage correctly will ensure a visually appealing and structurally sound staircase.
Preparing the Staircase for Vinyl Plank Installation
The initial stage involves preparing the existing staircase surface. This step is critical for ensuring proper adhesion and a level surface for the vinyl planks. Start by thoroughly cleaning the stairs, removing any dirt, dust, debris, paint chips, or remnants of old flooring materials. A vacuum cleaner with a brush attachment is effective for removing loose particles, followed by a damp cloth or mop to eliminate any remaining residue. Allow the stairs to dry completely before proceeding.
Inspect each stair tread and riser for any imperfections, such as cracks, unevenness, or loose boards. Address any structural issues promptly. Loose boards should be securely re-nailed or screwed into place. Cracks can be filled with wood filler or patching compound, ensuring a smooth and even surface. If the stair surface is significantly uneven, consider applying a self-leveling compound to create a uniform base for the vinyl planks. Allow the patching compound or self-leveling compound to dry and cure completely according to the manufacturer's instructions before proceeding further.
If the stairs are carpeted, the carpet and any underlying padding must be completely removed. Use a utility knife to cut the carpet along the edges of the treads and risers. Carefully peel back the carpet, using pliers to remove any staples or tacks securing it to the wood. After removing the carpet, inspect the exposed wood surface for any remaining adhesive residue. Remove any adhesive residue using a scraper or adhesive remover, ensuring a clean and smooth surface.
Once the stairs are clean, level, and free of debris, consider applying a primer to the surface. A primer enhances the adhesion of the adhesive and helps to prevent moisture from penetrating the wood. Choose a primer that is compatible with both the wood substrate and the specific adhesive recommended for Shaw vinyl plank flooring. Apply the primer evenly, following the manufacturer's instructions, and allow it to dry completely before moving on to the next step.
Measuring and Cutting the Vinyl Planks
Accurate measurements are essential for achieving a professional-looking installation. Begin by measuring the width and depth of each stair tread. Since stairs may not be perfectly uniform, measure each tread individually to ensure a precise fit. Note the largest width and depth measurements for each tread, as these will be the dimensions used for cutting the vinyl planks.
Next, measure the height of each stair riser. Again, measure each riser individually, as slight variations in height may exist. Record the measurement for each riser. It is often a good practice to add a small amount of extra material (approximately ¼ inch) to each measurement. This allows for slight adjustments during installation and ensures that the vinyl planks completely cover the tread and riser.
Once the measurements are recorded, transfer them to the vinyl planks. Use a measuring tape, a straight edge, and a pencil to mark the cutting lines on the planks. For straight cuts, a utility knife with a sharp blade is typically sufficient. Score the surface of the vinyl plank along the marked line, then snap the plank along the score. For more intricate cuts or curves, a jigsaw or a miter saw may be necessary. Use appropriate safety glasses when using power tools.
The nosing, which is the rounded edge of the stair tread, requires special attention. Shaw offers specific stair nose profiles designed to complement their vinyl plank flooring. Select a stair nose profile that matches the color and style of the chosen vinyl planks. Measure the width of the stair tread nosing and cut the stair nose profile to the appropriate length using a miter saw. Bevel cuts may be necessary to accommodate angled staircases.
After cutting each piece, dry-fit it onto the corresponding stair tread or riser. This allows for a visual inspection of the fit and provides an opportunity to make any necessary adjustments before applying the adhesive. Make sure the vinyl plank sits flush against the adjacent surfaces and that the edges are aligned correctly. If any adjustments are needed, use a utility knife or sander to trim the vinyl plank. This practice ensures all cut pieces accurately fit and minimizes waste material.
Adhering the Vinyl Planks and Finishing the Installation
With the vinyl planks cut and dry-fitted, the next step involves applying the adhesive. Select an adhesive specifically designed for vinyl plank flooring and approved by Shaw for use on stairs. Carefully read and follow the manufacturer's instructions regarding application method, drying time, and safety precautions.
Typically, the adhesive is applied to the stair tread or riser using a notched trowel. The notched trowel creates ridges in the adhesive, which provide a better bond between the vinyl plank and the substrate. Apply the adhesive evenly, ensuring that the entire surface is covered. Avoid applying too much adhesive, as this can cause the vinyl plank to slide or shift during installation. Work in small sections to prevent the adhesive from drying out before the vinyl plank is installed.
Carefully position the vinyl plank onto the adhesive-covered surface, aligning it with the edges of the stair tread or riser. Press the vinyl plank firmly into the adhesive, ensuring full contact between the plank and the surface. Use a hand roller to roll over the entire surface of the vinyl plank, applying even pressure to ensure a strong bond. Wipe away any excess adhesive that squeezes out from under the edges of the plank with a damp cloth. Repeat this process for each stair tread and riser.
Install the stair nose profile after the vinyl planks have been adhered to the treads. Apply adhesive to the underside of the stair nose profile and carefully position it along the edge of the stair tread, ensuring that it aligns properly with the vinyl plank. Press the stair nose profile firmly into the adhesive and hold it in place until the adhesive has set. Some stair nose profiles may also require additional fasteners, such as nails or screws, to secure them in place. Refer to the manufacturer's instructions for specific installation recommendations.
Once all the vinyl planks and stair nose profiles are installed, allow the adhesive to cure completely according to the manufacturer's instructions. Avoid walking on the stairs during the curing process to prevent any shifting or lifting of the vinyl planks. After the adhesive has cured, inspect the installation for any gaps or imperfections. If necessary, apply a bead of caulk along the edges of the vinyl planks to seal any gaps and prevent moisture from penetrating the installation.
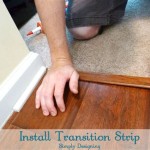
Finally, clean the installed vinyl plank flooring with a damp cloth and a mild detergent. Avoid using harsh chemicals or abrasive cleaners, as these can damage the surface of the vinyl planks. Sweep or vacuum the stairs regularly to remove any dirt or debris. With proper care and maintenance, Shaw vinyl plank flooring can provide years of durable and attractive performance on stairs. Consider installing transition pieces where the vinyl plank flooring meets other flooring types to provide a seamless and professional finish.

How To Install Vinyl Plank Flooring On Stairs In 6 Steps Inc

How To Install Vinyl Plank Flooring On Stairs In 6 Steps Inc

How To Install Vinyl Plank Flooring On Stairs

How To Install Vinyl Plank Flooring On Stairs In 6 Steps Inc

Vinyl Flooring On Stairs Complete Guide

How To Install Vinyl Plank Flooring On Stairs

How To Install Vinyl Plank Flooring On Stairs In 6 Steps Inc Installing

Innovations Luxury Vinyl Stair Tread Shaw Builder Flooring

Look And Feel Of Resilient Vinyl Shaw Floors

Revamp Renew The Look Of Your Staircase With Luxury Vinyl
Related Posts