How To Lay Laminate Flooring From Hallway To Living Room
Laminate flooring offers a cost-effective and durable alternative to hardwood and other types of flooring. Its ease of installation makes it a popular choice for DIY enthusiasts. Laying laminate flooring seamlessly from a hallway into a living room can enhance the aesthetic appeal and create a more unified and spacious feel within the home. This article provides a step-by-step guide on how to accomplish this, ensuring a professional-looking finish.
Prior to commencing any installation, meticulous planning and preparation are crucial. This stage significantly impacts the outcome and longevity of the flooring. Incorrect preparation can lead to issues such as uneven surfaces, squeaking, and premature wear and tear. A thorough understanding of the process and adherence to best practices are essential for a successful project.
Key Point 1: Preparation is Paramount
The success of any flooring project hinges on adequate preparation. This includes acclimating the laminate flooring, preparing the subfloor, and gathering the necessary tools and materials. Neglecting these steps can result in a compromised finished product.
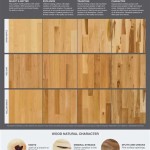
Acclimatizing the Laminate Flooring: Laminate flooring needs to acclimatize to the environment in which it will be installed. This process allows the boards to expand or contract based on the room's temperature and humidity levels. This is essential to prevent warping or buckling after installation. Store the boxes of laminate flooring horizontally in the room(s) where they will be laid for at least 48 to 72 hours prior to installation. The ideal temperature range is between 60°F and 75°F (16°C and 24°C), with relative humidity between 30% and 60%. Avoid stacking the boxes directly against walls or in direct sunlight.
Preparing the Subfloor: The subfloor is the foundation upon which the laminate flooring will rest. It must be clean, level, and dry. Any imperfections in the subfloor will telegraph through the laminate, resulting in an uneven surface. Start by thoroughly sweeping or vacuuming the entire area to remove all dust, debris, and loose particles. Inspect the subfloor for any signs of damage, such as cracks, holes, or water stains. Repair any cracks or holes with a suitable patching compound. Use a self-leveling compound to correct any unevenness exceeding 3/16 inch (approximately 5mm) over a 10-foot span. Ensure the compound is fully cured before proceeding with the underlayment installation.
If laying laminate over a concrete subfloor, test the moisture levels. Excessive moisture can damage the laminate over time. Use a moisture meter to check the moisture content of the concrete. If the moisture level is too high, consider using a moisture barrier underlayment.
Gathering Tools and Materials: Having all the necessary tools and materials readily available will streamline the installation process and prevent delays. Essential tools include: a measuring tape, a pencil, a utility knife, a tapping block, a pull bar, spacers, a circular saw or laminate cutter, a hammer, and safety glasses. In addition to the laminate flooring itself, you will also need underlayment, baseboards or quarter-round molding, and transitions for doorways or where the laminate meets other flooring types.
The choice of underlayment depends on the specific requirements of the project. Some laminate flooring comes with pre-attached underlayment. If not, select an underlayment that provides adequate sound insulation and moisture protection. Consider the thickness of the underlayment, as it can affect the overall height of the flooring and the fit of doors.
Key Point 2: Installation Process from Hallway to Living Room
The actual installation of the laminate flooring requires careful attention to detail and adherence to the manufacturer's instructions. Proper alignment, spacing, and cutting techniques are essential for a professional-looking finish. The installation should proceed smoothly and seamlessly from the hallway into the living room.
Laying the Underlayment: Before laying the laminate, install the underlayment across the prepared subfloor. Roll out the underlayment, ensuring it covers the entire area, including both the hallway and the living room. Trim any excess underlayment with a utility knife. Butt the edges of the underlayment together and tape them securely with underlayment tape. This will prevent moisture from seeping through the seams. Ensure the underlayment is flat and free of wrinkles or bubbles.
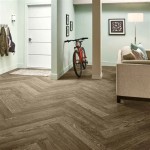
Planning the Layout: Before laying the first row of laminate flooring, plan the layout to ensure a balanced and aesthetically pleasing result. Measure the width of the room and divide it by the width of a laminate plank. If the last row will be less than half a plank wide, consider cutting the first row to ensure a wider plank for the last row. This will provide a more visually appealing and structurally sound finish. Also, determine the direction in which the planks will be laid. Typically, laminate flooring is laid parallel to the longest wall of the room or in the direction of the main light source. In this case, laying continuously from the hallway to the living room will dictate a consistent direction.
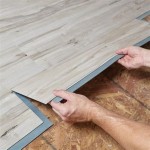
Installing the First Row: Begin installing the first row of laminate flooring along a straight wall. Use spacers (approximately 1/4 inch or 6mm) between the laminate planks and the wall to allow for expansion and contraction. The tongue side of the plank should face the wall. Connect the planks end-to-end, using the manufacturer's locking system. Ensure the planks are properly aligned and securely locked together. Use a tapping block and hammer to gently tap the planks together if necessary. Avoid hitting the planks directly with the hammer, as this can damage the edges.
Continuing the Installation: Continue laying the laminate flooring row by row, working your way across the hallway and into the living room. Stagger the end joints of the planks in each row to create a more visually appealing and structurally sound floor. A minimum stagger of 6 inches (15cm) is generally recommended. Use the cut-off piece from the end of one row to start the next row, as long as it is at least 6 inches long. This will minimize waste and create a more random pattern. Ensure the planks are properly locked together, using a tapping block and pull bar as needed. The pull bar is particularly useful for tightening the planks along walls or in tight spaces.
Cutting Laminate Planks: Laminate flooring can be cut using a circular saw or a laminate cutter. A circular saw is effective for making straight cuts, while a laminate cutter is ideal for making quick and clean cuts without generating dust. When using a circular saw, use a fine-tooth blade designed for cutting laminate. Cut the planks with the decorative side facing up to prevent chipping. Wear safety glasses to protect your eyes from flying debris. When using a laminate cutter, simply place the plank on the cutter and press down on the handle. The cutter will cleanly slice through the laminate.
Dealing with Obstacles: When encountering obstacles such as doorways or pipes, carefully measure and cut the laminate planks to fit around them. Use a jigsaw to make curved cuts or to create intricate shapes. For pipes, drill a hole slightly larger than the diameter of the pipe in the laminate plank. Cut a slit from the edge of the plank to the hole. Place the plank around the pipe and seal the slit with sealant or caulk. At doorways, consider using a transition strip to create a smooth and seamless transition between the laminate flooring and other flooring types.
Key Point 3: Finishing Touches and Maintenance
After the laminate flooring is installed, the finishing touches are essential for a polished and professional look. This includes removing the spacers, installing baseboards or quarter-round molding, and cleaning the floor. Regular maintenance will help to keep the laminate flooring looking its best for years to come.
Removing Spacers: Once the last row of laminate flooring is installed, remove the spacers from around the perimeter of the room. These spacers were used to allow for expansion and contraction and are no longer needed.
Installing Baseboards or Quarter-Round Molding: Install baseboards or quarter-round molding around the perimeter of the room to cover the expansion gap. This will create a clean and finished look. The baseboards or quarter-round molding can be attached to the wall using nails, screws, or adhesive. Ensure the molding is properly aligned and securely attached. Caulk any gaps between the molding and the wall or floor to create a seamless finish.
Installing Transition Strips: Install transition strips at doorways or where the laminate flooring meets other flooring types. Transition strips provide a smooth and seamless transition between different flooring surfaces and help to prevent tripping hazards. Transition strips are available in a variety of materials and styles to match the laminate flooring. They can be attached to the subfloor using screws or adhesive.
Cleaning the Floor: After the installation is complete, clean the laminate flooring to remove any dust, debris, or adhesive residue. Use a soft broom or vacuum cleaner to remove loose particles. Damp-mop the floor with a laminate floor cleaner. Avoid using excessive water, as this can damage the laminate. Dry the floor thoroughly with a clean cloth.
Regular Maintenance: To keep the laminate flooring looking its best, regular maintenance is essential. Sweep or vacuum the floor regularly to remove dust and debris. Clean spills immediately to prevent staining. Use a laminate floor cleaner to damp-mop the floor as needed. Avoid using abrasive cleaners or scouring pads, as these can damage the surface of the laminate. Place mats at entrances to prevent dirt and debris from being tracked onto the floor. Use furniture pads under the legs of furniture to prevent scratches. Avoid wearing shoes with high heels or sharp objects on the laminate flooring.
By following these steps, individuals can successfully install laminate flooring seamlessly from a hallway into a living room, creating a beautiful and durable flooring solution that enhances the overall aesthetic appeal of the home. Consistent maintenance will ensure the longevity and beauty of the flooring for years to come.

Installing Laminate Flooring Where To Start

Direction Of Laminate Floor Doityourself Com Community Forums

Iheart Organizing Do It Yourself Floating Laminate Floor Installation

Laying Laminate Flooring In The Living Room And Hall Way

The Direction Of Laminate Flooring In Hallway Design Tips

Choosing Laminate Flooring For An Entrance Or Hallway Tarkett

Which Direction To Lay Your Hardwood Flooring Riterug

One Room Challenge Week Three Installing Laminate Floor Hilltown House

Den And Hallway Same Kind Flooring Or Diffe Of Wood Floors Wide Plank Hardwood

Transform Your Hallway Flooring From Dull To Dazzling With These 6 Ideas Carpetright
Related Posts