Bellawood Prefinished Hardwood Flooring Installation: A Comprehensive Guide
Bellawood prefinished hardwood flooring is a popular choice for homeowners seeking the beauty and durability of hardwood without the extended installation time associated with unfinished options. The prefinished nature of the boards significantly reduces the mess and time required for sanding and finishing, making it a viable project for experienced DIYers or a quicker process for professional installers. This article provides a detailed overview of the Bellawood prefinished hardwood flooring installation process, covering key considerations, necessary tools and materials, and step-by-step instructions.
Key Considerations Before Installation
Before commencing any flooring project, careful planning and preparation are essential. Several factors must be considered to ensure a successful and long-lasting installation. These include assessing the subfloor, acclimating the flooring, and selecting the appropriate installation method.
Subfloor Assessment: The subfloor is the foundation upon which the hardwood flooring will rest. Its condition is critical to the overall stability and longevity of the finished floor. The subfloor must be level, clean, and dry. Any imperfections, such as unevenness, cracks, or loose areas, must be addressed before proceeding. Self-leveling compounds can be used to fill minor depressions, while more significant issues may require the replacement of damaged subfloor sections. Moisture testing is crucial, as excessive moisture can lead to warping, cupping, and other problems with the hardwood flooring. Industry standards dictate acceptable moisture levels for both the subfloor and the hardwood flooring, typically measured using a moisture meter. Addressing any moisture issues with a vapor barrier is critical.
Acclimation: Hardwood flooring is a natural product that expands and contracts with changes in humidity and temperature. Acclimation allows the flooring to adjust to the environment in which it will be installed, minimizing the risk of gapping or buckling after installation. Bellawood flooring should be acclimated in the room where it will be installed for a minimum of 72 hours, or as specified by the manufacturer. During this time, the flooring should be stacked loosely, allowing air to circulate around the boards. The temperature and humidity in the room should be maintained at normal living conditions.
Installation Method Selection: The choice of installation method depends on the subfloor type, the type of Bellawood flooring being installed (e.g., solid hardwood, engineered hardwood), and personal preference. Common installation methods include nail-down, glue-down, and floating. The nail-down method is typically used for solid hardwood flooring installed over a wooden subfloor. The glue-down method is suitable for engineered hardwood flooring installed over concrete or wooden subfloors. The floating method, often used with engineered hardwood flooring, involves assembling the planks without attaching them directly to the subfloor. Each method has its advantages and disadvantages, and the selection should be made based on a thorough understanding of the project requirements.
Tools and Materials Required
Having the right tools and materials is essential for a smooth and efficient installation process. This list provides a comprehensive overview of the items typically needed for installing Bellawood prefinished hardwood flooring:
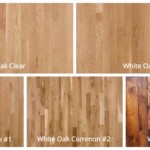
- Bellawood Prefinished Hardwood Flooring: The quantity should be calculated based on the square footage of the room, plus an additional 5-10% for waste and cuts.
- Underlayment (if required): Depending on the installation method and subfloor type, an underlayment may be necessary to provide cushioning, sound insulation, and moisture protection.
- Moisture Meter: To test the moisture content of the subfloor and hardwood flooring.
- Measuring Tape: For accurate measurements and layout.
- Pencil: For marking cut lines.
- Chalk Line: To establish straight layout lines.
- Circular Saw or Miter Saw: For cutting the hardwood flooring planks.
- Jigsaw: For making intricate cuts around obstacles.
- Hammer: For tapping planks into place (nail-down method).
- Nail Gun (for nail-down method): A flooring nailer designed for hardwood flooring installation.
- Construction Adhesive (for glue-down method): A high-quality adhesive specifically formulated for hardwood flooring.
- Trowel (for glue-down method): To apply the adhesive evenly.
- Spacers: To maintain consistent expansion gaps around the perimeter of the room.
- Tapping Block and Pull Bar: To protect the flooring edges during installation and help tighten joints.
- Safety Glasses: To protect eyes from flying debris.
- Dust Mask: To avoid inhaling dust particles.
- Knee Pads: For comfort during installation.
- Broom or Vacuum Cleaner: To clean the subfloor and remove debris during installation.
Step-by-Step Installation Guide
This section provides a detailed, step-by-step guide to installing Bellawood prefinished hardwood flooring. While the specific steps may vary slightly depending on the chosen installation method, the following provides a general framework.
Preparation: Ensure the subfloor is clean, level, and dry. Remove any existing flooring, debris, or fasteners. Address any subfloor imperfections as described above. Allow the Bellawood flooring to acclimate in the room for the recommended time period.
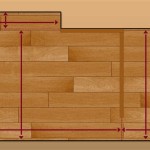
Layout: Determine the direction in which the flooring will be installed. Generally, it is recommended to run the flooring parallel to the longest wall of the room. Use a chalk line to establish a straight starting line, typically leaving a ¼- to ½-inch expansion gap along the wall. This gap allows for natural expansion and contraction of the wood without causing damage to the floor or walls.
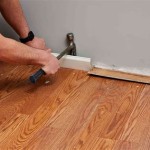
Installing the First Row: Begin installing the first row of planks along the starting line, ensuring the tongue or groove side is facing the wall and the expansion gap is maintained using spacers. Depending on the chosen installation method:
- Nail-Down: Use a flooring nailer to secure each plank to the subfloor, following the manufacturer's recommendations for nail spacing.
- Glue-Down: Apply construction adhesive to the subfloor using the recommended trowel, covering only the area that can be worked within the adhesive's open time. Place the plank onto the adhesive and press firmly.
- Floating: Connect the first row of planks using the tongue-and-groove system. Ensure the planks are securely locked together.
Continuing the Installation: Continue installing the remaining rows of planks, staggering the end joints to create a visually appealing and structurally sound floor. Use a tapping block and pull bar to tighten the joints between planks. Regularly check alignment and ensure the expansion gap is maintained. For planks that require cutting, measure and mark the cut line accurately, then use a circular saw or miter saw to make the cut.
Obstacles and Trimming: When encountering obstacles such as door frames, pipes, or cabinets, use a jigsaw to make precise cuts around them. Ensure the expansion gap is maintained around these obstacles as well. For the last row of planks, it may be necessary to rip the planks to the appropriate width using a table saw or circular saw.
Finishing Touches: Once the flooring is completely installed, remove the spacers and install baseboards or quarter-round molding to cover the expansion gap and provide a finished look. Clean the floor thoroughly to remove any dust or debris. Inspect the floor for any imperfections or damaged areas and make any necessary repairs.
Specific considerations for floating floors: Floating floors often utilize click-lock systems. Ensure each plank is properly engaged and locked into place. Walking on the newly installed floor can help the click-lock system fully engage. Subfloor preparation is even more critical for floating floors; ensure the floor is adequately leveled.
Specific considerations for nail-down installation: Proper selection of nails is essential. Follow the manufacturer's recommendation for the correct nail type and size. Incorrect nail selection can damage the flooring and affect the integrity of the installation. Ensure the nail gun is properly adjusted to avoid surface damage.
Specific considerations for glue-down installation: The selection of the correct adhesive is paramount. Not all adhesives are created equal. Choose an adhesive specifically designed for hardwood flooring. Apply the adhesive evenly and in accordance with the manufacturer's instructions. Insufficient adhesive can lead to loose planks and premature failure. Remember to allow adequate drying time before allowing heavy traffic on the floor.
By carefully following these steps and paying attention to detail, a beautiful and durable Bellawood prefinished hardwood floor can be successfully installed, enhancing the value and aesthetic appeal of any home.

How To Install Prefinished Hardwood Floors Ll Flooring

Bellawood From Lumber Liquidators

Bellawood Artisan 9 16 In Claire Gardens Oak Engineered Hardwood Flooring 8 5 Wide Ll

Bellawood 3 4 In Matte Carriage House White Ash Solid Hardwood Flooring 25 Wide Ll

Bellawood Review On The Job

Bellawood 3 4 X 1 Select White Oak Lumber Liquidators Flooring Co Solid Hardwood Floors Engineered Installing

Ll Flooring Bellawood Artisan Amelia Island White Oak 10053014 Review Consumer Reports

Bellawood 3 4 In Iron Hill Maple Character Solid Hardwood Flooring 5 Wide 162 91 Usd Box Ll Lumber Liquidators Yahoo Ping

Bellawood 3 4 X 2 1 Natural Ash Flooring Updating House Lumber Liquidators

How To Install Hardwood Flooring Complete Instructions
Related Posts