Installing Engineered Hardwood Flooring Over Tile: A Comprehensive Guide for Professionals
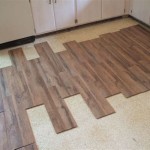
Installing engineered hardwood flooring over tile is a sought-after home improvement project, combining the timeless appeal of hardwood with the practicality of tile. However, this undertaking demands precision and attention to detail to achieve a flawless finish. In this comprehensive guide, we'll explore the essential aspects of this process, ensuring a successful and long-lasting installation.
1. Surface Preparation: The Foundation of a Flawless Finish
Before installing engineered hardwood, it's crucial to ensure the tile surface is meticulously prepared. This involves:
- Cleaning: Thoroughly clean the tile floor with a degreasing cleaner to remove dirt, oils, and any other contaminants that may compromise adhesion.
- Leveling: Inspect the floor for any unevenness or gaps. If necessary, use a self-leveling compound to create a smooth and level surface.
- Underlayment: Install an underlayment specifically designed for engineered hardwood over tile. This layer provides cushioning, reduces noise, and helps prevent moisture from seeping through.
2. Adhesive Selection: The Glue That Binds
Choosing the right adhesive is vital. Look for a high-quality, moisture-resistant adhesive specifically formulated for engineered hardwood flooring over tile. Consider the following:
- Type of tile: Adhesives vary in their compatibility with different tile types. Check the manufacturer's specifications to ensure proper adhesion.
- Consistency: Choose an adhesive that is thick enough to provide a strong bond but not so thick that it becomes difficult to spread.
- Cure time: Allow ample time for the adhesive to cure, as specified by the manufacturer. This ensures a secure bond before walking on the floor.
3. Installation Techniques: Precision and Patience
Carefully follow the manufacturer's guidelines for installing the engineered hardwood flooring. This typically involves:
- Starting point: Determine a starting point along a straight wall and work your way out from there.
- Spreading adhesive: Apply a thin layer of adhesive to the prepared surface using a trowel, ensuring even coverage.
- Installing the planks: Carefully place the engineered hardwood planks into the adhesive, pressing them firmly into place. Stagger the joints for added stability.
4. Finishing Touches: Enhancing the Look and Longevity
After installation, some finishing touches complete the project:
- Trimming: Cut the planks to fit snugly around walls, doorways, and other obstacles.
- Sealing: Apply a clear sealant to protect the floor from moisture and wear, enhancing its durability and shine.
- Moldings: Install baseboards or other moldings to conceal any gaps and provide a polished look.
5. Maintenance Tips: Preserving the Beauty
Proper maintenance will extend the life and beauty of your engineered hardwood floor:
- Cleaning: Use a microfiber mop or vacuum with a soft brush attachment for regular cleaning.
- Protection: Place mats or rugs under furniture legs to prevent scratches and dents.
- Moisture control: Avoid prolonged exposure to moisture and promptly clean up any spills.

Can You Install Wood Flooring Over Tiled Floors Havwoods

Can You Install Wood Flooring Over Tiled Floors Havwoods

Install Hardwood Flooring Over Tile Floor Double Glue Down Method

Can Timber Flooring Be Laid Over Tiles Cb Floors

Can You Install Wood Flooring Over Tiled Floors Havwoods

Discover How To Lay Wood Floors Over Tile Discount Flooring Depotdiscount Depot Blog

How To Install Hardwood Flooring For Beginners

A Comprehensive Guide On Engineered Wood Flooring Installation Mersey

Laying Wood Flooring Over Tiles Floor Fitting

Installing Luxury Vinyl Floors Over Engineered Hardwood Honey Built Home

