How to Install Laminate Wood Flooring Planks
Laminate flooring is a popular choice for homeowners seeking a durable, affordable, and stylish alternative to traditional hardwood floors. Installing laminate planks is a DIY project that many homeowners can tackle with the right tools and knowledge. This guide will provide a step-by-step breakdown of the installation process, offering clear instructions and helpful recommendations for achieving a successful outcome.
Step 1: Preparing the Subfloor
The foundation of any successful laminate flooring installation lies in the preparation of the subfloor. A level and smooth subfloor is essential to ensure the planks lay flat and prevent buckling or gaps.
Begin by inspecting the existing subfloor for any imperfections, such as unevenness, cracks, or loose boards. Repair any damaged areas using wood filler, shims, or replacement boards as needed. If the subfloor is significantly uneven, consider using a self-leveling compound to create a smooth and even surface.
Once the subfloor is repaired, it's crucial to ensure it's adequately level. Use a level to check the subfloor's flatness, and address any high or low spots using wood filler or a sander. Aim for a maximum variation of 1/8 inch over a 10-foot span to prevent potential problems with the laminate floor.
Step 2: Acclimating the Flooring
Before starting the installation, it's essential to acclimate the laminate planks to the environment where they will be installed. This step allows the planks to adjust to the room's temperature and humidity, minimizing the risk of expansion or contraction after installation.
Bring the laminate flooring boxes into the installation area and leave them sealed for at least 48 hours. This allows the planks to adjust to the surrounding conditions and prevent any unexpected issues caused by sudden temperature or humidity changes.
Step 3: Choosing the Installation Pattern
Laminate planks can be installed using various patterns, each offering a unique aesthetic appeal. The most common patterns include:
Straight Lay: This classic pattern involves laying the planks in a straight line, creating a simple yet elegant look.
Staggered Lay: This pattern offsets each row by half the plank's length, creating a more visually interesting and less predictable look.
Herringbone Lay: This intricate pattern involves laying the planks in a V-shape, creating a distinctive and sophisticated look.
Select the pattern that best suits your desired aesthetic and matches the overall design of your home.
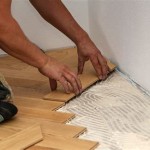
Step 4: Laying the Underlayment
Underlayment provides a protective layer between the subfloor and the laminate flooring, improving sound dampening, insulation, and cushioning. Installing underlayment is crucial for achieving a comfortable and durable installation.
Choose an underlayment suitable for laminate flooring, considering factors like moisture barrier, soundproofing, and thickness. Roll out the underlayment, ensuring it's smooth and free of wrinkles or gaps. Secure the underlayment using staples or tape, ensuring it's securely attached to the subfloor.
Step 5: Installing the First Row
Start by laying the first row of laminate planks against the longest wall of the room. Leave a small expansion gap (usually 1/4 inch) between the planks and the wall to allow for expansion and contraction. Use a spacer to maintain this gap throughout the installation process.
Use a tapping block and a mallet to gently tap the planks together, interlocking them firmly. Ensure the planks are flush with each other and maintain a straight line, especially for the first row, as this sets the foundation for the rest of the installation.
Step 6: Installing Subsequent Rows
Continue installing subsequent rows of laminate planks, ensuring each row is offset from the previous one to create a staggered pattern. Use a spacer to maintain the expansion gap along the walls and any other obstacles.
As you install each row, use a tapping block and mallet to gently tap the planks together, ensuring they are securely interlocked. Pay close attention to the alignment of the planks, ensuring they are straight and level.
Step 7: Cutting Planks to Fit
As you reach corners, doorways, or other obstacles, you will need to cut laminate planks to fit. Use a utility knife or a circular saw with a fine-tooth blade for precise cuts.
Measure the required length of the plank, mark the cut line, and carefully cut the plank. Use a level or a straight edge to ensure the cuts are accurate and create a seamless finish.
Step 8: Installing Transition Strips
When transitioning from laminate flooring to other floor coverings, such as tile or carpet, it's important to install transition strips to create a smooth and even transition.
Choose a transition strip that matches your flooring and the other covering. Use screws or adhesive to secure the transition strip to the floor, ensuring it's level and flush with the adjacent flooring surfaces.
Step 9: Installing Molding
To create a finished look and protect the edges of the laminate flooring, install molding around the perimeter of the room.
Choose molding that complements your flooring style and matches the existing trim in your home. Use screws or adhesive to secure the molding to the wall, ensuring it's level and aligned with the laminate floor.

How To Install Laminate Flooring For Beginners

How To Install Laminate Flooring For The 1st Time Easy Tips Room Renovation

How To Lay Laminate Flooring Cost In Fantastic Handyman

Common Mistakes When Laying Laminate Flooring Next Day Floors

How To Install Laminate Flooring The Home Depot

How To Install Laminate Flooring Guide 2024

Laminate Flooring Installation A Step By Guide

How To Install Laminate Flooring The Home Depot

How To Install Hardwood Flooring Step By Forbes Home

How To Install Lock Engineered Hardwood Flooring
Related Posts