How To Fix Laminate Flooring Planks
Laminate flooring offers a durable and aesthetically pleasing flooring solution for many homes and businesses. However, despite its resilience, laminate flooring is susceptible to damage from moisture, impacts, and general wear and tear. Addressing damaged laminate planks promptly is crucial to prevent further deterioration and maintain the overall integrity and appearance of the floor. This article provides comprehensive guidance on various methods for repairing laminate flooring planks, ranging from minor scratch repairs to complete plank replacements.
Addressing Minor Scratches and Surface Damage
Superficial scratches and minor surface imperfections are common occurrences in laminate flooring. Several techniques can be employed to address these issues, often without the need for plank replacement. The selection of the appropriate method depends on the severity and extent of the damage.
Using a Laminate Repair Kit: Laminate repair kits are readily available at hardware stores and home improvement centers. These kits typically contain a range of colored fillers designed to match various laminate flooring colors and patterns. The process involves cleaning the damaged area thoroughly, applying the appropriate filler to the scratch, and then carefully leveling the filler with the surrounding surface. Excess filler should be removed promptly using a clean, damp cloth. After the filler has dried completely, a sealant is often applied to protect the repaired area and blend it seamlessly with the rest of the floor.
Employing Wax Fill Sticks: Wax fill sticks, also known as touch-up sticks, are another option for repairing minor scratches and chips. These sticks are available in a variety of colors to match different laminate flooring shades. To use a wax fill stick, simply rub the stick over the scratch, applying gentle pressure until the scratch is filled with wax. Use a plastic putty knife or a similar tool to remove any excess wax and level the repaired area with the surrounding surface. A soft cloth can then be used to buff the area to a smooth finish.
Utilizing Furniture Polish or Shoe Polish: For very light scratches or scuffs, a simple solution may be found in common household products. Furniture polish or shoe polish, matching the color of the laminate flooring, can sometimes effectively conceal minor imperfections. Apply a small amount of polish to a soft cloth and gently rub it over the scratched area. Allow the polish to dry completely, and then buff the area with a clean cloth to restore the floor's shine.
Repairing Deeper Scratches and Gouges
Deeper scratches and gouges require more extensive repair techniques than those used for superficial damage. These types of damage often penetrate the protective wear layer of the laminate and require a more robust filling and leveling process.
Using Wood Filler or Epoxy: For deeper scratches and gouges, wood filler or epoxy can provide a more durable and long-lasting repair. Before applying the filler, thoroughly clean the damaged area and remove any loose debris. Apply the filler to the gouge, ensuring that it completely fills the void. Allow the filler to dry completely according to the manufacturer's instructions. Once the filler is dry, sand it smooth with fine-grit sandpaper, being careful not to damage the surrounding laminate. After sanding, the repaired area can be stained or painted to match the color of the flooring. Finally, apply a sealant to protect the repaired area and blend it with the rest of the floor.
Color Matching Considerations: Achieving a seamless repair often requires careful color matching. Laminate flooring comes in a wide range of colors and patterns, so it's essential to select a filler or stain that closely matches the existing flooring. If an exact match cannot be found, mixing different colors of filler or stain may be necessary to achieve the desired result. It is always advisable to test the color match in an inconspicuous area before applying it to the damaged area.
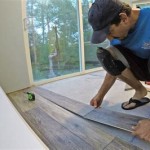
Replacing Damaged Laminate Planks
In cases of significant damage, such as severe scratches, dents, water damage, or warping, replacing the affected laminate plank is often the most effective solution. This process requires careful removal of the damaged plank and precise installation of a new one.
Identifying the Damaged Plank: The first step in replacing a laminate plank is to clearly identify the damaged area. Examine the floor closely to determine the extent of the damage and ensure that the replacement plank will adequately cover the affected area. It is also important to ensure that you have a matching replacement plank, either from leftover flooring from the original installation or by purchasing a new plank that accurately matches the existing flooring in terms of color, pattern, and thickness.
Removing the Damaged Plank (Without Tongue and Groove): Removing a damaged plank without tongue and groove is usually easier. It typically involves carefully cutting out the damaged section of the plank. Start by using a utility knife to score the perimeter of the damaged area. Then, using a chisel and hammer, carefully break apart the plank along the scored lines. Be cautious not to damage the surrounding planks during this process. Once the damaged section has been removed, clean the exposed subfloor thoroughly to remove any debris or adhesive residue.
Removing the Damaged Plank (With Tongue and Groove): Removing planks interlocked with a tongue and groove system requires a more intricate approach. Start by removing the baseboards or moldings that cover the edges of the flooring. This will allow you to access the edges of the laminate planks. Locate the damaged plank and carefully use a utility knife to score the joint between the damaged plank and the adjacent planks. Using a pry bar or a flat bar, gently lift the damaged plank, working along its edges to loosen it from the surrounding planks. Be careful not to damage the tongue and groove edges of the adjacent planks. If the plank is difficult to remove, a rubber mallet can be used to gently tap the plank loose.
Installing the Replacement Plank: Once the damaged plank has been removed, the replacement plank can be installed. If the new plank has a tongue and groove system, align the tongue of the new plank with the groove of the adjacent plank and gently tap it into place using a rubber mallet. Ensure that the plank is securely locked into place with the surrounding planks. If the plank does not have a tongue and groove system, apply a thin layer of construction adhesive to the subfloor and position the new plank carefully over the adhesive. Press the plank firmly into place and wipe away any excess adhesive. Use weights or clamps to hold the plank in place while the adhesive dries completely. Reinstall the baseboards or moldings to conceal the edges of the flooring.
Dealing with Click-Lock Systems: Many modern laminate floors utilize click-lock systems for easy installation. When replacing a plank in a click-lock system, carefully examine the locking mechanism to understand how the planks interlock. Typically, the replacement plank needs to be angled into place and then clicked down to secure it. Use a tapping block and a hammer to ensure a tight and secure fit. Pay close attention to the direction of the locking mechanism to ensure that the plank is installed correctly.
Preventative Measures to Minimize Damage
While repairs are sometimes necessary, taking preventative measures can significantly reduce the likelihood of damage to laminate flooring and prolong its lifespan.
Using Protective Mats and Rugs: Placing mats at entrances and in high-traffic areas can help to protect the flooring from dirt, debris, and moisture. Rugs can also provide an additional layer of protection and cushion against impacts.
Employing Furniture Pads: Applying felt pads to the feet of furniture can prevent scratches and dents caused by furniture movement. Regularly check and replace the pads as needed to ensure that they are in good condition.
Practicing Proper Cleaning Procedures: Use appropriate cleaning products specifically designed for laminate flooring. Avoid using excessive water, as moisture can seep into the seams and cause warping. Clean up spills promptly to prevent staining and water damage.
Maintaining Consistent Humidity Levels: Laminate flooring is susceptible to expansion and contraction in response to changes in humidity. Maintaining consistent humidity levels in the home can help to prevent warping and buckling. Using a humidifier or dehumidifier, as needed, can help to regulate humidity levels.

How To Repair Laminate Flooring The Home Depot

Laminate Floor Repair Diy Family Handyman

3 Ways To Repair Laminate Flooring Wikihow

How To Replace A Damaged Laminate Board That S In The Middle Of Floor

How To Close Gaps In Laminate Flooring 3 Easy Methods

How To Repair Laminate Flooring With Water Damage Dry Force

Easily Repair Chipped Laminate Flooring With Tiktok S Brilliant Trick

How To Repair Laminate Flooring Forbes Home

How To Replace A Damaged Laminate Board That S In The Middle Of Floor

Can I Fix Laminate Flooring That Has Chipped And Led On The Top Hometalk
Related Posts