Laying Parquet Flooring On Concrete: A Comprehensive Guide
Parquet flooring, with its geometric patterns and inherent elegance, offers a sophisticated alternative to standard flooring options. While traditionally installed over wooden subfloors, it is entirely possible to successfully lay parquet flooring on a concrete subfloor. However, this process requires careful planning, preparation, and execution to ensure a long-lasting and aesthetically pleasing result. Concrete, unlike wood, is a rigid and porous material that presents unique challenges related to moisture, leveling, and adhesion. Addressing these challenges proactively is crucial for the successful installation of parquet flooring.
This article will provide a detailed guide on the process of laying parquet flooring on concrete, outlining the necessary steps, materials, and considerations. It will cover the entire process from subfloor preparation to the final finishing touches, enabling both experienced DIY enthusiasts and professional installers to achieve exemplary results. Understanding the nuances of this installation method is key to avoiding common pitfalls and ensuring the longevity of the parquet flooring.
Key Point 1: Assessing and Preparing the Concrete Subfloor
The foundation of any successful flooring installation lies in the proper preparation of the subfloor. For concrete subfloors, this preparation is paramount, as any imperfections or issues left unaddressed will directly impact the final quality and durability of the parquet flooring. The assessment process involves a thorough inspection to identify any potential problems that need rectification.
First and foremost, moisture levels within the concrete must be evaluated. Concrete is porous and can absorb moisture from the ground, which can lead to warping, cupping, or adhesive failure in the parquet flooring. A moisture meter specifically designed for concrete should be used to measure the moisture content. Acceptable levels will vary depending on the type of adhesive used and the manufacturer's recommendations, but generally, a moisture content below 3% is considered ideal for most adhesives. If moisture levels are higher than acceptable, a moisture barrier must be applied prior to installation. This barrier can be a liquid-applied membrane or a sheet material, carefully chosen to be compatible with the chosen adhesive.
Next, the levelness of the concrete subfloor must be assessed. Parquet flooring requires a flat and even surface to ensure proper adhesion and prevent unevenness in the finished floor. Use a long, straight edge, such as a six-foot level, to check for any dips, humps, or variations in the surface. Significant discrepancies can be addressed using a self-leveling compound specifically formulated for concrete floors. This compound is poured onto the floor and allowed to flow freely, filling in low spots and creating a level surface as it cures. Careful adherence to the manufacturer's instructions is critical for achieving optimal results with self-leveling compounds.
Finally, the concrete surface must be clean and free of any debris, dust, grease, paint, or other contaminants that could interfere with the adhesive bond. Thoroughly sweep and vacuum the entire surface. For stubborn residues, a concrete cleaner or degreaser may be necessary. After cleaning, the concrete should be lightly scarified or roughened to create a better bonding surface for the adhesive. This can be achieved using a concrete grinder or a wire brush attachment on a drill. Following scarification, the surface should be vacuumed again to remove any loose particles.
Key Point 2: Selecting and Applying the Correct Adhesive
Choosing the appropriate adhesive is crucial for securing the parquet flooring to the concrete subfloor. The adhesive must be specifically designed for bonding wood to concrete and must also be compatible with the type of parquet flooring being used. There are several types of adhesives available, each with its own set of properties and advantages. Common options include polyurethane adhesives, epoxy adhesives, and modified silane polymer (MSP) adhesives.
Polyurethane adhesives are known for their strong bond strength and resistance to moisture. They are a popular choice for parquet flooring installations on concrete, particularly in areas with potentially higher moisture levels. However, they can be more difficult to work with and may release volatile organic compounds (VOCs) during the curing process. Ensure adequate ventilation during installation and choose a low-VOC option if possible.
Epoxy adhesives offer exceptional bond strength and are highly resistant to chemicals and moisture. They are often used in demanding environments, such as commercial spaces. However, epoxy adhesives typically have a shorter working time and can be more expensive than other options. They also require precise mixing and application to achieve optimal results.
Modified silane polymer (MSP) adhesives are a newer generation of adhesives that combine the benefits of both polyurethane and epoxy adhesives. They offer excellent bond strength, flexibility, and moisture resistance, while also being low in VOCs and easier to apply. MSP adhesives are becoming increasingly popular for parquet flooring installations on concrete due to their versatility and environmental friendliness.
Regardless of the adhesive chosen, it is essential to follow the manufacturer's instructions carefully. This includes preparing the adhesive according to the specified mixing ratios (if applicable), applying the adhesive in the correct thickness using the recommended trowel notch size, and allowing sufficient curing time before walking on the floor. Using the wrong trowel notch size can result in either insufficient adhesive coverage or excessive adhesive squeeze-out, both of which can compromise the bond strength and affect the appearance of the finished floor.
The application of adhesive should generally involve using a notched trowel held at the correct angle, applying even pressure, and maintaining consistent rows of adhesive ribbing. It is advisable to only apply adhesive to an area that can be covered with parquet blocks within the adhesive's open time (the time during which the adhesive remains workable). Working in smaller sections helps prevent the adhesive from skinning over before the parquet blocks are installed.
Key Point 3: Laying the Parquet Flooring and Achieving the Desired Pattern
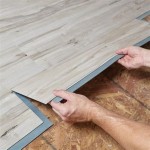
Once the concrete subfloor is properly prepared and the adhesive is applied, the next step is to lay the parquet flooring. This process involves carefully positioning each parquet block according to the chosen pattern and ensuring a tight and even fit. Common parquet patterns include herringbone, basketweave, and brick bond, each offering a distinct visual appeal. The choice of pattern will influence the starting point and the overall layout of the flooring.
Before beginning the installation, it is recommended to dry-lay several rows of parquet blocks to ensure that the pattern aligns correctly and that there are no unexpected gaps or irregularities. This allows for adjustments to be made before the adhesive is applied, preventing costly mistakes. Establishing a central reference line is crucial for maintaining the symmetry and alignment of the pattern. This line can be drawn using a chalk line or laser level, and it should be aligned with the longest straight wall in the room.
Starting from the central reference line, carefully position each parquet block into the adhesive bed, pressing firmly to ensure good contact. Use spacers along the walls to allow for expansion and contraction of the flooring due to changes in temperature and humidity. This will prevent buckling or cracking of the floor over time. As each block is installed, check its alignment with the neighboring blocks and make any necessary adjustments before the adhesive sets. A rubber mallet can be used to gently tap the blocks into place, ensuring a tight and even fit.
It is essential to regularly clean any adhesive residue that may squeeze out between the blocks. Use a damp cloth or sponge and a mild cleaning solution to remove the adhesive before it hardens. Allowing the adhesive to dry on the surface of the parquet will make it much more difficult to remove and can damage the finish of the flooring.
Once the entire floor has been laid, allow the adhesive to cure completely according to the manufacturer's instructions. This typically takes at least 24-48 hours, and it is important to avoid walking on the floor during this time. After the adhesive has cured, remove the spacers along the walls and install baseboards or quarter-round molding to cover the expansion gap. These moldings should be securely fastened to the walls, not to the flooring, to allow for free movement of the floor.
The final step is to finish the parquet flooring. This may involve sanding, staining, and applying a protective finish, such as polyurethane or varnish. Sanding is necessary to smooth out any imperfections and create a uniform surface for finishing. Staining can be used to enhance the natural color of the wood or to create a custom color scheme. The protective finish will protect the floor from wear and tear and make it easier to clean. Always follow the manufacturer's instructions for applying the finish and allow sufficient drying time before using the floor.
Proper acclimation of the parquet flooring is also essential. The wood should be stored in the room where it will be installed for several days prior to installation to allow it to adjust to the temperature and humidity levels. This will help minimize expansion and contraction after installation and prevent gaps from forming.
When cutting parquet blocks to fit around walls or doorways, use a saw that is appropriate for cutting wood, such as a jigsaw or a miter saw. Always measure carefully and cut slightly oversized, then trim the block to the exact size. This will prevent gaps from forming between the blocks and the walls.
Consider the underfloor heating system if the concrete subfloor has one. Not all parquet types and adhesives are compatible with underfloor heating. Consult with the manufacturer to ensure compatibility and follow their specific installation guidelines. Proper installation over underfloor heating requires specific adhesives and installation techniques to accommodate heat transfer and prevent damage to the wood.
By following these steps and taking the necessary precautions, you can successfully lay parquet flooring on concrete and create a beautiful and durable floor that will last for many years. Careful planning, preparation, and execution are the keys to success. Remember to always consult with the manufacturer's instructions for specific recommendations regarding adhesive selection, application techniques, and finishing procedures.

Installing Wood Flooring Over Concrete Diy

Herringbone Parquet Flooring Installation Gluing Down On Concrete Full Tutorial Start To Finish

Hardwood Over Concrete Auten Wideplank Flooring

Laying A Parquet Floor

How To Lay Solid Wood Flooring Over Concrete

Installing Engineered Hardwood On Concrete Twenty Oak

Installing Hardwood Floors On Concrete Subfloors

Diy Laying Engineered Oak Parquet Flooring Swoon Worthy

Fitting Hardwood Floor To Concrete Wood And Beyond Blog

Installation Methods For Wooden Floor Craftedforlife
Related Posts

