How To Install Vinyl Plank Flooring Under a Toilet
Installing vinyl plank flooring can significantly enhance the aesthetic appeal and durability of a bathroom. However, the presence of a toilet introduces a unique challenge. Many homeowners and even some professionals face the dilemma of whether to cut the vinyl planks around the toilet base or to remove the toilet entirely and install the flooring underneath. Both approaches have their pros and cons, and the optimal method depends on factors such as the homeowner's skill level, the type of toilet and its connection, and the existing subfloor condition.
This article provides a comprehensive guide on how to properly install vinyl plank flooring under a toilet, covering the necessary preparations, procedures, and considerations to achieve a professional and long-lasting result. Emphasis will be placed on the removal and reinstallation method, as this is generally the preferred approach for achieving a seamless and watertight flooring installation.
Assessing the Situation and Gathering Materials
Before commencing any work, a thorough assessment of the existing situation is crucial. This involves evaluating the condition of the subfloor, determining the toilet type and its connection, and identifying any potential challenges. The subfloor must be level, clean, and dry to ensure proper adhesion and prevent future flooring issues. Any imperfections, such as cracks, holes, or unevenness, should be addressed prior to vinyl plank installation. This may involve patching with a leveling compound or replacing sections of the subfloor if necessary.
Identifying the toilet type is also important. Most toilets are either close-coupled (where the cistern is directly attached to the bowl) or concealed cistern toilets (where the cistern is hidden within the wall). Understanding the toilet's connection to the water supply and waste pipe is crucial for successful removal and reinstallation. Shutting off the water supply is paramount before disconnecting any plumbing.
Once the assessment is complete, gather all the necessary materials and tools. These typically include:
* Vinyl plank flooring (sufficient quantity to cover the area) * Toilet wax ring (a new one is essential for reinstallation) * Shims (for leveling the toilet) * Caulk (waterproof silicone caulk for sealing around the toilet base) * Measuring tape * Pencil * Utility knife or flooring cutter * Tapping block * Hammer * Pry bar (for gently lifting the toilet if necessary) * Adjustable wrench * Screwdriver (various sizes) * Level * Safety glasses * Gloves * Shop towels or rags * Vacuum cleaner * Floor scraper (for removing old adhesives or debris) * Moisture meter (to check subfloor moisture levels)Proper preparation and material gathering will contribute significantly to a smoother and more efficient installation process.
Removing the Toilet Safely and Effectively
Removing the toilet requires careful attention to detail to avoid damage to the fixture, plumbing, or surrounding areas. The following steps outline the typical procedure:
- Shut off the water supply to the toilet at the shut-off valve located near the toilet.
- Flush the toilet to remove as much water as possible from the tank and bowl.
- Use a sponge or small container to remove any remaining water from the tank and bowl.
- Disconnect the water supply line from the toilet tank. Place a bucket underneath to catch any residual water.
- Remove the decorative caps from the bolts that secure the toilet to the floor.
- Loosen and remove the bolts. If the bolts are corroded or stuck, use penetrating oil and allow it to soak for a while before attempting to remove them. If they still won't budge, you may need to cut them off with a hacksaw or bolt cutters.
- Gently rock the toilet back and forth to break the seal between the wax ring and the flange.
- Carefully lift the toilet straight up and off the flange. It's helpful to have a second person assist with this step, as toilets can be heavy and awkward.
- Place the toilet on a protected surface, such as cardboard or a drop cloth, to prevent damage.
- Inspect the toilet flange for damage. If it's cracked or broken, it should be replaced before reinstalling the toilet.
- Stuff a rag into the drainpipe to prevent sewer gases from escaping.
- Remove the old wax ring from the flange. Use a putty knife or scraper to clean the flange thoroughly, removing any residual wax or debris.
Following these steps meticulously will minimize the risk of damage or injury during toilet removal.
Installing the Vinyl Plank Flooring
With the toilet removed, the subfloor is now fully accessible for vinyl plank installation. Follow these steps to ensure a proper and durable flooring installation:
- Ensure the subfloor is clean, level, and dry. Use a floor scraper to remove any old adhesives or debris. Patch any cracks or holes with a leveling compound and allow it to dry completely. Use a moisture meter to verify that the subfloor moisture content is within the acceptable range specified by the vinyl plank manufacturer.
- Plan the layout of the vinyl planks. Start by determining the direction in which you want to lay the planks. Consider the room's shape, the location of doorways, and any existing flooring. It's generally recommended to run the planks parallel to the longest wall of the room.
- Dry-lay a row of planks to check the fit and appearance. This will help you identify any potential issues and make adjustments before applying adhesive or clicking the planks into place.
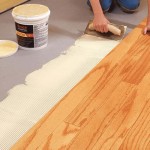
- Begin installing the vinyl planks according to the manufacturer's instructions. Most vinyl plank flooring systems are either glue-down or click-lock. For glue-down systems, apply adhesive to the subfloor according to the manufacturer's recommendations and carefully position the planks, pressing them firmly into place. For click-lock systems, align the planks and click them together, ensuring a tight and seamless connection.
- Use a tapping block and hammer to ensure that the planks are properly seated and locked together. This will help prevent gaps or unevenness in the flooring.
- Cut the vinyl planks to fit around the toilet flange and other obstacles. Use a utility knife or flooring cutter to make precise cuts. Measure carefully and mark the cutting lines accurately. It's better to cut slightly larger than necessary and then trim the planks to fit, rather than cutting them too small.
- Leave a small expansion gap around the perimeter of the room. This will allow the flooring to expand and contract with temperature and humidity changes without buckling or warping. The manufacturer's instructions will specify the appropriate expansion gap.
Adhering to these guidelines will result in a professional-looking and long-lasting vinyl plank floor.
Reinstalling the Toilet and Finishing Touches
After the vinyl plank flooring is installed, the toilet can be reinstalled. This requires careful attention to ensure a watertight seal and proper alignment. The following steps outline the reinstallation process:
- Remove the rag from the drainpipe.
- Install a new wax ring onto the toilet flange. Ensure the wax ring is properly seated and centered. Some wax rings have a plastic horn that extends into the drainpipe. Others are simply wax rings. Follow the manufacturer's instructions for the type of wax ring you are using.
- Carefully lower the toilet onto the flange, aligning the bolt holes with the holes in the flange. It's helpful to have a second person assist with this step.
- Press down firmly on the toilet to compress the wax ring and create a watertight seal.
- Install the bolts and washers, tightening them evenly. Do not overtighten the bolts, as this can crack the toilet bowl. Tighten them just enough to secure the toilet firmly to the floor.
- Connect the water supply line to the toilet tank. Ensure the connection is tight to prevent leaks.
- Turn on the water supply and check for leaks around the toilet base and water supply line connection. If you find any leaks, tighten the connections or replace the wax ring if necessary.
- Flush the toilet several times to ensure it is functioning properly.
- Shim the toilet if necessary to prevent it from rocking. Place shims under the base of the toilet until it is level and stable.
- Caulk around the base of the toilet with waterproof silicone caulk. This will seal the gap between the toilet and the floor, preventing water from seeping underneath. Smooth the caulk bead with a wet finger or caulk smoothing tool.
- Clean up any debris or spills and dispose of the old wax ring and other waste materials.
By following these steps carefully, the toilet will be properly reinstalled, ensuring a watertight and functional bathroom fixture.

How To Install Vinyl Plank Flooring In A Bathroom Fixthisbuildthat

How To Install Vinyl Plank Flooring In A Bathroom Fixthisbuildthat

How To Cut Flooring Around A Toilet Luxury Vinyl Plank Bathroom Installation Calibamboo

How To Install Vinyl Plank Flooring In A Bathroom Fixthisbuildthat

How To Easily Install Vinyl Flooring Around A Toilet

How To Install Vinyl Plank Flooring Around Bathroom Toilet Bowl Perfectly Tips And Tricks

How To Install Vinyl Plank Flooring In A Bathroom Fixthisbuildthat

How To Cut Flooring Around A Toilet Luxury Vinyl Plank Bathroom Installation Calibamboo

How To Install Vinyl Plank Flooring In A Bathroom Fixthisbuildthat

How To Install Vinyl Plank Flooring In A Bathroom As Beginner Home Renovation
Related Posts