Lifescapes Premium Hardwood Flooring Installation Instructions
Lifescapes Premium Hardwood Flooring represents a significant investment in a home’s aesthetic appeal and value. Proper installation is paramount to realizing the full potential of this flooring and ensuring its longevity. These instructions provide a comprehensive guide to the installation process, covering essential preparations, installation techniques, and post-installation considerations. Adhering to these guidelines will contribute to a professional and lasting hardwood floor installation.
Before commencing any installation work, thoroughly review these instructions and any supplementary documentation provided by Lifescapes. Understanding the specific requirements and recommendations associated with the chosen Lifescapes Premium Hardwood Flooring product is crucial for a successful outcome. Additionally, familiarize oneself with all applicable local building codes and regulations.
Pre-Installation Preparations
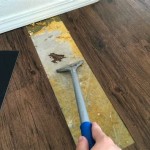
Adequate preparation is the cornerstone of a successful hardwood flooring installation. Neglecting this phase can lead to issues such as uneven flooring, gaps, and premature wear and tear. The subfloor must be structurally sound, clean, and level. Any existing flooring materials, such as carpeting, vinyl, or tile, should be removed. Residual adhesives or debris must be thoroughly scraped and vacuumed away. Any imperfections in the subfloor must be addressed before proceeding.
The subfloor's moisture content is a critical factor. Excess moisture can cause the hardwood flooring to warp, buckle, or develop mold. It is essential to test the moisture content of both the subfloor and the hardwood flooring. A moisture meter should be used to obtain accurate readings. The acceptable moisture content range will vary depending on the specific Lifescapes product; consult the product specifications for guidance. If the subfloor's moisture content exceeds the recommended threshold, it may be necessary to install a moisture barrier or allow additional drying time.
Acclimation is another crucial step. Hardwood flooring is a natural material that expands and contracts in response to changes in humidity and temperature. Acclimation allows the flooring to adjust to the environmental conditions of the installation site, minimizing the risk of dimensional changes after installation. The flooring should be stored in the room where it will be installed for a minimum of 72 hours prior to installation. The room temperature should be maintained between 60°F and 80°F (15°C and 27°C), and the relative humidity should be within the range specified by Lifescapes. Stacking the flooring in a way that allows for air circulation is crucial during the acclimation process.
Gather all necessary tools and materials before starting the installation. This includes, but is not limited to: a moisture meter, a measuring tape, a chalk line, a power saw (circular saw or miter saw), a tapping block, a rubber mallet, spacers, a nail gun or flooring stapler (depending on the installation method), safety glasses, and knee pads. Ensure all tools are in good working order and that the operator is familiar with their proper use.
Installation Techniques
Lifescapes Premium Hardwood Flooring can typically be installed using one of several methods: nailing, stapling, gluing, or floating. The appropriate method will depend on the specific product, the type of subfloor, and personal preference. Consult the Lifescapes product specifications to determine the recommended installation method for the chosen flooring.
Nailing/Stapling: This method is typically used for solid hardwood flooring installed over a wooden subfloor. A nail gun or flooring stapler is used to fasten the flooring to the subfloor at an angle through the tongue of the boards. Proper nail or staple placement is crucial to ensure a secure and aesthetically pleasing installation. Use the correct fastener type and size as specified by Lifescapes. Maintain consistent spacing between fasteners and avoid damaging the tongue or groove of the boards.
Gluing: This method involves applying an adhesive directly to the subfloor and then pressing the hardwood flooring into the adhesive. Gluing is often used for engineered hardwood flooring and can be suitable for concrete subfloors. Use a high-quality adhesive specifically designed for hardwood flooring installation. Apply the adhesive evenly with the appropriate trowel notch size. Follow the adhesive manufacturer's instructions for open time and curing time. Avoid walking on the newly installed flooring until the adhesive has fully cured.
Floating: This method involves assembling the hardwood flooring by interlocking the tongue and groove edges without directly attaching it to the subfloor. A thin foam underlayment is typically placed between the flooring and the subfloor to provide cushioning and sound insulation. Floating floors are relatively easy to install and can be suitable for various subfloor types. Ensure the subfloor is level and clean before installing the underlayment. Leave an expansion gap around the perimeter of the room to allow for dimensional changes.
Regardless of the chosen installation method, starting with a straight and square reference line is essential. Use a chalk line to establish a baseline along the longest wall of the room. Align the first row of flooring with this line, ensuring it is perfectly straight. Use spacers along the walls to maintain a consistent expansion gap. Work row by row, carefully aligning the tongue and groove edges and securing the flooring according to the chosen installation method.
Stagger the end joints of adjacent rows to create a visually appealing and structurally sound floor. A minimum stagger of 6 inches is generally recommended. Avoid creating patterns or lines with the end joints, as this can detract from the overall aesthetic. When cutting boards to fit around obstacles or at the end of a row, use a sharp saw and make precise cuts. A jigsaw can be helpful for cutting irregular shapes.
Post-Installation Considerations
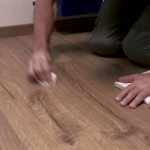
After the hardwood flooring has been installed, a few important steps should be taken to ensure its long-term durability and appearance. Remove any spacers and clean the floor to remove dust, debris, and adhesive residue. Use a cleaning product specifically designed for hardwood floors. Avoid using excessive water, as this can damage the flooring.
Install baseboards or quarter round along the perimeter of the room to conceal the expansion gap and provide a finished look. Secure the baseboards to the wall studs, not to the flooring. This allows the flooring to move freely without being constrained by the baseboards.
Protect the hardwood flooring from scratches and dents by placing felt pads under furniture legs. Use area rugs in high-traffic areas to reduce wear and tear. Avoid wearing shoes with sharp heels or cleats on the flooring. Promptly clean up spills to prevent staining or water damage.
Regular maintenance is essential for preserving the beauty and longevity of Lifescapes Premium Hardwood Flooring. Sweep or vacuum the floor regularly to remove dust and debris. Use a damp mop with a pH-neutral cleaning solution specifically designed for hardwood floors to clean the floor as needed. Avoid using harsh chemicals, abrasive cleaners, or steam mops. Periodic refinishing may be necessary to restore the floor's original luster and remove scratches or worn areas. The frequency of refinishing will depend on the amount of traffic and the level of care.
Addressing potential problems early can prevent them from escalating into more serious issues. Inspect the flooring regularly for signs of damage, such as scratches, dents, or water stains. Repair any damage promptly to prevent further deterioration. If the flooring develops gaps or buckles, this may indicate a moisture problem. Address the moisture issue and repair the flooring as needed.
Proper humidity control is crucial for maintaining the stability of hardwood flooring. A humidifier or dehumidifier may be necessary to maintain the recommended humidity levels. Avoid exposing the flooring to extreme temperature fluctuations. Direct sunlight can cause the flooring to fade or discolor over time. Use curtains or blinds to protect the flooring from direct sunlight.
By following these installation instructions and maintenance guidelines, one can enjoy the beauty and durability of Lifescapes Premium Hardwood Flooring for years to come. These instructions are a general guide and may need to be adapted based on specific site conditions and product variations. Always consult the Lifescapes product specifications and any applicable local building codes for complete and accurate information.

Lifescapes Premium Hardwood Flooring

How To Install Lock Engineered Hardwood Flooring

How To Install Lock Engineered Hardwood Flooring

Roanoke Oak Solid Hardwood Wood Floors Wide Plank Types Of Flooring

Acacia Wood Flooring Floor Decor

Engineered Wood Flooring Floor Decor

Your Flooring Source Lifescape Designs

Malibu Wide Plank Acacia Huntington Beach 3 8 In T X 6 1 2 Varying Length Engineered Hardwood Flooring 25 57 Sq Ft Case Hdmetg825ef The Home Depot

Hevea Jaya Distressed Solid Hardwood Floors

Hardwood Flooring Everyday Low S Floor Decor
Related Posts