Essential Aspects of Wood Vinyl Flooring Repair
Wood vinyl flooring is an increasingly popular choice for homeowners due to its durability and affordability. However, no matter its resilience, it's not impervious to damage. This guide will cover the essential aspects of wood vinyl flooring repair, enabling you to effectively restore your floor's pristine appearance.
### Identifying the DamageThe first step in repairing wood vinyl flooring is accurately identifying the type of damage. Common issues include scratches, dents, gouges, or loose planks. Understanding the extent and severity of the damage will help you determine the appropriate repair method.
### Gather Necessary MaterialsOnce the damage has been identified, collect the necessary materials for the repair. For minor scratches or dents, you may only need a vinyl repair kit. For more significant damage, you may require tools such as a utility knife, adhesive, and replacement planks.
### Preparing the Repair AreaBefore repairing the damage, it's crucial to clean and prepare the area. Use a damp cloth to remove any loose debris or dirt. If the damaged area is near a wall or baseboard, you may need to remove it temporarily for easier access.
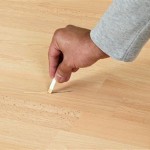
### Repairing Scratches and DentsFor minor scratches or dents, you can use a vinyl repair kit. These kits typically include a color-matched filler and a touch-up pen. Apply a small amount of filler to the damaged area and allow it to dry. Once dry, use the touch-up pen to blend the repaired area with the surrounding flooring.
### Repairing Gouges and Loose PlanksIf the damage involves gouges or loose planks, more extensive repair may be necessary. For gouges, use a utility knife to carefully remove any loose or damaged material. Clean the area and apply adhesive. Cut a small piece of replacement vinyl and fit it into the gouge. Press down firmly and use a weight to hold it in place while the adhesive dries.
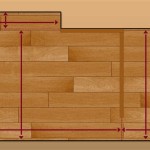
For loose planks, remove the damaged plank and replace it with a new one. Apply adhesive to the edges of the new plank and fit it into place. Use a tapping block and hammer to gently tap the plank into position. Allow the adhesive to dry completely before replacing the wall or baseboard.
### Maintaining the Repaired AreaOnce the repair is complete, it's essential to maintain the damaged area to prevent further damage. Regularly clean the repaired area with a damp cloth and avoid using harsh chemicals or abrasive cleaners. Protect the repaired area from heavy furniture or sharp objects that could cause damage.
### Professional Repair ConsiderationsFor major damage or if you are unsure about repairing wood vinyl flooring yourself, it's advisable to consult a professional flooring contractor. They have the expertise and experience to assess the damage and perform the repairs effectively, ensuring a flawless finish.
### ConclusionWood vinyl flooring repair can be a manageable task with the right knowledge and tools. By following these essential aspects, you can effectively restore the appearance of your damaged flooring and maintain its beauty for years to come. Remember to take precautions to prevent further damage and consider professional assistance for major repairs.

How To Repair Vinyl Flooring Fixing Sc Bubbles More

How To Repair Vinyl Flooring Fixing Sc Bubbles More

How To Repair Luxury Vinyl Plank Flooring The Palette Muse

How To Repair Vinyl Flooring Fixing Sc Bubbles More

How To Repair Luxury Vinyl Plank Flooring The Palette Muse

Avoid Costly Mistakes Repairing Vinyl Plank Flooring Made Easy

How To Repair Vinyl Flooring Fixing Sc Bubbles More

How Much Does Vinyl Flooring Repair Cost In 2024 Checkatrade

How To Repair Vinyl Flooring Fixing Sc Bubbles More

How To Repair Vinyl Flooring Fixing Sc Bubbles More

