Tranquility Vinyl Flooring Installation: A Comprehensive Guide
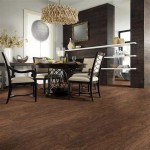
Tranquility vinyl flooring, renowned for its durability, aesthetic appeal, and water resistance, presents a practical and stylish flooring solution for various residential and commercial spaces. Successful installation is crucial to realizing the full potential of this flooring type. This article details the essential steps, considerations, and best practices associated with a Tranquility vinyl flooring installation project.
Preparing the Subfloor: The Foundation for Success
The subfloor is the underlying structure upon which the vinyl flooring rests. Its condition is paramount to achieving a smooth, even, and lasting installation. Improper subfloor preparation can lead to a myriad of problems, including uneven surfaces, telegraphing of imperfections, and eventual failure of the flooring.
The first step is a thorough inspection of the existing subfloor. This inspection must identify any signs of damage, such as cracks, holes, or moisture. Moisture is a particularly detrimental factor, as it can lead to mold growth and adhesive failure. If moisture is detected, its source must be identified and rectified before proceeding with the installation.
Once the subfloor is deemed structurally sound and dry, the next step is leveling. Unevenness can be addressed through various methods, depending on the severity of the discrepancies. Self-leveling compounds are often used for larger areas, providing a smooth, uniform surface upon which to install the vinyl flooring. For smaller imperfections, patching compounds can be used to fill in gaps and smooth out minor irregularities.
Regardless of the leveling method employed, it is crucial to ensure that the subfloor is clean and free of debris. Dust, dirt, and other contaminants can interfere with the adhesion of the vinyl flooring. Vacuuming and sweeping are essential steps, followed by wiping down the surface with a damp cloth. Allow the subfloor to dry completely before proceeding to the next phase of the installation.
For concrete subfloors, testing for alkalinity is also recommended. Excessive alkalinity can react with the adhesive and cause it to break down over time. Concrete sealers can be applied to neutralize alkalinity and protect the adhesive from degradation.
When installing over existing flooring, such as ceramic tile or hardwood, careful consideration must be given to the condition of the existing surface. Loose or damaged tiles must be removed and the resulting voids filled with a patching compound. Hardwood flooring must be properly secured and sanded to create a smooth, even surface. In some cases, it may be necessary to install a plywood underlayment over the existing flooring to provide a suitable substrate for the vinyl.
Acclimating the Flooring: Optimizing Performance
Acclimation refers to the process of allowing the vinyl flooring to adjust to the ambient temperature and humidity of the installation environment. This is a crucial step that helps to prevent expansion and contraction issues after installation. Vinyl flooring is susceptible to changes in temperature and humidity, and if it is not properly acclimated, it can buckle, warp, or develop gaps.
The acclimation period typically lasts for at least 48 to 72 hours, but it can vary depending on the specific product and the environmental conditions. The ideal temperature range for acclimation is between 65°F and 85°F (18°C and 29°C). Humidity levels should be maintained between 30% and 60%. It is important to consult the manufacturer's instructions for specific acclimation recommendations.
During the acclimation period, the vinyl flooring cartons should be opened and the planks or tiles should be spread out in the installation area. This allows for maximum exposure to the ambient conditions. Avoid stacking the cartons on top of each other, as this can impede the acclimation process.
If the installation environment is subject to extreme temperature or humidity fluctuations, it may be necessary to extend the acclimation period. Using a dehumidifier or humidifier can help to maintain stable environmental conditions during acclimation.
Proper acclimation is an investment in the long-term performance and appearance of the vinyl flooring. By allowing the flooring to adjust to its new environment, one can minimize the risk of problems and ensure a successful installation.
Installation Techniques: Achieving a Flawless Finish
The installation technique employed will depend on the type of Tranquility vinyl flooring being installed. Common types include click-lock, glue-down, and loose-lay. Each method requires specific tools and procedures.
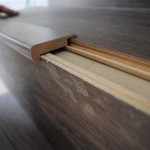
Click-lock vinyl flooring is a popular choice due to its ease of installation. The planks or tiles feature interlocking edges that snap together, creating a floating floor. This method does not require adhesive, making it a relatively simple and mess-free option. However, it is important to ensure that the subfloor is perfectly level to prevent movement or separation of the planks. A tapping block and rubber mallet are essential tools for ensuring a tight and secure connection.
Glue-down vinyl flooring offers enhanced stability and durability. This method involves applying adhesive to the subfloor and then pressing the vinyl planks or tiles firmly into place. Glue-down installation requires careful planning and precise execution. The correct type of adhesive must be used, and it must be applied evenly and in the proper thickness. A notched trowel is used to spread the adhesive, and a roller is used to ensure complete contact between the flooring and the subfloor. Glue-down installations are more permanent and generally require professional expertise.
Loose-lay vinyl flooring is designed to be installed without adhesive or interlocking mechanisms. The planks or tiles are typically thicker and heavier than other types of vinyl flooring, which helps to keep them in place. Loose-lay installation is the simplest method, but it is best suited for smaller areas or rooms with minimal foot traffic. Perimeter adhesive may be used to secure the edges of the flooring and prevent movement.
Regardless of the installation method, it is important to maintain consistent alignment and spacing between the planks or tiles. Use spacers to create uniform gaps and ensure a professional-looking finish. Cutting vinyl flooring can be done with a utility knife or a vinyl cutter. Always use a sharp blade and make multiple shallow cuts rather than trying to cut through the material in one pass.
During installation, regularly check for any imperfections or discrepancies. Address any issues promptly to prevent them from escalating. Clean up any adhesive spills or debris immediately to avoid staining or damaging the flooring.
After the installation is complete, allow the adhesive (if used) to cure completely before allowing foot traffic on the flooring. Follow the manufacturer's recommendations for curing time and cleaning procedures.
Essential Tools and Materials for Tranquility Vinyl Flooring Installation
A successful Tranquility vinyl flooring installation requires the right tools and materials. Preparing these ahead of time can streamline the process and prevent unnecessary delays.
Measuring Tape and Square: Accurate measurements are crucial for proper layout and cutting. A square ensures precise right angles for clean, professional seams.
Utility Knife or Vinyl Cutter: A sharp utility knife with extra blades or a specialized vinyl cutter is essential for cutting the flooring to size and shape. Replace blades frequently to maintain clean cuts.
Tapping Block and Rubber Mallet: These tools are used for click-lock installations to ensure a tight and secure connection between planks or tiles without damaging the edges.
Notched Trowel (for Glue-Down): The correct type of notched trowel, as specified by the adhesive manufacturer, is essential for applying adhesive evenly and in the proper thickness.
Adhesive (for Glue-Down): Use only the adhesive recommended by the vinyl flooring manufacturer. Different adhesives are formulated for different types of vinyl and subfloors.
Seam Roller (for Glue-Down): A seam roller helps to ensure complete contact between the vinyl flooring and the subfloor, promoting strong adhesion and preventing air bubbles.
Spacers: Spacers are used to maintain consistent gaps between planks or tiles, creating a professional-looking finish and allowing for expansion and contraction.
Level: A level is essential for checking the flatness of the subfloor and ensuring that the flooring is installed on a level surface.
Vacuum Cleaner and Cleaning Supplies: A vacuum cleaner is used to clean the subfloor before installation and to remove any debris after installation. Cleaning supplies are needed to clean up adhesive spills and maintain the flooring's appearance.
Safety Glasses and Gloves: Safety glasses protect the eyes from debris, and gloves protect the hands from adhesive and sharp edges.
Post-Installation Care and Maintenance
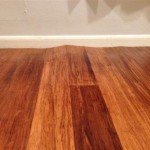
Proper care and maintenance are essential for preserving the beauty and longevity of Tranquility vinyl flooring. Regular cleaning and preventative measures can help to prevent damage and extend the life of the flooring.
Regular sweeping or vacuuming is essential for removing dirt, dust, and debris. Use a soft-bristled broom or a vacuum cleaner with a soft brush attachment to avoid scratching the surface of the flooring.
For damp mopping, use a mild detergent specifically designed for vinyl flooring. Avoid using harsh chemicals, abrasive cleaners, or scouring pads, as these can damage the finish. Mop the floor with a damp (not soaking wet) mop and dry it thoroughly with a clean towel.
Preventative measures can also help to protect the flooring from damage. Use furniture pads under the legs of chairs and tables to prevent scratches and dents. Place mats at entrances to trap dirt and moisture. Avoid dragging heavy objects across the floor. Clean up spills immediately to prevent staining.
Exposure to direct sunlight can cause vinyl flooring to fade over time. Use curtains, blinds, or shades to protect the flooring from excessive sunlight exposure.
Avoid using rubber-backed mats or rugs on vinyl flooring, as the rubber can react with the vinyl and cause discoloration. Use mats or rugs with a non-staining backing.
By following these care and maintenance tips, one can keep Tranquility vinyl flooring looking its best for years to come.

Tranquility Vinyl Floor Installation

How To Install A Tranquility Resilient Flooring With Tips From Property Improvement Guru Llc

I Installed Tranquility Vinyl Plank Flooring Organically Ann

My Luxury Vinyl Plank Flooring Review Pros And Cons Average But Inspired

My Luxury Vinyl Plank Flooring Review Pros And Cons Average But Inspired

Tranquility 1 5mm North Perry Pine Waterproof Luxury Vinyl Plank Flooring 6 In Wide X 36 Long Ll

Tranquility Ultra 5mm Copper Ridge Oak Waterproof Luxury Vinyl Plank Flooring 6 65 In Wide X 48 Long Ll

Tranquility Seeker Deep Space Luxury Vinyl Flooring Mohawk Klc Floors More

My Luxury Vinyl Plank Flooring Review Pros And Cons Average But Inspired

Tranquility Xd 4mm Clear Lake Chestnut Waterproof Luxury Vinyl Plank Flooring 7 08 In Wide X 48 Long Ll
Related Posts