DIY Laminate Flooring Installation on Stairs: A Comprehensive Guide
Installing laminate flooring can significantly enhance the aesthetic appeal and durability of a home's interior. While laminate flooring is frequently used in rooms, transitioning its application to stairs requires careful planning and execution. A DIY approach to installing laminate flooring on stairs can be a cost-effective solution for homeowners seeking to upgrade their staircase. This article will provide a detailed guide on how to successfully install laminate flooring on stairs, covering preparation, material selection, and step-by-step installation procedures.
Preparation and Planning: Laying the Groundwork for Success
Before commencing the installation process, thorough preparation is crucial. This phase involves assessing the existing staircase, selecting appropriate materials, and gathering the necessary tools. A well-prepared workspace will contribute significantly to a smoother and more efficient installation.
The initial step is to inspect the current state of the stairs. Identify any existing damage, such as loose treads, squeaky steps, or uneven surfaces. Addressing these issues before installing the laminate flooring is paramount. Loose treads should be securely fastened, and any squeaks should be eliminated by reinforcing the underlying structure. If the existing stair surface is uneven, leveling compounds can be used to create a smooth and consistent substrate for the laminate flooring.
Accurate measurements are equally important. Measure the width and depth of each tread and riser. It's advisable to measure each stair individually, as minor variations can occur, especially in older homes. These measurements will be used to determine the amount of laminate flooring required and to precisely cut the pieces to fit each step.
Selecting the right type of laminate flooring is another critical aspect of preparation. Consider the thickness and durability of the laminate. For stairs, a thicker laminate with a higher abrasion class (AC rating) is recommended to withstand the increased foot traffic and potential wear and tear. Laminate flooring specifically designed for stairs is available and often includes features like enhanced slip resistance.
In addition to the laminate flooring itself, other materials will be needed. These include stair nose moldings, which provide a finished edge to the treads and enhance safety by preventing slipping, as well as construction adhesive, shims, and underlayment. The underlayment helps to absorb sound, cushion the steps, and provide a moisture barrier.
Finally, ensure that all necessary tools are readily available. Essential tools include a measuring tape, a square, a pencil, a circular saw or miter saw for cutting the laminate, a jigsaw for making intricate cuts, a rubber mallet, a tapping block, construction adhesive, a caulking gun, safety glasses, and ear protection.
Step-by-Step Installation Process: From Measurement to Completion
The installation process involves cutting the laminate pieces to size, applying adhesive, and securing them to the stairs. Precision and attention to detail are crucial to achieving a professional-looking result. This section will outline the steps involved, providing practical advice for each stage.
The first step is to cut the laminate flooring to fit each tread and riser. Using the measurements taken earlier, carefully mark the laminate boards with a pencil. Utilize a square to ensure accurate cuts. When using a circular saw or miter saw, it's recommended to cut the laminate with the finished side facing up to minimize chipping.
For the stair treads, the laminate flooring will typically need to be combined with a stair nose molding. The stair nose molding creates a rounded edge that overhangs the riser, providing a safer and more aesthetically pleasing finish. Depending on the type of stair nose molding selected, it may need to be attached to the laminate tread using construction adhesive or screws.
Before applying adhesive, dry-fit each piece of laminate to ensure proper fit. Make any necessary adjustments before proceeding. Apply a generous amount of construction adhesive to the back of the laminate flooring and the stair nose molding. Press the laminate firmly onto the tread, ensuring that it is properly aligned. Use a rubber mallet and a tapping block to gently tap the laminate into place, ensuring a secure bond.
For the risers, cut the laminate to the appropriate size and apply construction adhesive to the back. Press the laminate firmly onto the riser, ensuring that it is aligned correctly. Use shims to hold the laminate in place while the adhesive dries. The adhesive manufacturer's instructions should be followed regarding drying time. It's generally recommended to allow the adhesive to dry for at least 24 hours before applying weight to the stairs.
Repeat these steps for each tread and riser, working from the top of the staircase down. Once all the laminate pieces are installed, inspect the stairs for any gaps or imperfections. Fill any gaps with color-matched caulk. Clean any excess adhesive or caulk from the laminate surface using a damp cloth.
In cases where the staircase includes a landing, the laminate flooring on the landing should be installed before starting on the stairs. This will ensure a seamless transition between the landing and the first step. The laminate flooring on the landing should be installed according to the manufacturer's instructions, using underlayment and construction adhesive as needed.
Addressing Common Challenges: Troubleshooting Installation Issues
Even with careful planning and execution, some challenges may arise during the installation process. Addressing these challenges effectively is essential to achieving a successful outcome. This section will discuss some common issues and provide solutions to overcome them.
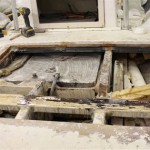
One common challenge is dealing with uneven stairs. As mentioned earlier, leveling compounds can be used to create a smooth and consistent surface. However, in some cases, more extensive repairs may be necessary. This may involve replacing damaged treads or risers or reinforcing the underlying structure of the staircase.
Another challenge is cutting the laminate flooring accurately. Mistakes can happen, especially when dealing with intricate cuts. It's always advisable to cut the laminate slightly larger than needed and then trim it to the exact size. This will allow for adjustments and prevent costly errors.
Dealing with curved or irregularly shaped stairs can also be challenging. In these cases, it may be necessary to create custom templates to ensure accurate cuts. A flexible measuring tape can be used to trace the shape of the stair onto a piece of cardboard, which can then be used as a template for cutting the laminate.
Another common issue is ensuring that the laminate flooring is securely attached to the stairs. If the adhesive is not applied properly or if the laminate is not pressed firmly into place, it may come loose over time. To prevent this, use a high-quality construction adhesive and follow the manufacturer's instructions carefully. Use a rubber mallet and a tapping block to ensure a secure bond.
Finally, achieving a professional-looking finish can be challenging, especially for DIYers. Pay close attention to detail and take your time. Use color-matched caulk to fill any gaps and clean any excess adhesive or caulk from the laminate surface. Consider hiring a professional installer if you are unsure about any aspect of the installation process.
Installing laminate flooring on stairs is a project that requires careful planning, meticulous execution, and attention to detail. By following these guidelines and addressing any challenges that may arise, homeowners can successfully transform their staircases, adding beauty, durability, and value to their homes. The careful selection of materials, meticulous attention to measurements and cuts, and proper adhesion techniques are pivotal for a long-lasting and visually appealing result. Safety should always be a priority throughout the process, wearing appropriate safety gear and taking precautions to prevent accidents.

How To Install Laminate Flooring On Staircase Step By Guide

How To Install Laminate Flooring On Stairs Direct Wood

Can You Laminate Stairs The Pros Cons

Laminate On Stairs With Bad Installation

How To Install Vinyl Plank Flooring On Stairs In 6 Steps Inc

How To Install Laminate Flooring On Stairs Direct Wood

How To Install Laminate Flooring On Stairs As A Beginner Stair Noses Step By Short

Laminate Stairs Installation How To Make Stair Nosing Yourself Tips Mryoucandoityourself

Installing Stair Risers Diy Laminate On Stairs

How To Install Laminate Flooring On Stairs 13 Steps
Related Posts