How To Install Tongue and Groove Flooring On A Porch
Installing tongue and groove flooring on a porch is a popular project that enhances the aesthetic appeal and durability of the outdoor space. This type of flooring provides a classic, seamless look and, when properly installed, can withstand the elements for many years. The process requires careful planning, proper preparation, and precise execution. This article provides a comprehensive guide to installing tongue and groove flooring on a porch, covering material selection, necessary tools, installation techniques, and essential considerations for a successful outcome.
Preparing the Subfloor
The first and arguably most crucial step in installing tongue and groove flooring is preparing the subfloor. The subfloor is the foundation upon which the new flooring will rest, and any imperfections or inadequacies will directly impact the quality and longevity of the finished product. A solid, level, and properly treated subfloor is essential for ensuring that the tongue and groove boards lay flat, are secure, and resist moisture damage.
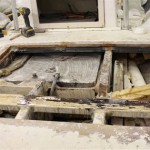
Begin by inspecting the existing subfloor. Look for signs of rot, decay, warping, or damage from insects or moisture. Any compromised areas must be addressed before proceeding. Rotting wood should be removed and replaced with new, pressure-treated lumber. Warped boards should be flattened or replaced to ensure a level surface. If the existing subfloor is significantly damaged, consider replacing the entire structure.
Clean the subfloor thoroughly to remove any debris, dirt, or old adhesives. Use a broom, vacuum, or scraper to ensure a clean surface. Even small particles can interfere with the proper adhesion of the flooring and create unevenness. For particularly stubborn residue, a solvent-based cleaner may be necessary, but ensure it is compatible with the subfloor material.
Leveling the subfloor is another critical aspect of preparation. Use a long level to identify any high or low spots. High spots can be sanded down using a belt sander or hand plane. Low spots can be filled with a self-leveling compound or shims. Ensure the leveling material is appropriate for outdoor use and is compatible with the subfloor material. A level surface will prevent the tongue and groove boards from rocking or flexing, which can lead to premature wear and damage.
Finally, consider adding a moisture barrier to the subfloor. This is particularly important if the porch is exposed to rain or humidity. A layer of roofing felt or a specialized moisture barrier membrane can protect the subfloor and the new flooring from water damage. Overlap the edges of the barrier by several inches and secure it with staples or nails. Proper subfloor preparation is an investment that will pay off in the form of a durable, attractive, and long-lasting porch floor.
Selecting the Right Materials and Tools
Choosing the correct materials and gathering the necessary tools is the next critical step. The selection of materials dictates the aesthetic appeal, durability, and resistance to the elements of the finished porch floor. The right tools ensure that the installation process is efficient, accurate, and safe.
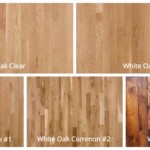
The choice of wood for tongue and groove flooring is paramount. For outdoor applications, pressure-treated lumber or naturally rot-resistant woods like cedar, redwood, or teak are recommended. Pressure-treated lumber is chemically treated to resist decay and insect infestation, making it a cost-effective option. Cedar, redwood, and teak contain natural oils that provide inherent resistance to rot and insects, offering a more natural and aesthetically pleasing alternative. The specific wood species chosen will depend on the desired look, budget, and local climate conditions. Consider the wood's resistance to warping, cracking, and splitting in your region.
The type of fasteners used to secure the tongue and groove boards is equally important. Stainless steel or galvanized screws are highly recommended for outdoor applications. These fasteners are corrosion-resistant and will prevent rust stains on the finished floor. Choose screws that are long enough to penetrate the subfloor adequately but not so long that they protrude through the bottom. Screws generally provide a more secure hold than nails, especially in high-traffic areas or areas subject to heavy wind or vibration.
Several essential tools are necessary for installing tongue and groove flooring. These include a circular saw or miter saw for cutting the boards to length, a measuring tape for accurate measurements, a level for ensuring a flat surface, a hammer or pneumatic nail gun for securing the boards, a tapping block and pull bar for properly fitting the boards together, a drill for pre-drilling screw holes (especially for hardwoods), and safety glasses and gloves for protection. A jigsaw may also be useful for cutting around posts or other obstructions.
In addition to these basic tools, consider investing in a moisture meter to check the moisture content of both the subfloor and the tongue and groove boards. Wood expands and contracts with changes in moisture content, so it is crucial to ensure that the wood is properly acclimated to the outdoor environment before installation. Excess moisture can lead to warping, cupping, or gapping in the finished floor.
Finally, don't overlook the importance of safety equipment. Safety glasses protect your eyes from flying debris, and gloves protect your hands from splinters and abrasions. Ear protection is also recommended when using power tools for extended periods. Investing in quality materials and the right tools is an investment in the longevity and appearance of your porch floor.
Installing the Tongue and Groove Boards
With the subfloor prepared and the materials and tools gathered, the actual installation of the tongue and groove boards can begin. This process requires precision, patience, and attention to detail to ensure a professional and durable finished product.
Start by laying out the first row of boards along the edge of the porch, ensuring that the tongue side faces outward. Leave a small expansion gap (approximately 1/4 inch) between the boards and the wall or edge of the porch. This gap will allow for the natural expansion and contraction of the wood due to changes in temperature and humidity. Use shims to maintain a consistent gap. Secure the first row of boards to the subfloor using screws or nails, driving them through the tongue at an angle. This "blind nailing" technique conceals the fasteners and creates a clean, professional look.
The next step involves fitting the subsequent rows of boards together. Align the tongue of the new board with the groove of the previously installed board. Use a tapping block and hammer to gently tap the boards together, ensuring a tight and seamless fit. The tapping block prevents damage to the tongue and groove edges. If the boards are particularly tight, a pull bar can be used to force them together. Secure each board to the subfloor using the same blind nailing technique.
As you progress, check the alignment of the boards frequently using a level and a straight edge. Any misalignments should be corrected immediately to prevent cumulative errors. Ensure that the expansion gap is maintained along any walls or edges. When you reach obstructions such as posts or railings, carefully measure and cut the boards to fit around them. A jigsaw is particularly useful for making curved or irregular cuts.
When installing the final row of boards, it may be necessary to rip them to width to fit the remaining space. Measure carefully and use a circular saw to cut the boards to the correct size. If the final row is narrow, it may be necessary to face-nail or screw the boards to the subfloor, as blind nailing may not be possible. If face-nailing or screwing is necessary, countersink the fasteners and fill the holes with wood putty that matches the color of the flooring.
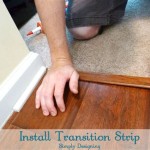
After the flooring is installed, remove any shims and fill the expansion gap with a flexible sealant or caulk. This will prevent water and debris from entering the gap. Finally, inspect the entire floor for any imperfections or loose boards. Correct any issues promptly to ensure a durable and long-lasting porch floor.
Finishing and Maintenance
After the tongue and groove flooring is installed, the final step involves finishing and maintaining the surface to protect it from the elements and enhance its appearance. Proper finishing and regular maintenance are essential for extending the life of the porch floor and keeping it looking its best.
The choice of finish depends on the type of wood used and the desired aesthetic. For pressure-treated lumber, a water-repellent sealant or stain is typically recommended. This will protect the wood from moisture damage and help to prevent warping and cracking. For naturally rot-resistant woods like cedar or redwood, a clear sealant or oil-based finish can be used to enhance the natural color and grain of the wood. Avoid using opaque paints, as they can trap moisture and lead to premature decay.
Before applying any finish, ensure that the floor is clean and dry. Lightly sand the surface to remove any imperfections and create a smooth base for the finish. Use a fine-grit sandpaper and sand in the direction of the grain. Remove any sanding dust with a tack cloth or vacuum. Apply the finish according to the manufacturer's instructions. Multiple coats may be necessary to achieve the desired level of protection and appearance.
Regular maintenance is crucial for preserving the beauty and longevity of the porch floor. Sweep or vacuum the floor regularly to remove dirt and debris. Wash the floor periodically with a mild soap and water solution. Avoid using harsh chemicals or abrasive cleaners, as they can damage the finish. Inspect the floor regularly for signs of wear or damage, such as cracks, splinters, or loose boards. Repair any damage promptly to prevent it from worsening.
Reapply the finish as needed to maintain its protective properties. The frequency of reapplication will depend on the type of finish used and the level of exposure to the elements. Generally, a new coat of sealant or stain should be applied every one to two years. By following these finishing and maintenance guidelines, you can ensure that your tongue and groove porch floor will provide years of enjoyment and enhance the beauty of your outdoor space.

How To Install Tongue And Groove Porch Flooring Home Painters

Tongue And Groove Porch Flooring Installation Guides

Fixing A Rotten Tongue And Groove Porch Floor The Craftsman Blog

How To Install Tongue And Groove Porch Flooring Home Painters

How To Install Porch Floors 3

Porch Flooring 4 How To Build A Decking

How To Install Tongue And Groove Porch Flooring Home Painters

Tongue And Groove Porch Flooring Installation Guides

Installs Easier Than Wood Aeratis Porch Flooring

How To Install Porch Floors 2
Related Posts