Essential Aspects of Installing Laminate Flooring Transition Pieces
Transition pieces are an essential element for creating a seamless and cohesive appearance when transitioning between different types of flooring. They effectively bridge the gap between laminate flooring and other surfaces, such as carpet, tile, or hardwood. Understanding the essential aspects of installing laminate flooring transition pieces can ensure a professional-looking finish.
1. Choose the Right Transition Type: There are various types of transition pieces available, including T-moldings, reducers, end caps, and stair noses. Selecting the appropriate type depends on the transition situation and the specific flooring materials involved. Consider the height difference, width of the gap, and the desired aesthetics.
2. Measure and Cut Precisely: Accurate measurements are crucial for a proper installation. Measure the length of the transition area and use a measuring tape to mark the cutting points on the transition piece. Use a sharp miter saw to ensure clean and precise cuts.
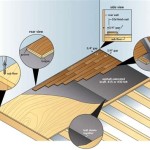
3. Use a Vapor Barrier: Installing a vapor barrier under the transition piece is recommended to prevent moisture from seeping into the subfloor. Cut the vapor barrier to size and place it over the subfloor or underlayment before installing the transition piece.
4. Apply Adhesive: Most transition pieces require adhesive to secure them to the subfloor. Choose an adhesive specifically designed for the type of flooring and transition material. Apply the adhesive evenly along the bottom of the transition piece.
5. Install the Transition Piece: Position the transition piece in the desired location and press it firmly into place. Ensure that it is level and securely attached to the subfloor. Use a tapping block or hammer with a rubber mallet to tap along the transition piece and secure it fully.
6. Finish and Seal: Once the transition piece is installed, finish it by removing any excess adhesive and cleaning the surface. Seal the transition piece with a matching color caulk or sealant to prevent moisture penetration and provide a professional look.
By following these essential aspects, you can successfully install laminate flooring transition pieces that create a smooth and attractive transition between different flooring surfaces. Proper installation techniques and attention to detail will enhance the overall appearance and functionality of your flooring.

How To Install Laminate Flooring Transitions

How To Install A Floor Transition Strip

How To Install Transition Strips In Doorways

How To Install Transition Strips In Doorways

How To Install Floating Laminate Wood Flooring Part 3 The Finishing Touches Installing Transition Strips Diy

How To Add Floor Trim Transitions And Reducers Young House Love

Laminate Floors Installation Tips To Avoid Humps Bumps Gaps And S

Installing Laminate Transitions Step By Instructions

Installing Laminate Transitions Step By Instructions

How To Install Reducer Molding Stone Tile Pe Inc
Related Posts