Essential Aspects of Dream Home Flooring Installation Instructions
Installing flooring is a significant undertaking requiring careful planning and precise execution. By understanding the essential aspects of flooring installation instructions, homeowners can ensure a successful and durable flooring upgrade.
1. Know Your Tools and Materials
Before starting installation, familiarize yourself with the necessary tools and materials. This includes a variety of saws, hammers, wedges, and adhesives. Ensure you have the correct size and type of flooring underlayment and moldings. Having the right equipment will make the installation process smoother and more efficient.
2. Prepare the Subfloor
A level and moisture-free subfloor is crucial for a successful installation. Remove any existing flooring, clean the surface thoroughly, and repair any imperfections. Level the subfloor using self-leveling compound or by installing a layer of plywood. Ensure the subfloor is completely dry before proceeding with the installation.
3. Plan the Layout
Plan the flooring layout meticulously before laying the first plank. Determine the starting point and orientation of the flooring, accounting for any obstacles or design elements. Dry-fit a few planks to visualize the layout and identify potential challenges.
4. Install the Underlayment
Underlayment provides cushioning and insulation, enhancing the flooring's comfort and durability. Roll out the underlayment evenly over the subfloor, ensuring it covers the entire area. Seams should be overlapped by at least 2 inches and taped together for a secure installation.
5. Start Laying the Flooring
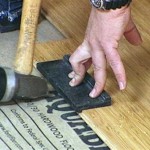
Start laying the flooring from the established starting point. Most flooring types have interlocking tongue-and-groove joints, allowing for easy assembly. Tap the planks together firmly using a tapping block or hammer. Ensure each plank is level and securely locked in place.
6. Install Moldings
Moldings provide a finished look to the flooring installation. Baseboards, shoe molding, or transition strips are typically used. Measure and cut the moldings to fit the appropriate areas and secure them using nails or adhesive.
7. Trim and Fit
Once the flooring is installed, trim any excess material around the edges using a circular saw or jigsaw. Fit flooring around obstacles such as doorways or cabinets using a multi-tool or oscillating saw. Ensure the cuts are precise and clean.
8. Seal and Protect
For certain flooring types, such as hardwood or laminate, applying a sealant or finish is essential to protect them from wear and tear. Choose a sealant or finish that is appropriate for the specific type of flooring, and follow the manufacturer's instructions for application.
9. Maintenance and Care
Regular maintenance is crucial to extend the life of your flooring installation. Sweep or vacuum regularly to remove dirt and debris, and clean with appropriate cleaning solutions according to the flooring manufacturer's recommendations. Avoid using harsh chemicals or abrasive cleaners.
10. Professional Assistance
If you encounter any difficulties or have a particularly complex flooring installation, don't hesitate to seek professional assistance. A qualified flooring installer can ensure a precise and durable installation.

These Instructions Apply To The Dream Home Laminate Collection

Diy How To Corelux Vinyl Installation Tips And Tricks Lumber Liquidators Lvp Plank Flooring Install

How To Install Sentinel Protect Plus Underlayment And Moisture Barrier The Fixer Clips

How To Install Laminate Flooring The Home Depot

How To Install Lock Engineered Hardwood Flooring

How To Install Laminate Flooring Easy Diy Guide

How To Install Laminate Floors

Lock Vinyl Floor Installation Ll Flooring

Frosted Pine 12mm Laminate Flooring 1 New Sealed Box 17 24 Sq Ft Pr W Pad

Lock Vinyl Floor Installation Ll Flooring
Related Posts


