Mastering Shaw Resilient Vinyl Flooring Installation: A Definitive Guide
Transforming your living spaces with durable and stylish Shaw Resilient Vinyl Flooring is a captivating endeavor. To ensure a seamless and flawless installation, it's crucial to meticulously follow these essential steps:
1. Preparation: Laying the Foundation for Success
Begin by scrupulously cleaning the subfloor, removing any dust, debris, or adhesive residue. Ensure a flat, level surface using a spirit level to identify any uneven areas. Moisture is the vinyl's nemesis, so verify that the subfloor's moisture content doesn't exceed 12% using a hygrometer.
2. Acclimation: Allowing the Vinyl to Adapt
Unpack the vinyl flooring and allow it to acclimate to the room's temperature and humidity for at least 48 hours before installation. This crucial step minimizes the risk of buckling or warping due to thermal expansion or contraction.
3. Dry Lay: A Preview of the Puzzle
Lay the vinyl planks or tiles dry without adhesive to visualize the overall layout. This dry run enables you to make any necessary adjustments to the pattern or cut pieces to fit irregular areas.
4. Adhesive Application: The Bonding Agent
Using a notched trowel, apply a thin, even layer of Shaw Resilient Vinyl Adhesive to the subfloor. Work in small sections to prevent the adhesive from drying before placing the vinyl. Ensure the adhesive has adequate open time based on the manufacturer's instructions.
5. Plank Placement: Aligning for Perfection
Gently place the vinyl planks or tiles onto the adhesive, carefully aligning the edges and ends. Apply pressure to ensure proper adhesion, but avoid sliding the vinyl as this can disturb the adhesive's bond.
6. Rolling Out the Results: Smoothing the Surface
Once all the vinyl is installed, use a heavy roller to apply even pressure across the entire floor. This step enhances adhesion, eliminates air pockets, and produces a smooth, uniform surface.
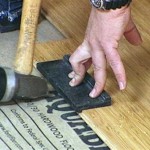
7. Trimming and Finishing: The Final Touches
Use a utility knife or a vinyl cutter to trim the excess vinyl around the perimeter of the room. Install transition strips or molding to cover any exposed edges and provide a professional-looking finish.
Additional Tips for a Professional-Grade Installation:
- Maintain a consistent room temperature of around 70°F (21°C) throughout the installation process.
- If adhesive residue appears on the vinyl surface, gently wipe it away with a damp cloth and mild detergent.
- Allow the floor to cure for the recommended time before placing heavy furniture or foot traffic on it.
- Regularly clean and maintain your Shaw Resilient Vinyl Flooring to preserve its pristine condition and extend its life.

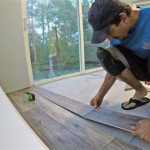
Shaw Floorte Vinyl Flooring Installation Getting Started Job Preview Floor Prep Plank

Installation Review Of Shaw Vinyl Floor Tile

Shaw Floors Resilient Residential Luxury Vinyl Flooring In Mountain Oak 00260 0129v Boston Ma Aj Rose Carpets

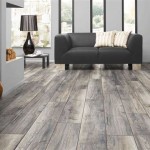
Shaw Limitless 20 Vista Lvp

Shaw Take Home Sample Primavera Whisper Resilient Vinyl Plank Flooring 5 In X 7 Sh 943659 The Depot

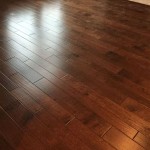
Presto Plus Washed Oak Resilient Ve284 00509 Shaw Builder Flooring

Shaw Floorte Pro Impact Plus Weathered Barnboard 2031v 00400 Spc Vinyl Flooring

Shaw Floorte Valore Wpc Low Cost Waterproof Vinyl Plank

Shaw Limitless Spc Drift Lvp

Cleveland Plus 20 Mineral Maple Resilient Ve463 00297 Shaw Property Solutions
Related Posts