How To Lay Laminate Flooring With Skirting Boards
Laying laminate flooring is a popular DIY project that can significantly enhance the aesthetic appeal and functionality of a space. When installing laminate flooring, the treatment of skirting boards is a crucial consideration, as it affects both the finished look and the longevity of the floor. This article provides a comprehensive guide on how to lay laminate flooring effectively, taking into account the presence of skirting boards. The goal is to provide a durable and professional-looking finish.
There are two primary approaches to working with skirting boards when laying laminate flooring: installing the flooring up to the existing skirting boards or removing the skirting boards before installation and then reinstalling them afterwards. Each method has its advantages and disadvantages, which will be discussed in detail. The choice depends on factors such as the existing condition of the skirting boards, personal preference, and the desired level of finish.
Before embarking on the installation process, it's essential to gather all necessary tools and materials. This proactive approach ensures a smooth and efficient workflow, minimizing interruptions and potential delays. The required tools include a measuring tape, a pencil, a saw (either a hand saw, jigsaw, or circular saw), a hammer, a tapping block, a pull bar, spacers, a moisture meter, a level, and safety glasses. Materials needed are the laminate flooring itself, underlayment, skirting boards (if replacing), adhesive (if required), and nails or screws for reattaching the skirting boards. It is also vital to have appropriate safety gear, including knee pads and dust masks.
Key Measurements and Preparations
Accurate measurements and thorough preparation are paramount to a successful laminate flooring installation. The first step involves precisely measuring the dimensions of the room, paying close attention to any irregularities in the walls or corners. These measurements will determine the amount of laminate flooring required and help in planning the layout.
Once the room dimensions are established, it is crucial to calculate the number of laminate planks needed, accounting for waste. It is standard practice to add an extra 5-10% to the total area to accommodate cuts and potential errors. This contingency ensures that there is sufficient material to complete the job without resorting to mismatched pieces.
The subfloor must be clean, level, and dry before laying the underlayment. Any existing flooring should be removed, including carpet, vinyl, or old laminate. Inspect the subfloor for any imperfections, such as cracks, holes, or unevenness. These flaws must be addressed before proceeding. Small cracks can be filled with a leveling compound, while larger imperfections may require more extensive repairs. A self-leveling compound can be used to create a perfectly smooth surface.
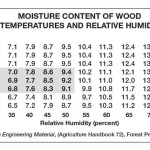
Moisture is a significant enemy of laminate flooring. Before installation, test the moisture content of the subfloor using a moisture meter. The reading should be within the manufacturer's recommended range, typically below 12%. If the moisture level is too high, allow the subfloor to dry completely before proceeding. This may involve using dehumidifiers or improving ventilation in the room. Failure to address moisture issues can lead to warping, buckling, or mold growth.
Acclimatization is another critical step. Laminate flooring should be stored in the room where it will be installed for at least 48-72 hours before starting the project. This allows the planks to adjust to the room's temperature and humidity, minimizing expansion and contraction after installation. Store the planks in their original packaging, laid flat on the floor.
The underlayment serves as a crucial barrier between the subfloor and the laminate flooring. It provides cushioning, reduces noise transmission, and acts as a moisture barrier. Roll out the underlayment, overlapping the edges slightly and securing them with tape. Ensure the underlayment is smooth and free of wrinkles or creases.
Installation Methods: With or Without Skirting Board Removal
As mentioned earlier, there are two main methods for dealing with skirting boards during laminate flooring installation. The first approach involves laying the flooring up to the existing skirting boards, while the second entails removing the skirting boards before installation and then reattaching them afterwards.
Laying Laminate Flooring Up To Existing Skirting Boards:
This method is generally simpler and faster, as it avoids the hassle of removing and reinstalling the skirting boards. However, it requires precise cutting and fitting to achieve a clean and professional look. The disadvantage is that it can leave a small gap between the flooring and the skirting board, which may need to be filled with sealant or caulking.
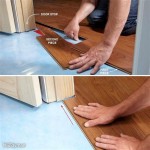
Start by laying the first row of laminate planks along the longest straight wall, leaving a gap of 8-10mm between the planks and the wall. This expansion gap allows the flooring to expand and contract with changes in temperature and humidity. Use spacers to maintain the correct gap.
When reaching the skirting board, carefully measure the distance between the last full plank and the skirting board. Cut the next plank to fit, ensuring you maintain the expansion gap. Use a jigsaw or hand saw to make precise cuts. A coping saw can be helpful for intricate shapes around pipes or other obstacles.
Continue laying the flooring, staggering the joints between the planks to create a more visually appealing and structurally sound floor. Use a tapping block and a hammer to gently tap the planks together, ensuring they are tightly locked. For the final row, you may need to cut the planks lengthwise to fit the remaining space. Again, remember to maintain the expansion gap.
Once the flooring is installed, fill the expansion gap with sealant or caulking to prevent dirt and debris from accumulating. This also helps to create a more airtight seal, reducing drafts and improving energy efficiency.
Removing and Reinstalling Skirting Boards:
This method provides a cleaner and more professional look, as the laminate flooring can be laid directly to the wall, eliminating the need for sealant or caulking. However, it is more time-consuming and requires care to avoid damaging the skirting boards during removal and reinstallation.
Before removing the skirting boards, carefully score along the top edge of the board where it meets the wall using a utility knife. This will prevent the paint or wallpaper from tearing when the skirting board is removed. Use a pry bar or a flathead screwdriver to gently pry the skirting board away from the wall. Start at one end and work your way along, applying even pressure to avoid breaking the board.
Once the skirting boards are removed, remove any nails or screws that were used to attach them to the wall. Use a hammer and nail punch to drive the nails through the back of the board, or use a screwdriver to remove the screws. Clean the back of the skirting boards to remove any old adhesive or debris.
Install the laminate flooring as described above, laying it directly to the wall. When reinstalling the skirting boards, ensure they are aligned properly and attached securely to the wall. Use nails or screws that are long enough to penetrate the wall studs, providing a strong and durable connection. Fill any nail holes with wood filler and sand them smooth before painting or varnishing the skirting boards.
Dealing With Obstacles and Finishing Touches
Most rooms contain obstacles such as pipes, doorways, and radiator legs, which require special attention during laminate flooring installation. Precision cutting and careful planning are essential to achieve a seamless and professional finish around these obstacles.
Pipes:
For pipes, use a hole saw to drill a hole in the laminate plank that is slightly larger than the diameter of the pipe. Then, use a saw to cut a straight line from the edge of the plank to the hole. This will allow you to fit the plank around the pipe. Once the plank is in place, use pipe collars to cover the gap around the pipe, creating a clean and finished look.
Doorways:
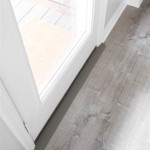
Doorways require careful planning to ensure a smooth transition between the laminate flooring and the adjacent flooring. Use a transition strip to cover the gap between the two floors, creating a safe and visually appealing transition. The transition strip should be installed flush with both floors, eliminating any tripping hazards. Consider using a threshold that matches the laminate flooring for a cohesive design.
Radiator Legs:
Similar to pipes, radiator legs require precise cutting and fitting. Use a template to trace the shape of the radiator leg onto the laminate plank. Then, use a jigsaw or hand saw to cut out the shape, ensuring you maintain the expansion gap. Once the plank is in place, use radiator leg covers to conceal the gap and create a clean finish.
Final Steps:
After the laminate flooring is installed and the skirting boards are reattached, inspect the floor for any imperfections or gaps. Fill any gaps with sealant or caulking, and clean the floor thoroughly with a damp cloth. Avoid using excessive water, as this can damage the laminate flooring. Use a laminate floor cleaner recommended by the manufacturer.
Consider adding rugs or mats to high-traffic areas to protect the laminate flooring from wear and tear. Use furniture pads under the legs of heavy furniture to prevent scratching. Regularly sweep or vacuum the floor to remove dirt and debris. With proper care and maintenance, laminate flooring can provide years of beauty and durability.

Laying Laminate Flooring With Skirting Boards Still On Diy Her Way

How To Install Skirting Boards Factory Direct Flooring

How To Install Skirting Boards

Floor Edging Skirting Boards Or Beading For Laminate Floors

Laying The Floor And Skirting Board In Our Log Cabin

How Should I Use Skirting Board With Laminate Flooring Egger More From Wood

Diy Fitting Skirting Boards Baseboards As Beading For Laminate Flooring And Other Hard Floors

Floor Edging Skirting Boards Or Beading For Laminate Floors

Everything That You Need To Know About Skirting Boards Wood Floor Fitting

How To Install Skirting Boards
Related Posts