How to Install Laminate Flooring with Underlayment Attached
Installing laminate flooring with underlayment attached is a relatively simple and straightforward process that can be completed in a few hours. By following these steps, you can achieve a professional-looking finish that will last for years to come.
Materials Needed:
- Laminate flooring with underlayment attached
- Tape measure
- Pencil
- Utility knife
- Tapping block
- Hammer
- Pull bar
- Spacer blocks
Step 1: Prepare the Subfloor
The first step is to prepare the subfloor by cleaning it thoroughly and removing any debris. The subfloor should be level and free of any imperfections that could cause the laminate flooring to buckle or warp. If the subfloor is not level, you may need to use a self-leveling compound to level it out.
Step 2: Measure and Cut the Laminate Flooring
Once the subfloor is prepared, you can begin measuring and cutting the laminate flooring. Measure the length and width of the room and add 10% for waste. Cut the laminate flooring to the desired length and width using a utility knife.
Step 3: Install the Laminate Flooring
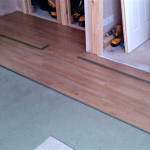
The first row of laminate flooring should be installed along the longest wall in the room. Place the first plank in the corner of the room and tap it into place using a tapping block and hammer. Continue installing the planks in this manner, making sure to stagger the joints between the rows.
Step 4: Tap the Planks into Place
Once the first row is installed, you can begin tapping the remaining planks into place. Use a tapping block and hammer to tap each plank into the previous one. Be sure to use enough force to ensure that the planks are securely connected.
Step 5: Install the Last Row
The last row of laminate flooring may need to be cut to fit. Measure the remaining space and cut the plank to the appropriate length. Use a pull bar to help you pull the plank into place. Tap the plank into place using a tapping block and hammer.
Step 6: Trim the Excess Underlayment
Once the laminate flooring is installed, you will need to trim the excess underlayment around the edges of the room. Use a utility knife to score the underlayment and then bend it back and cut it off.
Step 7: Install the Trim
The final step is to install the trim around the edges of the room. Trim can be used to cover up the expansion gap and give the room a finished look. Choose the type of trim that you prefer and follow the manufacturer's instructions for installation.

Laminate Flooring With Attached Underlayment Pros And Cons Mp Global S Llc

Laminate Flooring With Attached Underlayment

How To Install Laminate Flooring The Home Depot

Pergo Installation Laminate Flooring Sawdust Girl

Laminate Flooring With Attached Pad Shortens The Laying Process

How To Choose Laminate Flooring Underlay Tile Merchant

Installing Laminate Flooring For The First Time Crafted Work

How To Lay Underlayment For Laminate Flooring

Laminate Flooring Installation A Step By Guide

Underlayment Buyer S Guide
Related Posts


