Essential Wood Flooring Installation Tips for a Flawless Finish
Installing wood flooring is a rewarding home improvement project that can enhance the beauty and value of your space. However, it's essential to plan and execute the installation meticulously to ensure a durable and aesthetically pleasing result. Here are some crucial tips to guide you through the process:
1. Prepare the Subfloor
The subfloor serves as the foundation for your wood flooring. Ensure it's level, smooth, and free from moisture. Inspect the subfloor for any unevenness, cracks, or loose boards. Address any issues by sanding, leveling, or replacing damaged sections.
2. Choose the Right Flooring Type
Select a wood flooring type that suits your lifestyle and the intended use of the space. Consider factors such as durability, moisture resistance, and appearance. Solid hardwood flooring provides a timeless and elegant look, while engineered hardwood is more stable and can withstand temperature fluctuations better.
3. Acclimatize the Flooring
Before installing the flooring, allow it to acclimatize to the ambient temperature and humidity of the room where it will be installed. This ensures that the wood expands or contracts accordingly, preventing buckling or gaps later on.
4. Install a Vapor Barrier
A vapor barrier is a crucial step to prevent moisture from migrating up through the subfloor and damaging the wood flooring. Install a vapor barrier, such as plastic sheeting or a mastic, over the subfloor before laying the wood flooring.
5. Determine the Installation Method
There are several methods of installing wood flooring, including nailing down, stapling, and floating floors. Choose the installation method best suited for your flooring type and subfloor conditions. Ensure you have the necessary tools and materials for the selected method.
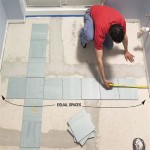
6. Start from the Center and Work Outward
Start laying the wood flooring from the center of the room and work your way outward. This helps ensure a symmetrical and balanced appearance. Use spacers to maintain even gaps between the planks.
7. Secure the Flooring
For nailed-down floors, drive the nails at an angle into the tongue of each plank. For stapled floors, use a pneumatic stapler to secure the planks. For floating floors, simply click or lock the planks together.
8. Trim and Finish
Once the flooring is installed, trim the edges around the perimeter of the room using a circular saw or miter saw. Install baseboards or quarter rounds to cover the expansion gap and enhance the finished look.
9. Protect the Flooring
After installation, protect your wood flooring by applying a sealant or finish. This will enhance its durability and resistance to wear and tear. Use a flooring cleaner specifically designed for wood to maintain its appearance.

5 Common Hardwood Flooring Installation Mistakes And How To Avoid Them

How To Install Wood Flooring Diy Kährs Us

5 Essential Tips For Tongue And Groove Flooring District Floor Depot

Top Ten Tips For Installing Wood Flooring Ambience Hardwood

Tips For Diy Flooring Projects Everything You Need To Know

Sub Flooring Installation Tips When Using Hardwood West Fraser Integrated Forestry Company

Gluing Hardwood Floors Your Comprehensive Installation Guide

Laminate Floor Installation For Beginners 9 Clever Tips

Essential Hardwood Floor Installation Tips For Homeowners

Installing Hardwood Timber Floors Tips To Make The Job Go Easier Better Flooring
Related Posts

