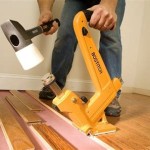
Essential Aspects of Bostitch MIIIFN Kit Flooring Cleat Nailer Conversion
Converting your Bostitch MIIIFN flooring stapler to a cleat nailer is a straightforward process that can significantly enhance its versatility. By utilizing cleats, you can tackle a broader range of flooring projects and achieve professional-grade results. Here's a comprehensive guide to help you navigate the conversion seamlessly:
1. Gather Necessary Tools and Materials
Before embarking on the conversion, ensure you have the following tools and materials:
- Bostitch MIIIFN flooring stapler
- Cleat nailer conversion kit (includes nosepiece, driver blade, and retaining rings)
- Allen wrench
- Safety glasses
2. Remove Existing Nosepiece and Driver Blade
Don safety glasses and locate the two bolts securing the nosepiece and driver blade. Using the Allen wrench, carefully loosen these bolts and remove the components. Keep these securely, as you will need to reinstall them later.
3. Install Conversion Kit Components
Take the nosepiece from the conversion kit and align it with the housing. Securely tighten the bolts using the Allen wrench. Next, insert the driver blade from the conversion kit and secure it with the retaining rings. Ensure the blade is facing downwards.
4. Adjust Cleat Depth
To adjust the depth at which the cleats are driven into the flooring, locate the adjustment screw on the nosepiece. Turn the screw clockwise to increase the depth or counterclockwise to decrease it. Use a test piece of flooring to determine the optimal depth.
5. Load Cleats and Test Function
Load the appropriate cleats into the nailer magazine. Hold the nailer perpendicular to the flooring surface and press the trigger. The cleats should be driven in smoothly and securely. If not, adjust the cleat depth as needed or consult the manufacturer's instructions.
6. Maintain and Inspect Conversion Kit
Regular maintenance is crucial to ensure optimal performance of the converted cleat nailer. After each use, clean the nosepiece and driver blade to remove any debris or obstructions. Lubricate the moving parts as per the manufacturer's guidelines. Additionally, periodically inspect the conversion kit components for any signs of damage or wear and replace them if necessary.
By following these steps, you can successfully convert your Bostitch MIIIFN flooring stapler to a cleat nailer. This conversion will expand its functionality and allow you to take on a wider variety of projects with confidence and precision.
Bostitch Miiifn Flooring Nailer Conversion Kit 110 1 2 To In L Fastener 4 Cfm Shot Air Vorg6854376

Stanley Bostitch Miiifn M111fn M3fn Hardwood Flooring Cleat Nailer R

Buy Bostitch Miiifn Flooring Nailer Conversion Kit 110 1 2 To In L Fastener 4 Cfm Shot Air

Bostitch Pneumatic 16 Ga Flooring Nailer Kit Com

Bostitch Pneumatic 16 Ga Flooring Nailer Kit Com

Bostitch Hardwood Flooring Cleat Nailer Miiifn Acme Tools

Bostitch Hardwood Flooring Cleat Nailer Miiifn Acme Tools

Bostitch Flooring Nailer Miiifn

Must Have Flooring Tools Accessories

Bostitch Miiifn Pneumatic Flooring Nailer Discussion And Diy Demo
Related Posts


