How To Install Engineered Hardwood Flooring In Basement
Installing engineered hardwood flooring in a basement can be a great way to add value and style to your home. However, there are a few things you need to keep in mind before starting your project. First, you need to make sure that your basement is dry and well-ventilated. Engineered hardwood flooring is not waterproof, so it is important to make sure that your basement is not prone to flooding or moisture problems. Second, you need to level the floor before installing the flooring. This will help to ensure that the flooring is installed correctly and that it will last for many years to come.
Materials You Will Need
Before you start installing your engineered hardwood flooring, you will need to gather the following materials:
- Engineered hardwood flooring
- Underlayment
- Moisture barrier
- Adhesive
- Saw
- Hammer
- Nail gun
- Tape measure
- Level
Step 1: Prepare the Floor
The first step is to prepare the floor. This involves removing any existing flooring, leveling the floor, and installing a moisture barrier. If your basement floor is concrete, you will need to level it using a self-leveling compound. If your basement floor is wood, you will need to level it using a plywood underlayment.
Step 2: Install the Moisture Barrier
Once the floor is leveled, you need to install a moisture barrier. This will help to protect the flooring from moisture damage. The moisture barrier should be overlapped by at least 6 inches and should be taped at the seams.
Step 3: Install the Underlayment
The next step is to install the underlayment. The underlayment will help to cushion the flooring and reduce noise. The underlayment should be rolled out over the moisture barrier and overlapped by at least 6 inches. The underlayment should be taped at the seams.
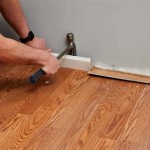
Step 4: Install the Flooring
Now you are ready to install the flooring. Start by measuring the room and cutting the flooring to size. The flooring should be installed in a staggered pattern. Apply adhesive to the back of the flooring and press it into place. Use a hammer or nail gun to secure the flooring.
Step 5: Finish the Installation
Once the flooring is installed, you need to finish the installation. This involves trimming the flooring around the edges of the room and installing baseboards. You can also add a sealant to the flooring to protect it from moisture damage.
Tips for Installing Engineered Hardwood Flooring in a Basement
Here are a few tips for installing engineered hardwood flooring in a basement:
- Make sure that your basement is dry and well-ventilated before starting your project.
- Level the floor before installing the flooring. This will help to ensure that the flooring is installed correctly and that it will last for many years to come.
- Install a moisture barrier to protect the flooring from moisture damage.
- Install the underlayment to cushion the flooring and reduce noise.
- Stagger the flooring joints when installing the flooring.
- Use a hammer or nail gun to secure the flooring.
- Trim the flooring around the edges of the room and install baseboards.
- Add a sealant to the flooring to protect it from moisture damage.

Installing Engineered Hardwood On Concrete Twenty Oak

Basement Wood Flooring What You Should Know

Installing Engineered Hardwood On Concrete Twenty Oak

How To Install Engineered Hardwood Floors 4 Easy Installation Options

Diy Engineered Hardwood Floor Installation Guide Four Generations One Roof Blog

How To Install Engineered Hardwood Floors A Erfly House

How To Install Solid Wood Flooring On Concrete And Oak Specialists Suppliers Nexus

How To Install A Wood Subfloor Over Concrete Olde Ltd

Diy Engineered Hardwood Floor Installation Guide Four Generations One Roof Blog

Diy Engineered Hardwood Floor Installation Guide Four Generations One Roof Blog