Essential Aspects of Locking Vinyl Flooring Installation
Locking vinyl flooring has become increasingly popular due to its durability, ease of installation, and attractive appearance. Installing locking vinyl flooring requires meticulous attention to detail and an understanding of the specific requirements of the product. To ensure a successful installation, here are some essential aspects to consider:
1. Site Preparation
Proper site preparation is crucial for a successful installation. The subfloor must be level, dry, and free of debris. Unevenness can cause the flooring to buckle or become damaged over time. If the subfloor is not level, it should be leveled using a self-leveling compound.
2. Underlayment Installation
Underlayment is a thin layer of material that is installed between the subfloor and the vinyl flooring. It provides additional comfort underfoot, reduces noise, and protects the vinyl flooring from moisture. Choose an underlayment that is compatible with your specific flooring product.
3. Plank Acclimation
Before installing the vinyl flooring, it is essential to acclimate the planks to the room's temperature and humidity. This process helps to prevent the planks from expanding or contracting after installation. Allow the planks to sit in the room for at least 24 hours before beginning the installation.
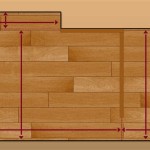
4. Starting Row Installation
The starting row is the foundation of the vinyl flooring installation. Begin by laying the first plank in the corner of the room, ensuring that it is straight and level. Use a spacer to maintain a consistent gap between the flooring and the wall. Continue laying planks in the same direction, locking them together using the built-in locking system.
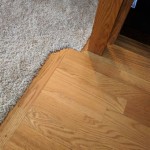
5. Cutting and Fitting Planks
When you reach obstacles such as doorways or corners, it will be necessary to cut the planks. Use a sharp utility knife and a straight edge to ensure a clean cut. Measure the required length and mark it on the plank. Hold the knife firmly and score the plank along the mark. Snap the plank along the scored line and fit it into place.
6. Tooling and Accessories
A few essential tools and accessories will assist in the installation process. A tapping block is used to gently tap the planks together, a pry bar helps to lift and adjust planks, and a spacer ensures a consistent gap around the perimeter of the room. Use these tools carefully to avoid damaging the flooring.
7. Jointing and Finishing
Once all the planks are installed, join the joints along the edges of the room using a sealant or adhesive. This helps to create a watertight seal and prevent moisture from seeping into the subfloor. Finally, install baseboards or molding around the perimeter of the room to conceal the expansion gap and complete the installation.
Conclusion
By following these essential aspects, you can ensure a successful locking vinyl flooring installation. Proper preparation, attention to detail, and the use of the right tools and techniques will result in a durable and aesthetically pleasing floor that will enhance the beauty and functionality of your space.

How To Install A Lock Vinyl Floor

How To Install A Lock Vinyl Floor

Luxury Vinyl Locking Systems 101 Nufloors

Ideal Floors Step By Lock Vinyl Plank Installation Guide Flooring Blog In Dallas Fort Worth

How To Install Lock Vinyl Flooring Step By 99cent Floor

A Beginner S Guide To Installing Vinyl Plank Flooring Dumpsters Com

Post Nbl Express Eco Flooring

Stainmaster 12x24 Lock Vinyl Tile Installation Tip

How The Locking System On Vinyl Plank And Laminate Works So That S You Do

Learn How To Choose Vinyl Flooring And Install It In Your Home
Related Posts