Installing Vinyl Plank Flooring on Shower Walls: A Step-by-Step Guide
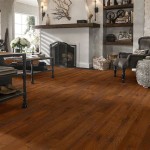
Enhance the style and appeal of your shower with vinyl plank flooring! This durable and waterproof material offers a stunning alternative to traditional tiles, transforming your bathroom into a modern oasis. Embark on this DIY project with our comprehensive guide, ensuring a flawless installation:
Materials Required:
- Vinyl plank flooring
- Adhesive
- Caulk
- Utility knife
- Tape measure
- Level
- Spacers
Step 1: Prepare the Wall Surface
Start by cleaning the shower wall thoroughly, removing any soap scum, mildew, or debris. Apply a mildew-resistant primer to prevent future growth and ensure adhesion. Allow the primer to dry completely.
Step 2: Plan the Layout
Determine the starting point for the installation and snap a chalk line to ensure a straight reference line. Tape spacers to the bottom of the wall and along any edges to maintain even spacing between the planks.
Step 3: Apply Adhesive
Use a notched trowel to apply a thin layer of adhesive to a small section of the wall. Follow the manufacturer's instructions carefully for optimal bonding.
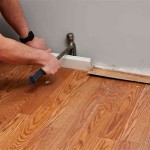
Step 4: Install the First Row
Align the first plank with the chalk line and gently press it into the adhesive. Use a level to ensure it is straight, and adjust the spacers as needed. Continue installing the first row, ensuring the joints are tight without any gaps.
Step 5: Install Subsequent Rows
Apply adhesive to the next section of the wall and stagger the joints with the planks in the previous row. Continue installing rows until the wall is completely covered. Use a utility knife to trim any excess flooring at the edges.
Step 6: Caulk and Finish
Apply a bead of caulk along all seams, corners, and edges. Use a damp cloth to smooth the caulk and remove any excess. Allow the caulk to dry completely before using the shower.
Tips for Success:
- Use a sharp utility knife to ensure clean cuts.
- Press the planks firmly into the adhesive to create a strong bond.
- Work in small sections to prevent the adhesive from drying out.
- Allow the installation to cure completely before using the shower.
- Clean and reseal the grout annually to maintain the longevity of your vinyl plank flooring.

Installing Waterproof Vinyl Flooring On Shower Walls Bathroom Design Inspiration Wall

Can Vinyl Flooring Be Used On Walls And Shower In Singapore Property

How To Install Vinyl Plank Flooring In A Bathroom Fixthisbuildthat

Vinyl Floor Tiles Above Tub Surround Update

Vinyl Flooring On Shower Walls 100 Waterproof Rescuing An Old House

Installed Vinyl Plank Flooring On My Bathroom Wall Love The Texture Color Walls

How To Install Vinyl Plank Flooring In A Bathroom Fixthisbuildthat

Vinyl Flooring On Shower Walls 100 Waterproof Rescuing An Old House

Can You Use Vinyl Flooring On Bathroom Walls Answered W Tips

Systems For Installing Lvt In Wet Environments Mapei
Related Posts