How To Install Vinyl Flooring Over Existing Tile
Installing vinyl flooring over existing tile offers a cost-effective and time-saving alternative to removing the old tiles. This approach allows for a significant aesthetic upgrade without the extensive demolition, disposal, and preparation work associated with a complete tile removal. However, successful installation requires meticulous preparation and adherence to specific techniques to ensure a durable and visually appealing result.
Before embarking on the project, it's crucial to determine the suitability of the existing tile floor. Considerations include the condition of the tile, the presence of any significant height variations between tiles, and the type of vinyl flooring to be installed. Properly assessing these factors will influence the preparation steps and the overall success of the installation.
This article outlines the necessary steps for a successful vinyl flooring installation over existing tile, covering preparation, material selection, proper techniques, and potential challenges. Careful attention to these details will ensure a professional-looking and long-lasting floor.
Assessing the Existing Tile Floor
The first and perhaps most critical step is a thorough assessment of the existing tile floor. The outcome of this assessment will dictate subsequent preparation steps and ultimately influence the durability and appearance of the new vinyl floor. Several factors need careful consideration.
Condition of the Tile: Examine the tile for any cracks, loose tiles, or significant damage. Cracked or broken tiles will create uneven surfaces that can telegraph through the vinyl flooring. Loose tiles will create voids that can lead to movement and eventual failure of the vinyl. Addressing these issues before installation is paramount.
Levelness of the Floor: Check for any significant height variations between tiles or across larger areas of the floor. Minor grout lines or slight imperfections are generally acceptable, but significant dips or rises will require leveling. Use a long level to identify any unevenness. Severe irregularities can impact the vinyl's resistance to wear and tear, and even cause cracking.
Grout Lines: The depth and width of grout lines are also important. Deep or wide grout lines can be visible through thinner vinyl flooring materials. Proper filling and smoothing of the grout lines is crucial to prevent these imperfections from showing through the new floor.
Cleanliness: Thoroughly clean the existing tile floor, removing any dirt, grease, wax, or other contaminants. These substances can interfere with the adhesion of the vinyl flooring. Use a suitable cleaning solution and ensure the floor is completely dry before proceeding.
Moisture: Verify that there are no moisture problems originating from beneath the tile floor. Excessive moisture can lead to mold growth and adhesive failure, potentially ruining the vinyl flooring. If moisture is suspected, investigate the source and address the issue before proceeding with the installation.
Preparing the Tile Floor for Vinyl Installation
Once the assessment is complete, the preparation phase begins. This involves addressing any issues identified during the assessment and creating a smooth, clean, and level surface for the vinyl flooring to adhere to. The preparation steps are essential for a successful and long-lasting installation.
Repairing Damaged Tiles: Remove any cracked, broken, or loose tiles. Scrape away any old adhesive or grout. Apply new adhesive to the back of the replacement tile and firmly press it into place. Allow the adhesive to cure completely before proceeding. Once the tile is set, apply new grout to match the existing grout lines.
Leveling the Floor: For minor height variations, a self-leveling compound can be used to create a smooth and even surface. Apply the compound according to the manufacturer's instructions, ensuring it flows into any low spots or dips. For larger variations, a patching compound might be necessary to fill in deeper areas before applying the self-leveling compound. Feather the edges of the patching compound to blend smoothly with the surrounding tile.
Filling Grout Lines: Use a cement-based grout filler to fill in the grout lines between the tiles. Apply the filler liberally, ensuring it completely fills the grout lines. Use a grout float to press the filler firmly into the joints. Remove any excess filler from the tile surface with a damp sponge. Allow the grout filler to dry completely before sanding it smooth. Use a fine-grit sandpaper to smooth out any imperfections and create a flush surface with the surrounding tile.
Cleaning and Priming: After repairing and leveling the floor, thoroughly clean the entire surface again to remove any dust or debris. Use a scrub brush and a cleaning solution to ensure a clean and grease-free surface. Rinse the floor thoroughly and allow it to dry completely. Apply a primer specifically designed for use with vinyl flooring adhesive. The primer will improve the adhesion of the vinyl flooring and help prevent moisture problems. Allow the primer to dry completely according to the manufacturer's instructions.
Selecting the Right Vinyl Flooring and Adhesive
Choosing the appropriate vinyl flooring and adhesive is crucial for a successful and long-lasting installation. The type of vinyl flooring you select will influence the adhesive requirements, and vice versa. Consider the following factors when making your selection.
Type of Vinyl Flooring: Vinyl flooring comes in various forms, including sheet vinyl, vinyl tiles, and luxury vinyl planks (LVP). Sheet vinyl provides a seamless surface and is a good choice for wet areas like bathrooms and kitchens. Vinyl tiles offer a more modular approach and are easier to install in smaller areas. LVP mimics the look of wood or stone and offers excellent durability and water resistance. The chosen vinyl flooring should be suitable for the intended use and the specific conditions of the installation area.
Vinyl Thickness and Wear Layer: The thickness of the vinyl flooring and the thickness of the wear layer are important considerations for durability. Thicker vinyl flooring is generally more durable and resistant to wear and tear. The wear layer is the top protective layer that protects the flooring from scratches, stains, and fading. Choose a vinyl flooring with a wear layer that is appropriate for the level of traffic in the area where it will be installed. Areas with heavy foot traffic will require a thicker wear layer.
Adhesive Compatibility: Select an adhesive that is specifically designed for use with the chosen vinyl flooring and the existing tile surface. Check the manufacturer's recommendations for both the vinyl flooring and the adhesive to ensure compatibility. Using the wrong adhesive can lead to adhesion problems, resulting in bubbles, peeling, or movement of the vinyl flooring. Different types of vinyl flooring require different types of adhesives.
Moisture Resistance: If the installation area is prone to moisture, choose a vinyl flooring and adhesive that are specifically designed to be moisture resistant. This will help prevent mold growth and adhesive failure. Some adhesives are also designed to create a waterproof barrier, which can be particularly important in bathrooms and kitchens.
Installing the Vinyl Flooring
With the preparation complete and the right materials selected, the actual installation of the vinyl flooring can begin. This phase requires careful attention to detail and adherence to the manufacturer's instructions to ensure a professional and durable result.
Acclimation: Allow the vinyl flooring to acclimate to the room temperature for at least 48 hours before installation. This will help prevent the vinyl from expanding or contracting after installation. Store the vinyl flooring in the room where it will be installed, away from direct sunlight or heat sources. Consult the manufacturer's instructions for specific acclimation requirements.
Dry Lay: Before applying any adhesive, lay out the vinyl flooring to ensure a proper fit and to identify any potential problems. This step is particularly important for sheet vinyl, as it allows you to make any necessary cuts or adjustments before committing to the adhesive. For vinyl tiles or LVP, this allows you to plan the layout and ensure a visually appealing pattern.
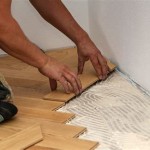
Applying Adhesive: Apply the adhesive according to the manufacturer's instructions. Use a notched trowel to spread the adhesive evenly over the prepared tile surface. The size of the notches on the trowel will be specified by the adhesive manufacturer. Work in small sections to prevent the adhesive from drying out before the vinyl flooring is applied. Avoid applying too much adhesive, as this can lead to bubbles or unevenness.
Laying the Vinyl Flooring: Carefully place the vinyl flooring onto the adhesive, starting from one edge of the room. Press the vinyl firmly into the adhesive, ensuring it is properly aligned and free of wrinkles or bubbles. Use a roller to smooth the vinyl flooring and ensure good contact with the adhesive. For sheet vinyl, use a seam roller to seal the seams between sheets. For vinyl tiles or LVP, ensure each piece is tightly butted against the adjacent pieces.
Cutting and Trimming: Use a utility knife to trim the vinyl flooring around the edges of the room and around any obstacles, such as pipes or doorways. Use a straight edge to ensure clean and accurate cuts. Leave a small expansion gap around the perimeter of the room to allow for any expansion or contraction of the vinyl flooring. Cover the expansion gap with baseboards or trim.
Sealing and Finishing: After the adhesive has dried completely, apply a sealant to the seams and edges of the vinyl flooring to protect it from moisture and dirt. Install baseboards or trim to cover the expansion gap around the perimeter of the room. Clean the vinyl flooring with a mild detergent and water.

Vinyl Tile Installation A Comprehensive Guide Gc Flooring Pros

How To Install Vinyl Plank Flooring As A Beginner Home Renovation

Can You Put Vinyl Flooring Over Tile Igloo Surfaces

How To Install Vinyl Plank Flooring As A Beginner Home Renovation

How To Install L And Stick Vinyl Plank Flooring The Nifty Nester

How To Install Ceramic Tile Over Vinyl Flooring

How To Lay Tile Over An Existing Vinyl Floor Today S Homeowner

How To Lay Vinyl Flooring Sheets Tiles And Planks Tarkett

Putting Down Self Adhesive Vinyl Floor Tiles Flooring Supplies

How To Install Vinyl Plank Flooring The Home Depot