How to Install Engineered Wood Flooring on Slab
Engineered wood flooring can be a beautiful and durable addition to any slabbed home. However, it is important to know that installing engineered wood flooring on slab requires some special considerations. Here is a step-by-step guide to help you achieve a successful installation:
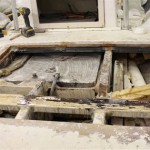
Step 1: Prepare the Slab
The first step is to prepare the slab. This includes cleaning the slab thoroughly, removing any debris or dirt, and repairing any cracks or imperfections. You should also check the slab for levelness. If the slab is not level, you will need to level it before installing the flooring.
Step 2: Install an Underlayment
An underlayment is a thin layer of material that is installed between the slab and the engineered wood flooring. The underlayment helps to protect the flooring from moisture and provides a cushion for the flooring to rest on. There are a variety of underlayments available, so you should choose one that is appropriate for your specific slab and flooring.
Step 3: Install a Vapor Barrier
A vapor barrier is a thin layer of material that is installed over the underlayment. The vapor barrier helps to prevent moisture from rising from the slab and damaging the flooring. There are a variety of vapor barriers available, so you should choose one that is appropriate for your specific slab and flooring.
Step 4: Install the Engineered Wood Flooring
Now it's time to install the engineered wood flooring. Start by laying out the flooring in the room to determine how it will fit. Once you have determined the layout, you can start installing the flooring. The flooring should be installed according to the manufacturer's instructions. There are a variety of ways to install engineered wood flooring, so be sure to follow the instructions for your specific flooring.
Step 5: Trim the Flooring
Once the flooring is installed, you will need to trim it around the edges of the room. This can be done using a circular saw or a jigsaw. Be sure to use a sharp blade to prevent the flooring from chipping. Trim the flooring carefully to ensure that it fits snugly against the walls and other obstacles in the room.
Step 6: Finish the Flooring
The final step is to finish the flooring. This includes sanding the flooring to smooth it out and applying a finish to protect it. The finish you choose will depend on the type of flooring you have installed. Be sure to follow the manufacturer's instructions for finishing your flooring.

Installing Engineered Hardwood On Concrete Twenty Oak

Installing Wood Flooring Over Concrete Diy

Installing Engineered Hardwood On Concrete Twenty Oak

Installing Engineered Flooring On A Concrete Slab Fine Homebuilding

How To Install An Engineered Hardwood Floor

Installing Hardwood Floors On Concrete Subfloors

How To Install Lock Engineered Hardwood Flooring

Hardwood Over Concrete Auten Wideplank Flooring

How To Install Lock Engineered Hardwood Flooring

How To Install Engineered Flooring On Concrete Adm
Related Posts