How to Install Hardwood Flooring on a Cement Slab
Installing hardwood flooring over a concrete slab presents a unique set of challenges compared to installing it over a wooden subfloor. Concrete is porous and can wick moisture, which can damage hardwood. Additionally, concrete is inflexible, requiring specific installation methods to accommodate the natural expansion and contraction of wood. This article details the process of installing hardwood flooring on a cement slab, outlining the necessary steps, materials, and precautions to ensure a successful and long-lasting installation.
Successful hardwood installation on concrete necessitates careful planning and preparation. Ignoring crucial steps can lead to warping, buckling, or other issues that compromise the integrity and appearance of the floor. Prior to beginning any installation, a thorough understanding of the site conditions and the chosen flooring product is paramount.
Assessing the Concrete Slab
The first critical step is assessing the condition of the concrete slab. This involves checking for levelness, moisture content, and any structural damage. Unevenness can cause instability in the finished floor, moisture can lead to mold and wood rot, and structural cracks can indicate underlying problems that need to be addressed before installation.
To determine the levelness of the slab, a long, straight edge and a level are required. Place the straight edge across various areas of the floor, and use the level to check for deviations. Areas with significant deviations (more than 3/16 inch over a 10-foot span) require leveling. Self-leveling concrete compounds can be applied to address these discrepancies, ensuring a flat and even surface for the hardwood.
Moisture testing is crucial. Several methods can be used, including the plastic sheet test, the calcium chloride test, and the electronic moisture meter test. The plastic sheet test involves taping a square of clear plastic sheeting to the concrete and leaving it for 24-72 hours. If condensation forms beneath the plastic, it indicates excessive moisture. The calcium chloride test, a more accurate method, involves placing a measured amount of calcium chloride beneath a sealed container for a specific period. The weight gain of the calcium chloride reveals the moisture vapor emission rate. Electronic moisture meters provide instant readings, but their accuracy can vary depending on the type of meter and the concrete's composition. The acceptable moisture level for hardwood installation depends on the flooring manufacturer's specifications, but generally, the moisture vapor emission rate should be below 3 lbs per 1000 sq ft per 24 hours.
Inspect the concrete for cracks. Hairline cracks are generally not a concern, but wider cracks or cracks that show signs of movement indicate structural issues. These cracks should be repaired with a concrete crack filler or epoxy before proceeding. Consult with a structural engineer or concrete specialist for significant cracking to determine the underlying cause and the appropriate repair strategy.
Selecting the Right Hardwood Flooring
Not all hardwood flooring is suitable for installation over concrete. Engineered hardwood is generally preferred over solid hardwood due to its greater dimensional stability. Engineered hardwood consists of multiple layers of wood veneer bonded together, making it less susceptible to expansion and contraction caused by moisture fluctuations. Solid hardwood, on the other hand, is a single piece of wood and is more prone to warping and cupping when exposed to moisture.
When selecting engineered hardwood, consider the thickness of the wear layer. The wear layer is the top layer of hardwood veneer that determines the floor's durability and lifespan. A thicker wear layer can withstand more sanding and refinishing, extending the floor's overall life. The core material of the engineered hardwood is also a factor. High-density fiberboard (HDF) cores offer good stability, while plywood cores provide better moisture resistance.
The flooring manufacturer's recommendations should always be followed regarding the suitability of a specific hardwood product for installation over concrete. These recommendations will take into account factors such as the concrete's moisture content, the intended use of the space, and the local climate.
Acclimation of the hardwood flooring is crucial, regardless of whether it's solid or engineered. The flooring should be stored in the room where it will be installed for several days (typically 3-5 days, but consult the manufacturer's guidelines) to allow it to adjust to the room's temperature and humidity. This helps to minimize expansion and contraction after installation.
Installation Methods and Materials
Several methods can be used to install hardwood flooring over concrete, each with its own advantages and disadvantages. The most common methods are gluing, floating, and attaching a wooden subfloor.
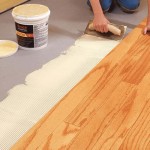
Gluing: Gluing the hardwood directly to the concrete slab is a common method, especially for engineered hardwood. This method provides a solid, stable surface and eliminates any hollow sounds. However, it requires a very flat and clean surface, and the adhesive must be compatible with both the concrete and the hardwood. A moisture barrier should be applied to the concrete before gluing, even if moisture tests indicate acceptable levels. This provides an extra layer of protection against moisture migration. When selecting an adhesive, choose one specifically designed for hardwood flooring and concrete. Follow the adhesive manufacturer's instructions regarding application rate and curing time. Spread the adhesive evenly over the concrete using a notched trowel, and install the hardwood planks immediately, pressing them firmly into the adhesive.
Floating: The floating method involves installing the hardwood over a moisture barrier and underlayment without directly attaching it to the concrete. This method is typically used with click-lock engineered hardwood. The planks are joined together using a tongue-and-groove system, creating a single, interconnected surface that "floats" above the concrete. A moisture barrier is essential to protect the hardwood from moisture migration. The underlayment provides cushioning, sound insulation, and helps to even out minor imperfections in the concrete surface. Install the moisture barrier and underlayment according to the manufacturer's instructions. Begin installing the hardwood planks, starting along a straight wall and working your way across the room. Use spacers along the walls to allow for expansion and contraction. Tap the planks together gently using a tapping block and mallet to ensure a tight fit. This is a faster installation method compared to gluing, but can result in a slightly springier feel underfoot.
Attaching a Wooden Subfloor: This method involves installing a wooden subfloor over the concrete and then nailing or gluing the hardwood to the subfloor. The wooden subfloor can be constructed using plywood or sleepers (narrow strips of wood). This method provides a more traditional feel and allows for greater flexibility in the choice of hardwood flooring. The first step is to install a moisture barrier over the concrete. Then, install the wooden subfloor. If using plywood, attach it to the concrete using concrete screws or adhesive. If using sleepers, space them evenly apart and attach them to the concrete. Ensure the sleepers are level and shimmed if necessary. Once the wooden subfloor is in place, the hardwood can be installed using nails or adhesive, following the manufacturer's instructions.
Regardless of the installation method, it is crucial to leave an expansion gap around the perimeter of the room and around any fixed objects, such as pipes or columns. This gap allows the hardwood to expand and contract without putting pressure on the walls or objects, preventing buckling or warping. The size of the expansion gap will depend on the width of the room and the type of hardwood, but it is typically around 1/4 to 3/8 inch.
Ensuring Proper Ventilation
Adequate ventilation beneath the flooring is vital to prevent moisture buildup and potential damage. While the methods outlined above address moisture concerns, ensuring proper airflow further mitigates risks.
In the glued-down method, the adhesive itself acts as a significant moisture barrier, but edge sealing and proper coverage are critical. Overlap any seams meticulously. For floating floors, select an underlayment that allows for some degree of breathability. Specialized underlayments designed for concrete subfloors often incorporate channels or perforations to facilitate air circulation.
For subfloor systems using sleepers, leaving small gaps between the sleepers can encourage airflow. Ensure that the perimeter of the room is also well-ventilated. If the room is particularly prone to humidity, consider installing a dehumidifier to maintain consistent moisture levels.
Consistent monitoring of humidity levels post-installation is advisable. Regular checks, particularly during seasonal changes, can help identify potential issues early and allow for corrective actions, such as adjusting the dehumidifier settings or improving ventilation.
Following these steps, choosing the appropriate materials, and taking necessary precautions will contribute to a successful and durable hardwood floor installation over a concrete slab. Paying close attention to moisture control, proper subfloor preparation, and appropriate installation techniques ensures a beautiful and long-lasting result.

Installing Wood Flooring Over Concrete Diy

Hardwood Over Concrete Auten Wideplank Flooring

Q A Solid Wood Floors Over Concrete Slabs Jlc

Installing Engineered Hardwood On Concrete Twenty Oak

How To Install A Wood Subfloor Over Concrete Rona

Installing A Hardwood Floor Over Concrete Slab American Information Center

How Do I Install A Hardwood Floor On Concrete Slab The Carpet Guys

Installing Hardwood Floors On Concrete Subfloors

Installing Engineered Hardwood On Concrete Twenty Oak

Getting It Right Wood Flooring Over A Concrete Subfloor Page 2 Of 3 Construction Specifier
Related Posts