Allure Tile Flooring Installation: A Comprehensive Guide
Allure tile flooring offers a popular and cost-effective solution for homeowners and property managers seeking a durable and aesthetically pleasing flooring option. Known for its ease of installation, water resistance, and variety of styles, Allure tile is often favored for DIY projects and quick renovations. This article provides a detailed guide to Allure tile flooring installation, covering preparation, tools, installation techniques, and troubleshooting common issues. Understanding these aspects is crucial for achieving a professional-looking and long-lasting result.
Key Point 1: Preparation is Paramount
Proper preparation is the cornerstone of a successful Allure tile flooring installation. Rushing this step can lead to imperfections, adhesion problems, and ultimately, a flooring system that fails to meet expectations. Preparation encompasses several critical elements, each designed to create an optimal foundation for the tile.
Subfloor Evaluation and Preparation: The subfloor must be structurally sound, clean, and level. Any existing damage, such as cracks, holes, or uneven surfaces, needs to be addressed before proceeding. For concrete subfloors, use a self-leveling compound to fill in low spots and cracks. Wood subfloors should be inspected for rot or warping, and any damaged sections must be replaced. Loose or squeaky floorboards should be securely fastened.
Regardless of the subfloor material, it must be thoroughly cleaned. Sweep, vacuum, and mop the area to remove all dust, debris, and old adhesive residue. A clean surface ensures proper adhesion of the Allure tile. In some cases, a primer may be required to improve adhesion, particularly on porous subfloors.
Acclimation: Allure tile, like many flooring materials, needs to acclimate to the room's temperature and humidity. This process allows the tile to expand or contract, minimizing gaps or buckling after installation. Store the unopened boxes of Allure tile in the room where they will be installed for at least 48 to 72 hours prior to installation. The ideal room temperature should be between 65°F and 85°F (18°C and 29°C). This acclimation period is critically important, especially in areas with significant temperature or humidity fluctuations.
Planning the Layout: Before starting the installation, plan the layout of the tiles. Measure the room's dimensions and determine the best starting point. Consider the placement of doors, walls, and other architectural features. Dry-lay the tiles without removing the adhesive backing to visualize the final appearance and make any necessary adjustments to the layout. This step helps avoid awkward cuts or uneven patterns.
When planning the layout, pay attention to the direction of the tiles. Allure tile often has a directional pattern, so ensure the tiles are oriented consistently to achieve the desired aesthetic. Consider using a chalk line to mark reference points and guide the installation process.
Key Point 2: Tools and Materials Essential for Installation
Having the right tools and materials on hand is crucial for a smooth and efficient Allure tile flooring installation. Gathering these items before starting the project minimizes interruptions and ensures you have everything needed to complete each step.
Essential Tools
* Utility Knife: A sharp utility knife is essential for cutting Allure tile. Opt for a knife with replaceable blades to ensure a clean and precise cut.
* Straight Edge or T-Square: A straight edge or T-square provides a guide for making accurate cuts. This ensures the tile is cut straight and to the correct dimensions.
* Measuring Tape: Accurate measurements are essential for planning the layout and cutting the tiles. A reliable measuring tape is a must-have tool.
* Chalk Line: A chalk line is used to create straight reference lines on the subfloor. These lines guide the installation process and ensure the tiles are aligned correctly.
* Rubber Mallet: A rubber mallet is used to gently tap the tiles into place, ensuring a secure bond with the subfloor. Avoid using a metal hammer, as it can damage the tiles.
* Spacers (Optional): While Allure tiles are often designed for a tight fit, spacers can be used to create consistent grout lines, depending on the desired aesthetic. Some installers prefer a seamless look, while others opt for the definition of grout lines.
* Roller (Optional): A floor roller can be used to further ensure adhesion, especially over larger areas. Applying even pressure promotes a strong bond between the tile and the subfloor.
Essential Materials
* Allure Tile Flooring: Calculate the amount of tile needed based on the room's square footage, adding an extra 5-10% for waste and future repairs.
* Subfloor Cleaner: Use a suitable cleaner to remove dust, debris, and old adhesive residue from the subfloor.
* Self-Leveling Compound (If Needed): If the subfloor is uneven, use a self-leveling compound to create a smooth and level surface.
* Primer (If Needed): A primer can improve adhesion on porous subfloors. Choose a primer specifically designed for use with vinyl flooring.
* Grout (Optional): If using spacers to create grout lines, select a suitable grout color and type.
* Sealer (Optional): If using grout, a sealer can protect the grout from stains and moisture.
Key Point 3: Step-by-Step Installation Process
The Allure tile flooring installation process requires careful attention to detail to ensure a professional-looking and durable result. Following these steps will help you achieve a successful installation.
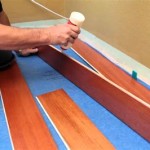
Step 1: Preparing the First Row: Begin by removing the adhesive backing from the first row of tiles. Position the tiles along the reference line, ensuring they are aligned correctly. Gently press the tiles into place, using a rubber mallet to tap them firmly. Ensure edges meet tightly.
Step 2: Laying Subsequent Rows: Remove the adhesive backing from the next row of tiles. Align the tiles with the previous row, ensuring the edges are tightly butted together. Press the tiles firmly into place, using the rubber mallet to tap them. Repeat this process for each subsequent row, working across the room.
Staggering the seams between rows can enhance the aesthetic appeal and structural integrity of the flooring. Offset the tiles by a third or half their length to create a visually appealing pattern and distribute stress evenly across the floor.
Step 3: Cutting Tiles: When you reach the edges of the room or encounter obstacles, you'll need to cut the tiles to fit. Measure the space accurately and mark the cutting line on the tile using a straight edge. Use a sharp utility knife to score the tile along the cutting line. Bend the tile along the score line to snap it cleanly. For more complex cuts, such as around pipes or doorways, use a jigsaw or coping saw.
Always measure twice and cut once to avoid mistakes. It's better to cut a tile slightly larger than necessary and then trim it down for a perfect fit. Wear safety glasses when cutting tiles to protect your eyes from debris.
Step 4: Rolling the Floor (Optional): After installing the tiles, use a floor roller to apply even pressure across the entire floor. This ensures a strong bond between the tile and the subfloor, minimizing the risk of lifting or movement. Roll the floor in both directions to cover the entire surface area.
Step 5: Grouting (Optional): If you've used spacers to create grout lines, allow the adhesive to set according to the manufacturer's instructions before grouting. Apply the grout using a grout float, pressing it into the grout lines. Remove excess grout with a damp sponge, being careful not to pull the grout out of the lines. Allow the grout to dry completely before sealing it.
Step 6: Cleaning and Finishing: After the installation is complete, clean the floor thoroughly to remove any remaining dust, debris, or adhesive residue. Use a damp mop and a mild detergent to clean the tiles. Avoid using harsh chemicals or abrasive cleaners, as they can damage the flooring. Allow the floor to dry completely before placing furniture or allowing heavy traffic.
Inspect the floor for any imperfections or areas where the tiles may not be fully adhered. Address these issues promptly to prevent further damage or lifting. Use a small amount of adhesive to re-secure any loose tiles.
Following these steps carefully ensures a professional and long-lasting Allure tile flooring installation. Attention to detail and proper preparation are key to achieving a beautiful and durable floor that will enhance the appearance and value of your home.

How To Install Allure Flooring

How To Install Allure Isocore Vinyl Flooring

How To Install Allure Flooring Askmediy

An Rv Flooring Replacement Using Allure By Traffic Master

Allure By Traffic Master Flooring Install

Diy Wood Look Allure Vinyl Plank Flooring Rebecca Propes Design

Trafficmaster Allure Ultra Resilient Flooring Installation Review

Installing Trafficmaster Allure In 4 Simple Steps All About Flooring

20 Tips For A Great Vinyl Plank Flooring Installation

Allure Locking Resilient Flooring Vinyl Floating Floor
Related Posts