Harmonics Laminate Flooring Instructions: A Comprehensive Guide
Harmonics laminate flooring is renowned for its durability, affordability, and ease of installation. By following these detailed instructions, you can successfully transform your space with the beauty and functionality of harmonics laminate flooring.
Materials Required:
- Harmonics laminate flooring planks
- Underlayment
- Moldings (optional)
- Installation tools (hammer, spacers, tapping block)
Step 1: Prepare the Subfloor
Ensure the subfloor is level, clean, and dry. Remove any existing flooring and debris. Install an underlayment to provide moisture protection and minimize noise.
Step 2: Acclimatize the Planks
Store the flooring planks in the installation room for 48 hours to acclimatize to the temperature and humidity.
Step 3: Determine the Starting Point
Locate the center point of the room and begin laying the planks from there, working outwards in rows.
Step 4: Install the First Row
Place spacers along the walls to maintain a consistent gap. Interlock the planks together and tap them into place using a tapping block and hammer. Trim the planks at the ends as needed.
Step 5: Continue Installing Rows
Continue installing rows by staggering the end joints of adjacent rows. Ensure the planks are tightly interlocked and secure.
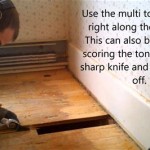
Step 6: Cut Out for Obstacles
Use a jigsaw or utility knife to cut out sections of the planks for obstacles such as doorways and pipes. Ensure the cuts are clean and precise.
Step 7: Install Moldings (Optional)
If desired, install moldings around the perimeter of the floor to cover expansion gaps and enhance the finished look.
Step 8: Clean and Care
Once the flooring is installed, vacuum or sweep regularly using a soft-bristled broom. Avoid using abrasive cleaners or excessive water, as this can damage the laminate finish.
Tips for Success:
- Use a tapping block between the hammer and flooring to prevent damage.
- Interlock the planks perpendicularly to ensure a secure connection.
- Allow for expansion gaps around the perimeter of the floor (1/4 inch to 1/2 inch).
- Follow the manufacturer's specific instructions for your particular flooring choice.
- Refer to online tutorials or consult a professional installer if you encounter any difficulties.
By adhering to these instructions and exercising care, you can achieve a professional-looking harmonics laminate flooring installation that will enhance the beauty and functionality of your space for years to come.

Harmonics Laminate Flooring Underlayment Installation Kit Model Ik 401

Costco Harmonics Flooring Review And Installation

Costco S Harmonics Laminate Wood Flooring Not Laying Flat How To Install Correct

Harmonics Laminate Flooring Underlayment Installation Kit Model Ik 401

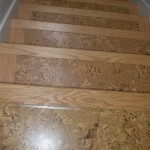
Costco Harmonics Vineyard Cherry Laminate Review

Costco Harmonics Vineyard Cherry Laminate Review

Laminate Flooring Installation Kit With Underfloor Tapping Block Pul Materials By Owner Craigslist

Do It Yourself Floating Laminate Floor Installation Wood Floors Wide Plank Basement Flooring

How To Install Laminate Flooring 101 Start Finish Costco 2024

Costco Harmonics Vineyard Cherry Laminate Review
Related Posts